Marketing Cloud Next Series: Solving the Landing Page Personalization Gap - Part 1

Part 1: Data Cloud Foundations for Marketing Cloud Next

🧠 Why Start Here?
Effective personalization in Marketing Cloud Next hinges on unified, connected, and actionable data. Before we can build 1:1 experiences, we must first lay a solid data foundation in Data Cloud.
This guide will walk you through that foundational setup. By the end, you’ll have a working Segment and Data Graph that will power the customer journey we’ll build in later posts.
🛠️ What You'll Build
In this guide, you'll learn how to complete the foundational data setup by following these steps:
- Create Data Streams - Import order, product, store, and customer data.
- Map to Data Model Objects - Map datasets to standard objects (
Order,OrderItem,Product) and set up relationships. - Configure Identity Resolution - Link customer identities via email and phone.
- Create Calculated Insights - Identify high-value customers by lifetime value.
- Build the Segment - Target customers who bought non-prescription sunglasses.
- Build the Data Graph - Connect related records across the unified profile.
📂 Sample Data for Optical Retail POC
To demonstrate this solution, I've created a sample dataset that represents a modern optical retailer operating both brick-and-mortar locations and an online store. The dataset simulates transactions exported from their ERP (Enterprise Resource Planning) system.
🗂 Download: mc_next_series_optical_shop_data.zip
What's inside:
-
contact.csv- 200 customers with realistic names, email addresses, and UAE-format mobile numbers. -
product.csv- 100 eyewear products — a mix of sunglasses and prescription frames — featuring major brands like Ray-Ban, Oakley, and Gucci. Includes SKUs and placeholder image URLs. -
store.csv- 10 store locations across the Middle East, including malls and an online channel. Each entry includes city, country, and store type. -
order.csv- 1,000 orders linked to customers and stores, timestamped across the past 12 months (as of July 10, 2025), with order times between 9am and 10pm to reflect normal business hours. -
order_item.csv- 2,956 order items with product references, quantities, unit prices, and calculated totals.
🛢️ 1. Data Ingestion
Create Initial Contact Data Stream
- Go to Data Streams.
- Click New Data Stream and select File Upload.
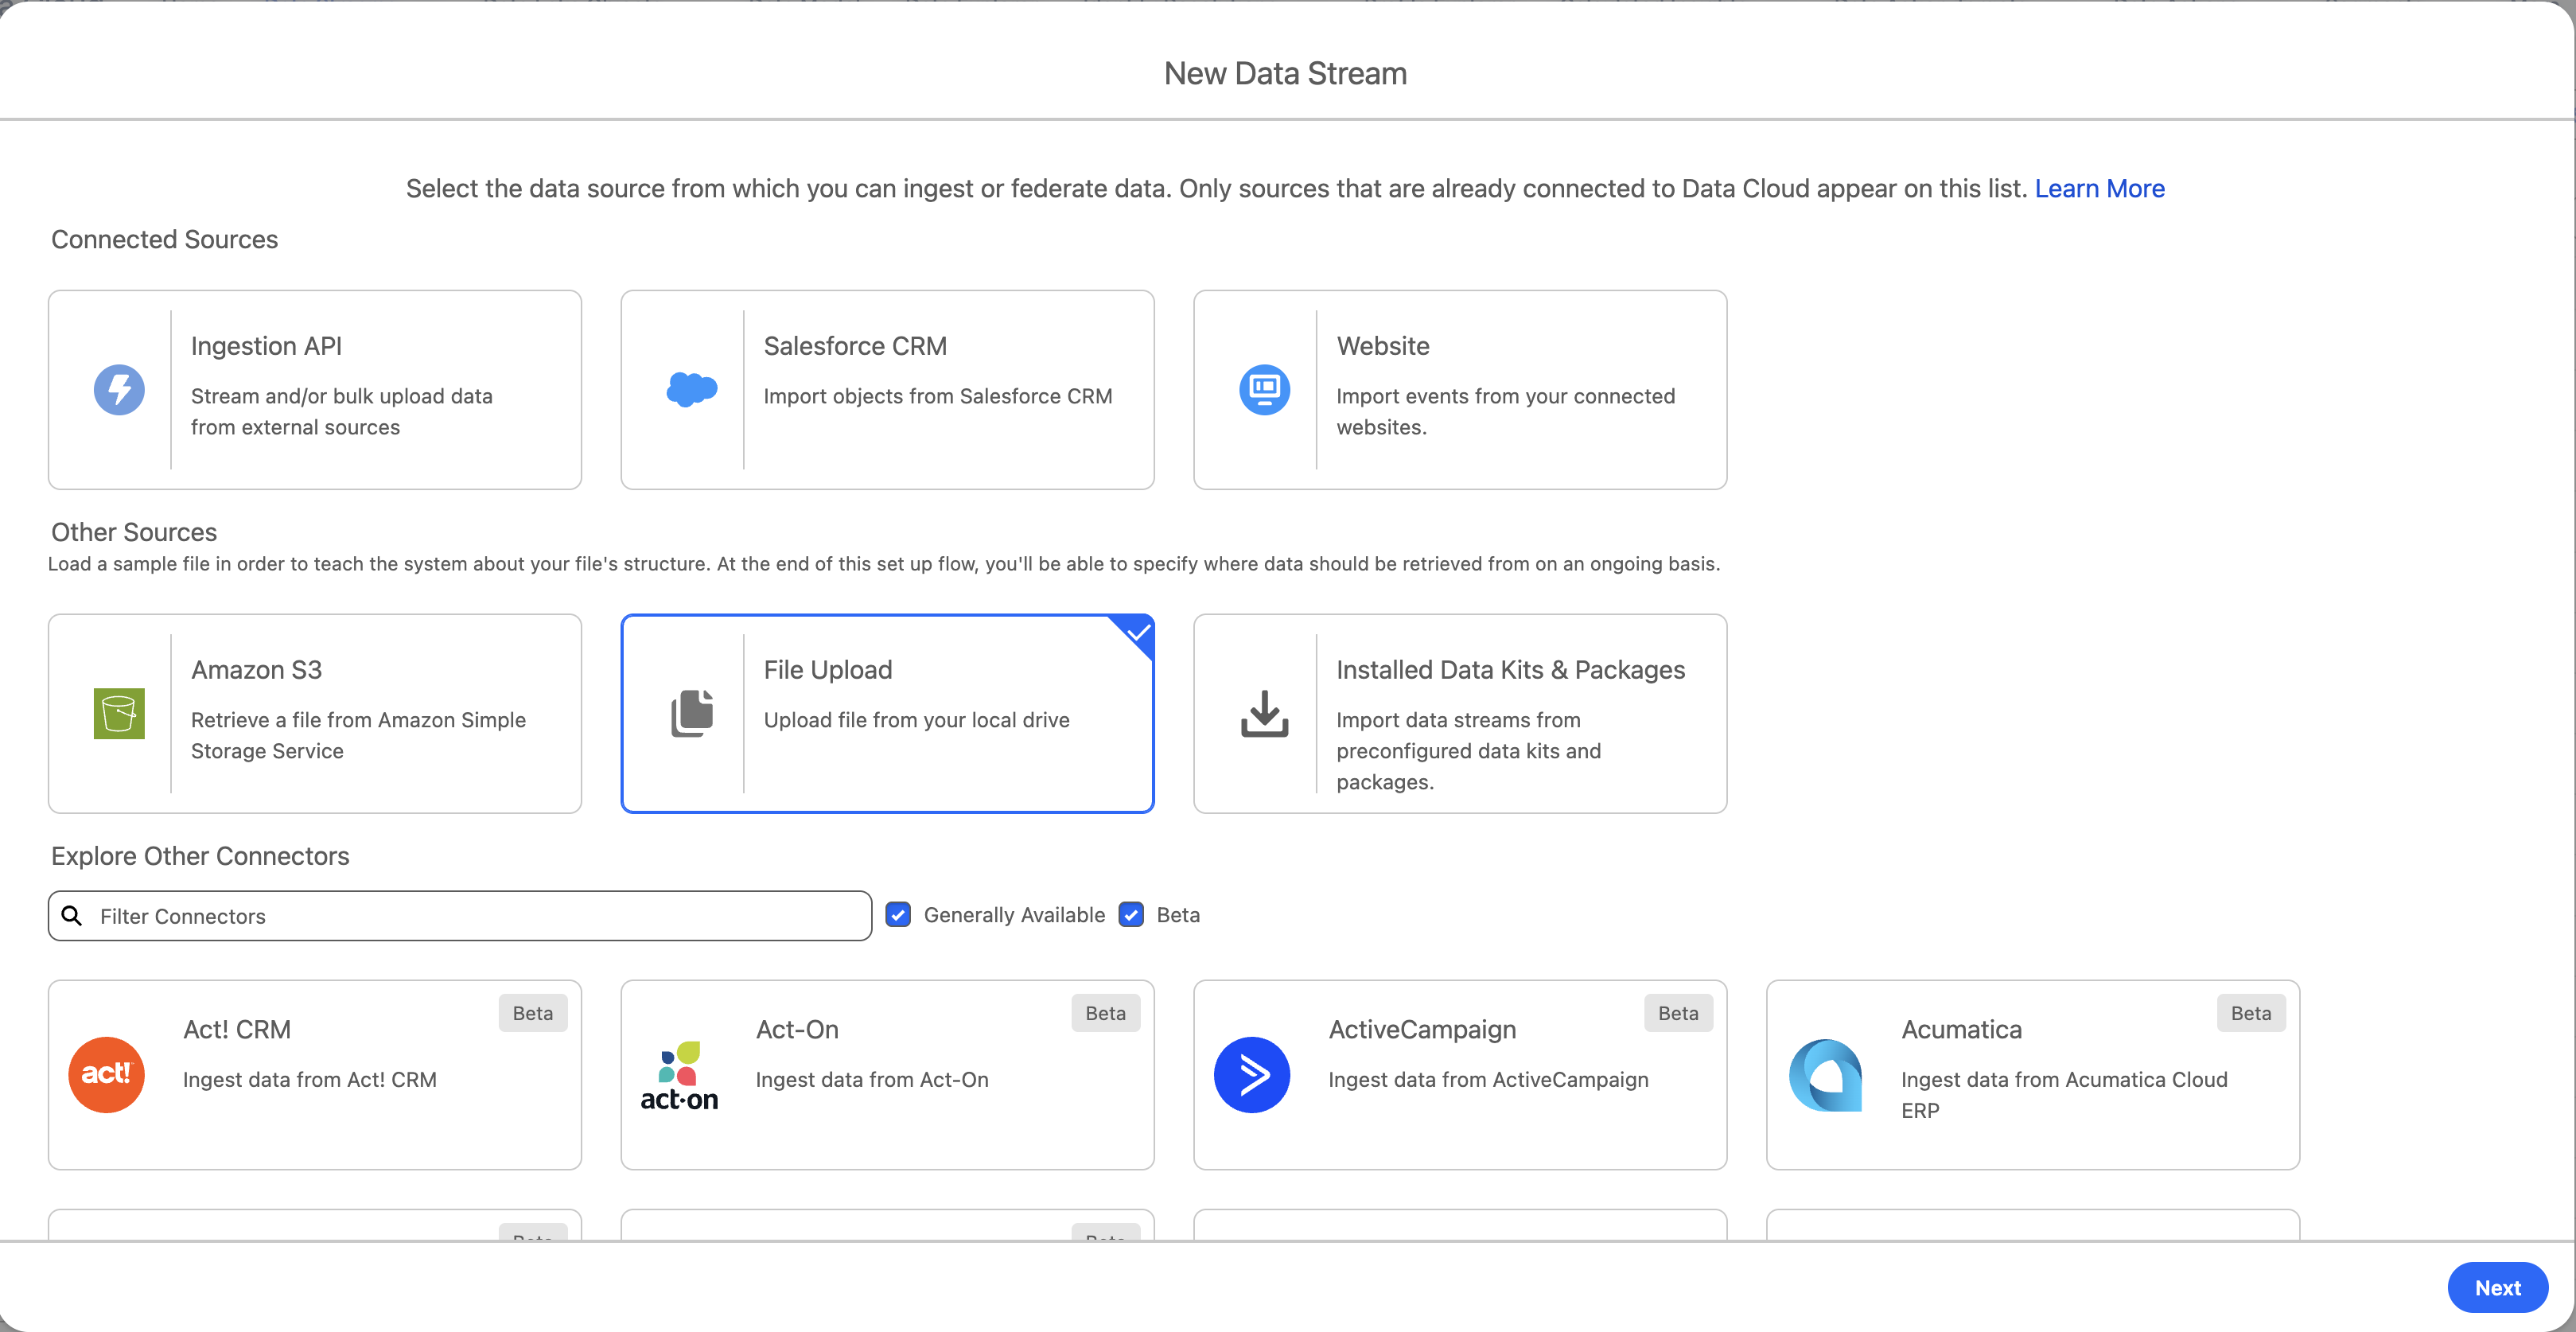

Configure the Data Stream as follows:
- Data Lake Object Label:
erp_contact
It's good practice to prefix the Data Lake Object Label with an identifier for the source system.
- Category:
Profile - Primary Key:
ContactID
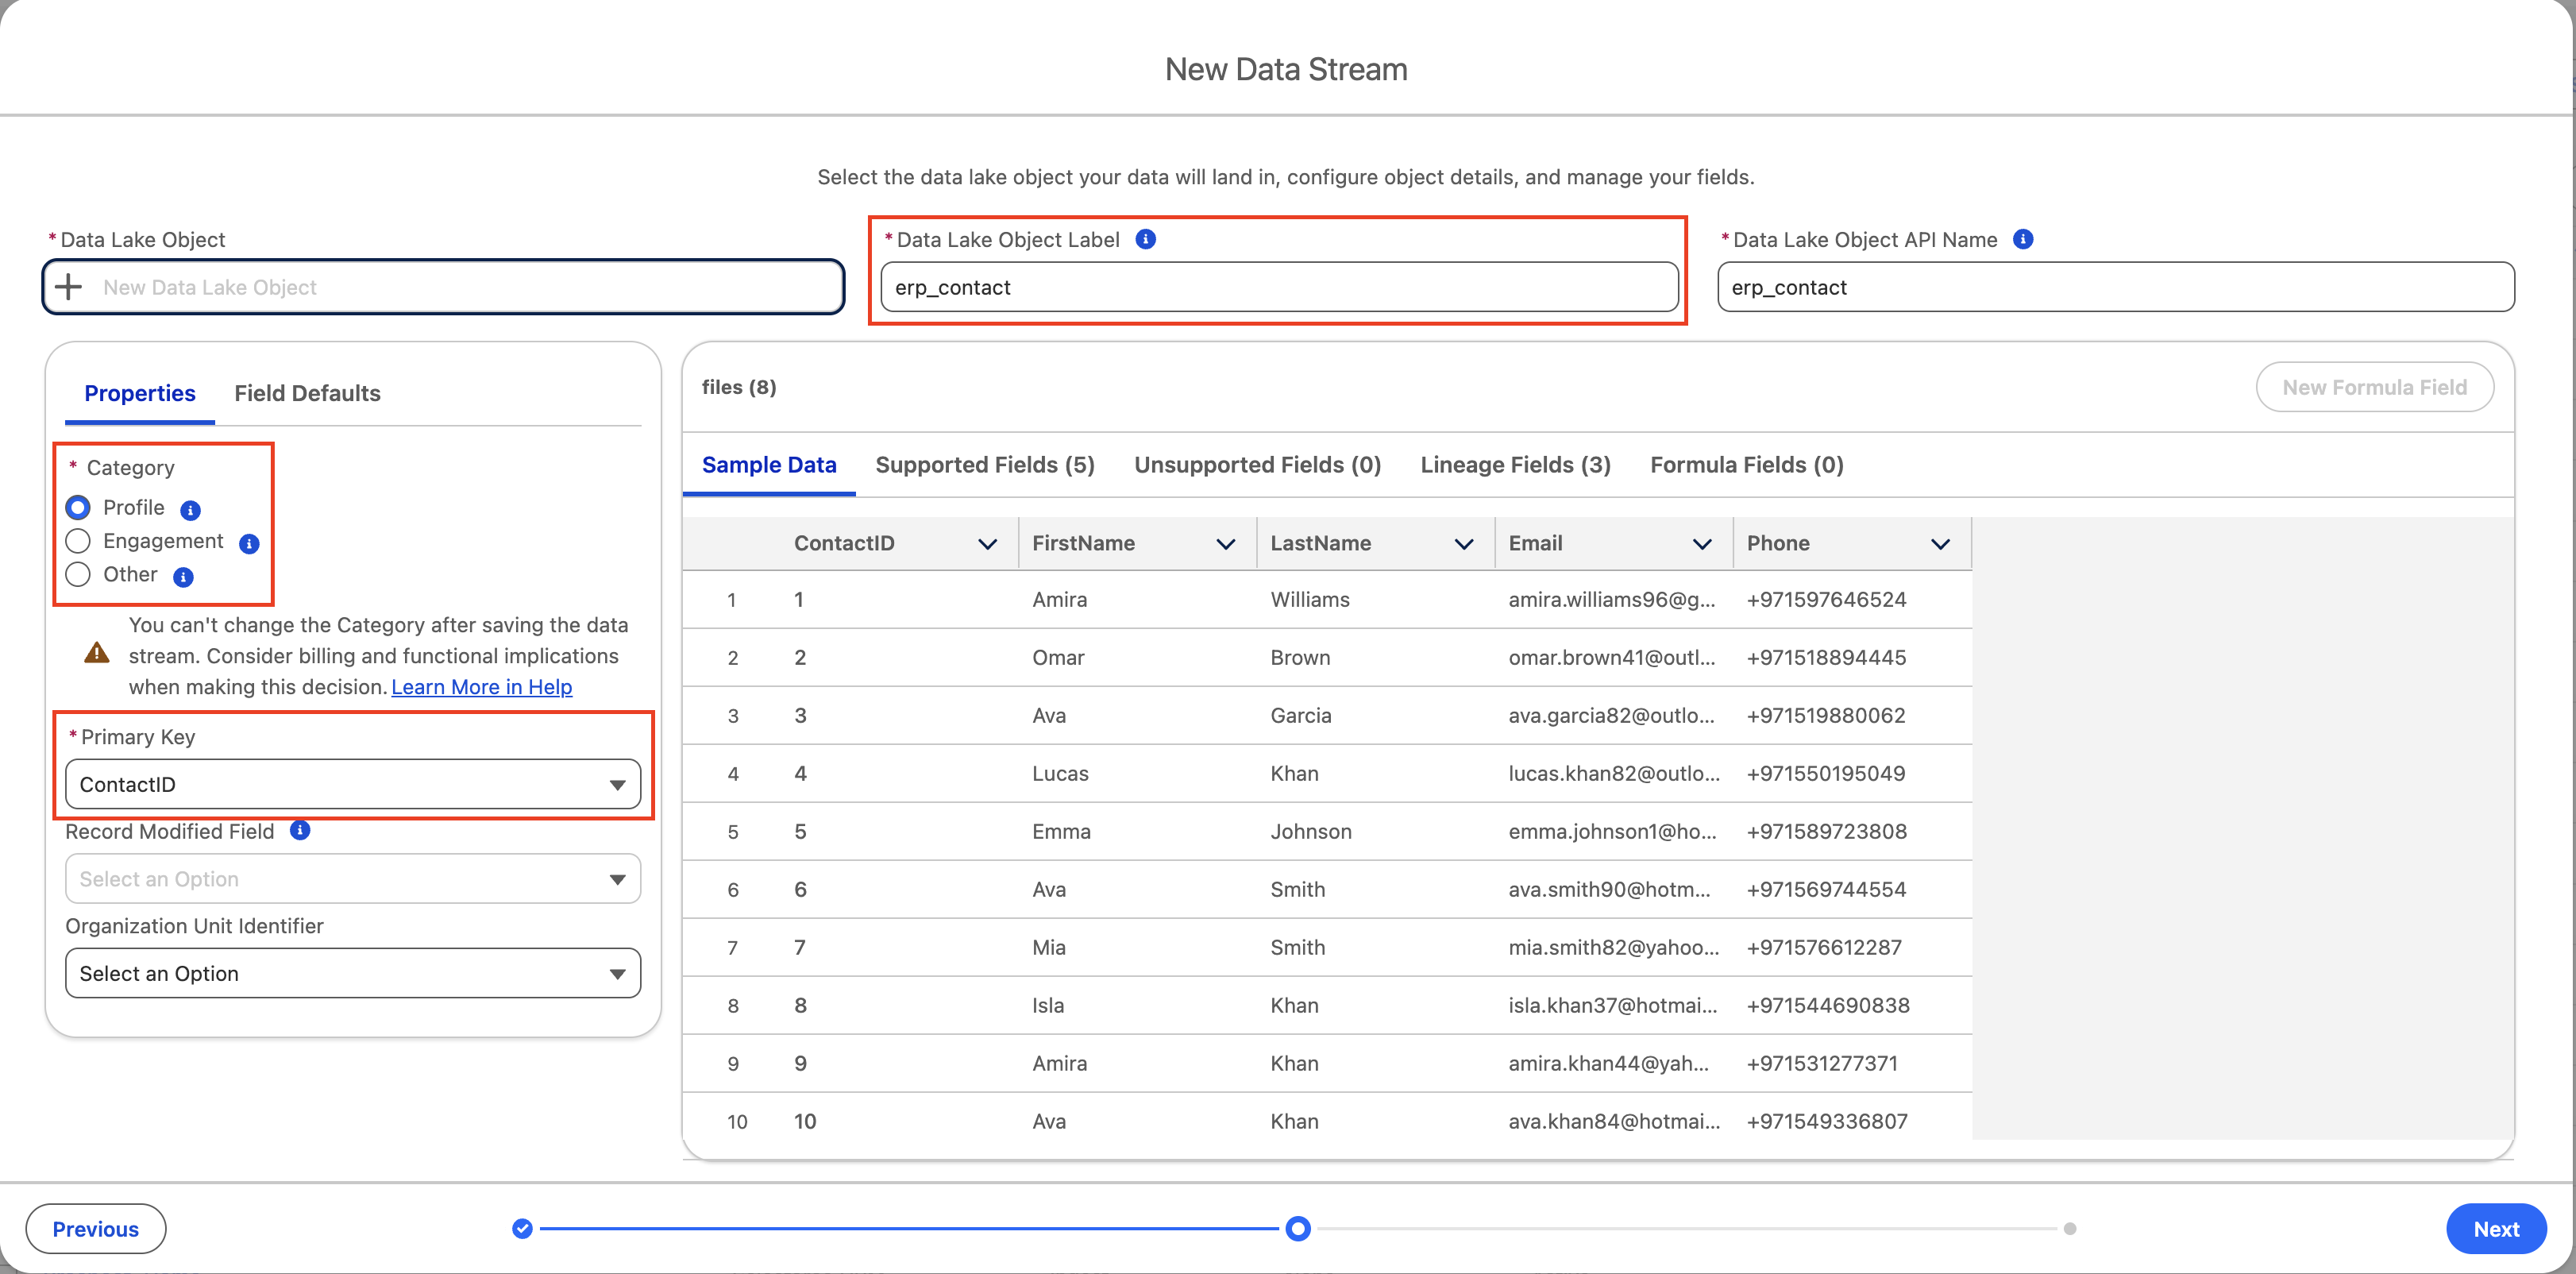
For the Data Stream name, use erp_contact.
It's good practice to keep the Data Stream name the same as the Data Lake Object Label.
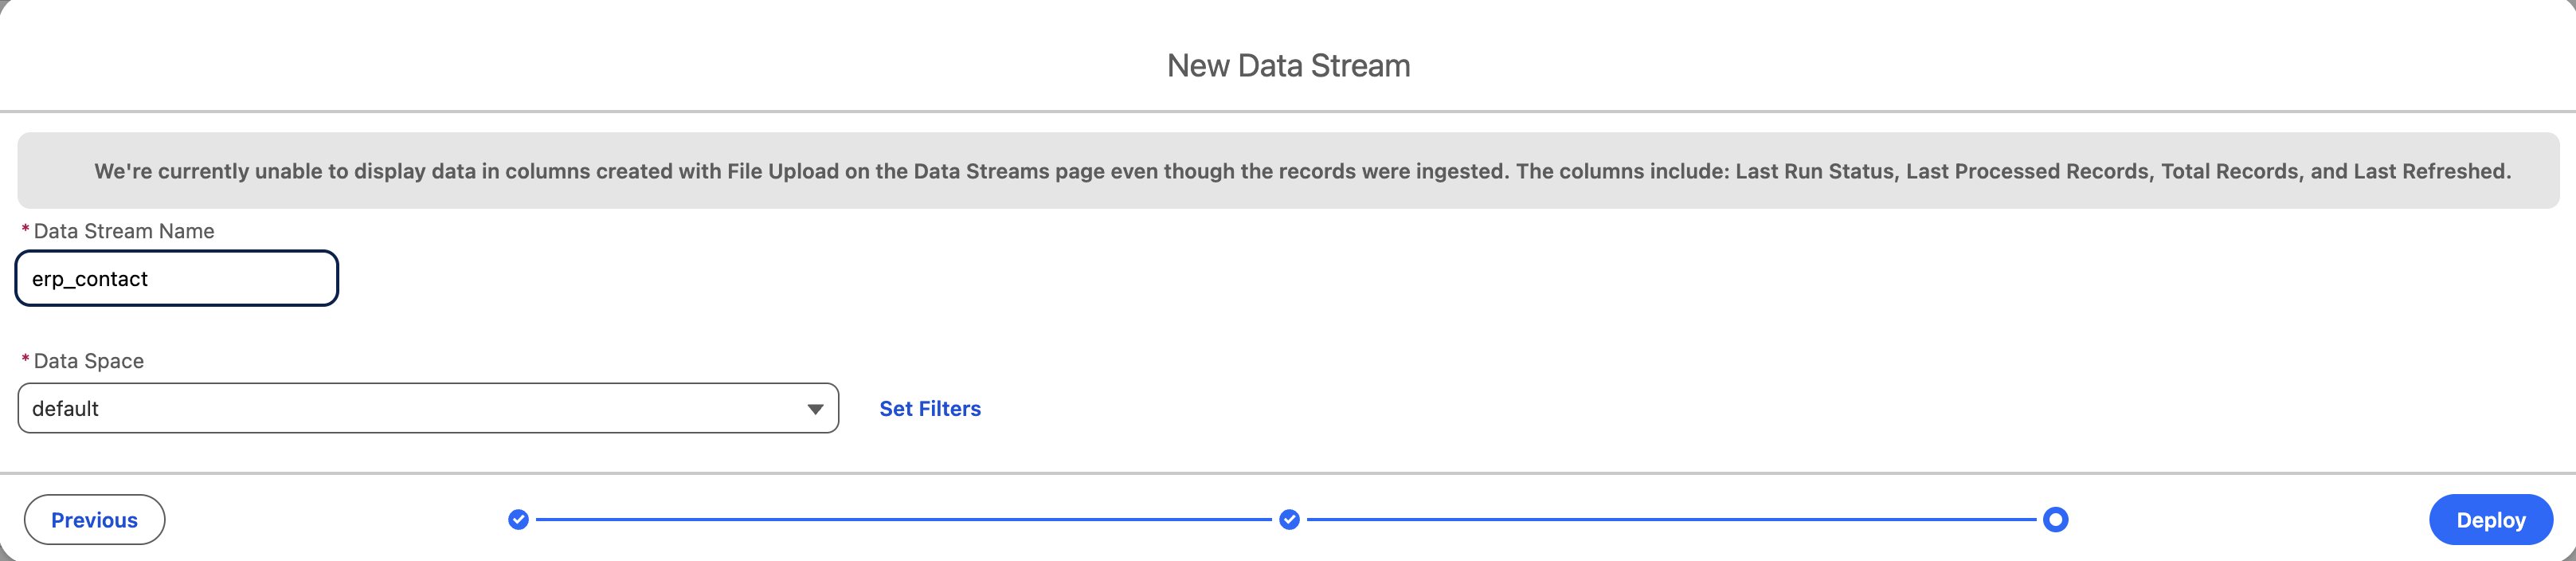
Leave Data Space as default.
As of July 10th, 2025, Marketing Cloud Growth/Advanced only supports the default Data Space.
Configure Other Data Streams
Repeat the process for the remaining files using these configurations:
| File | Data Lake Object Label | Category | Event Time Field | Primary Key |
|---|---|---|---|---|
order.csv | erp_order | Engagement | OrderDate | OrderID |
order_item.csv | erp_order_item | Other | - | OrderItemID |
store.csv | erp_store | Other | - | StoreID |
product.csv | erp_product | Other | - | ProductID |
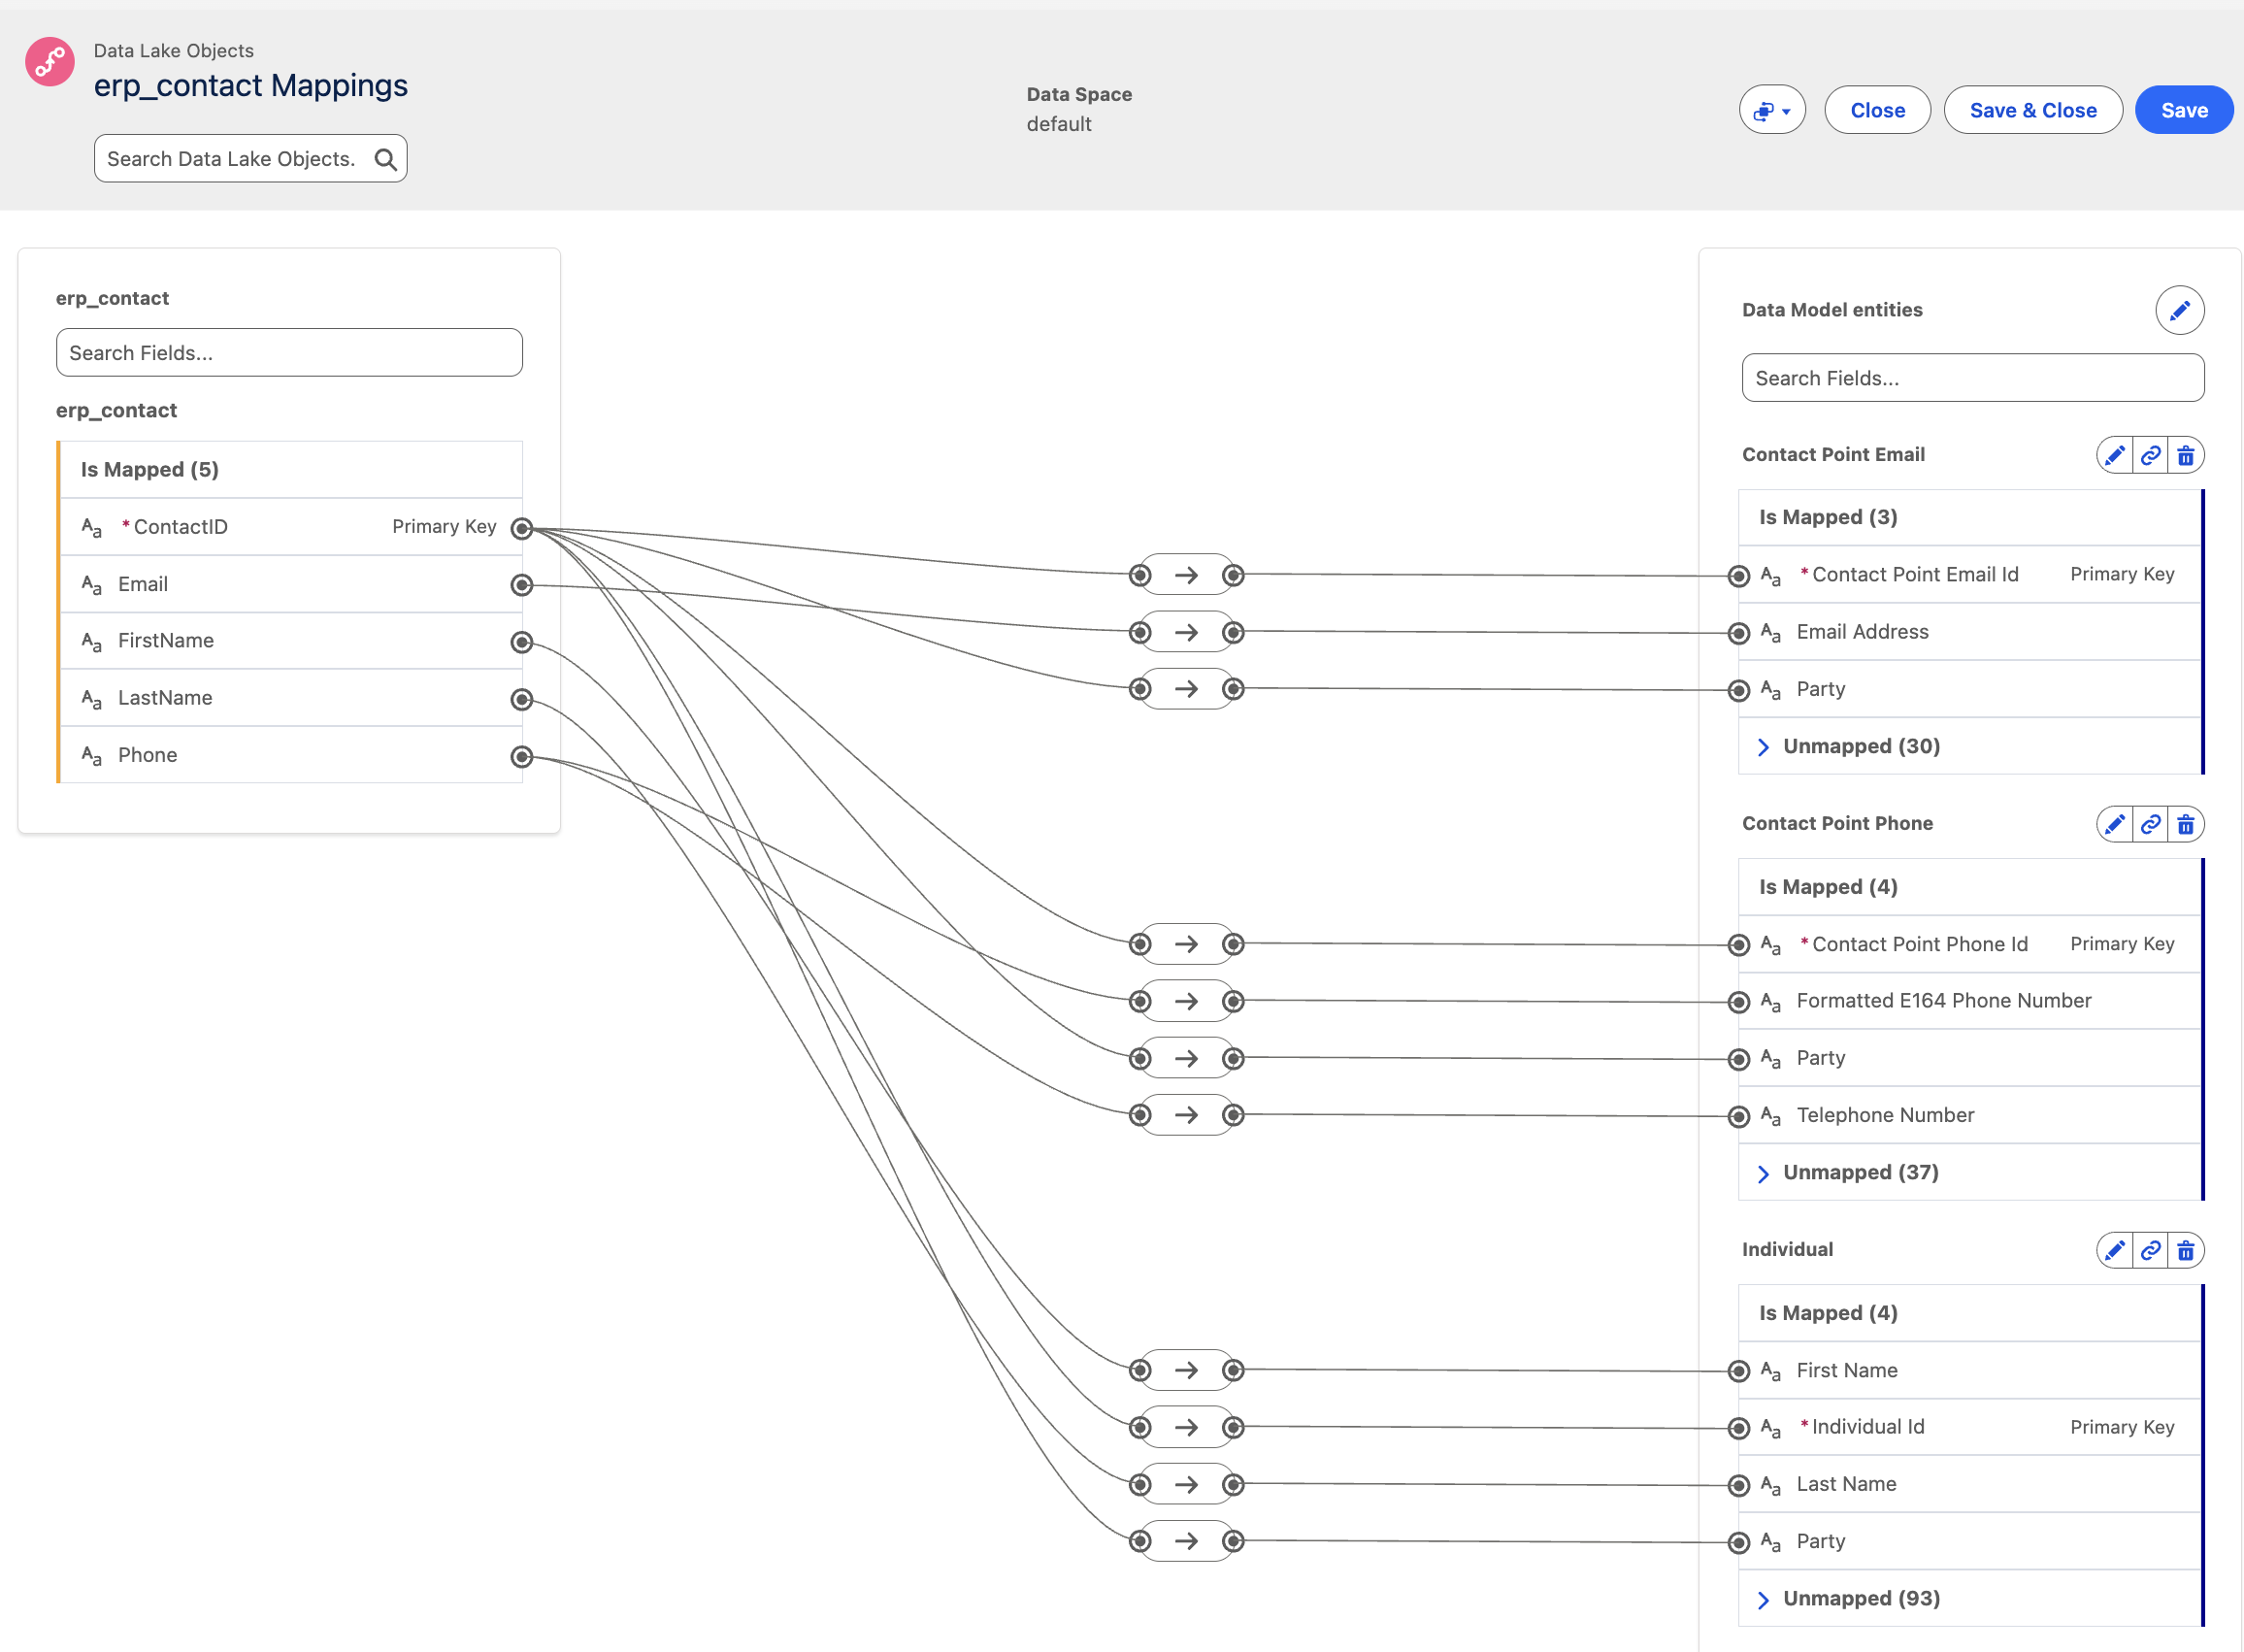
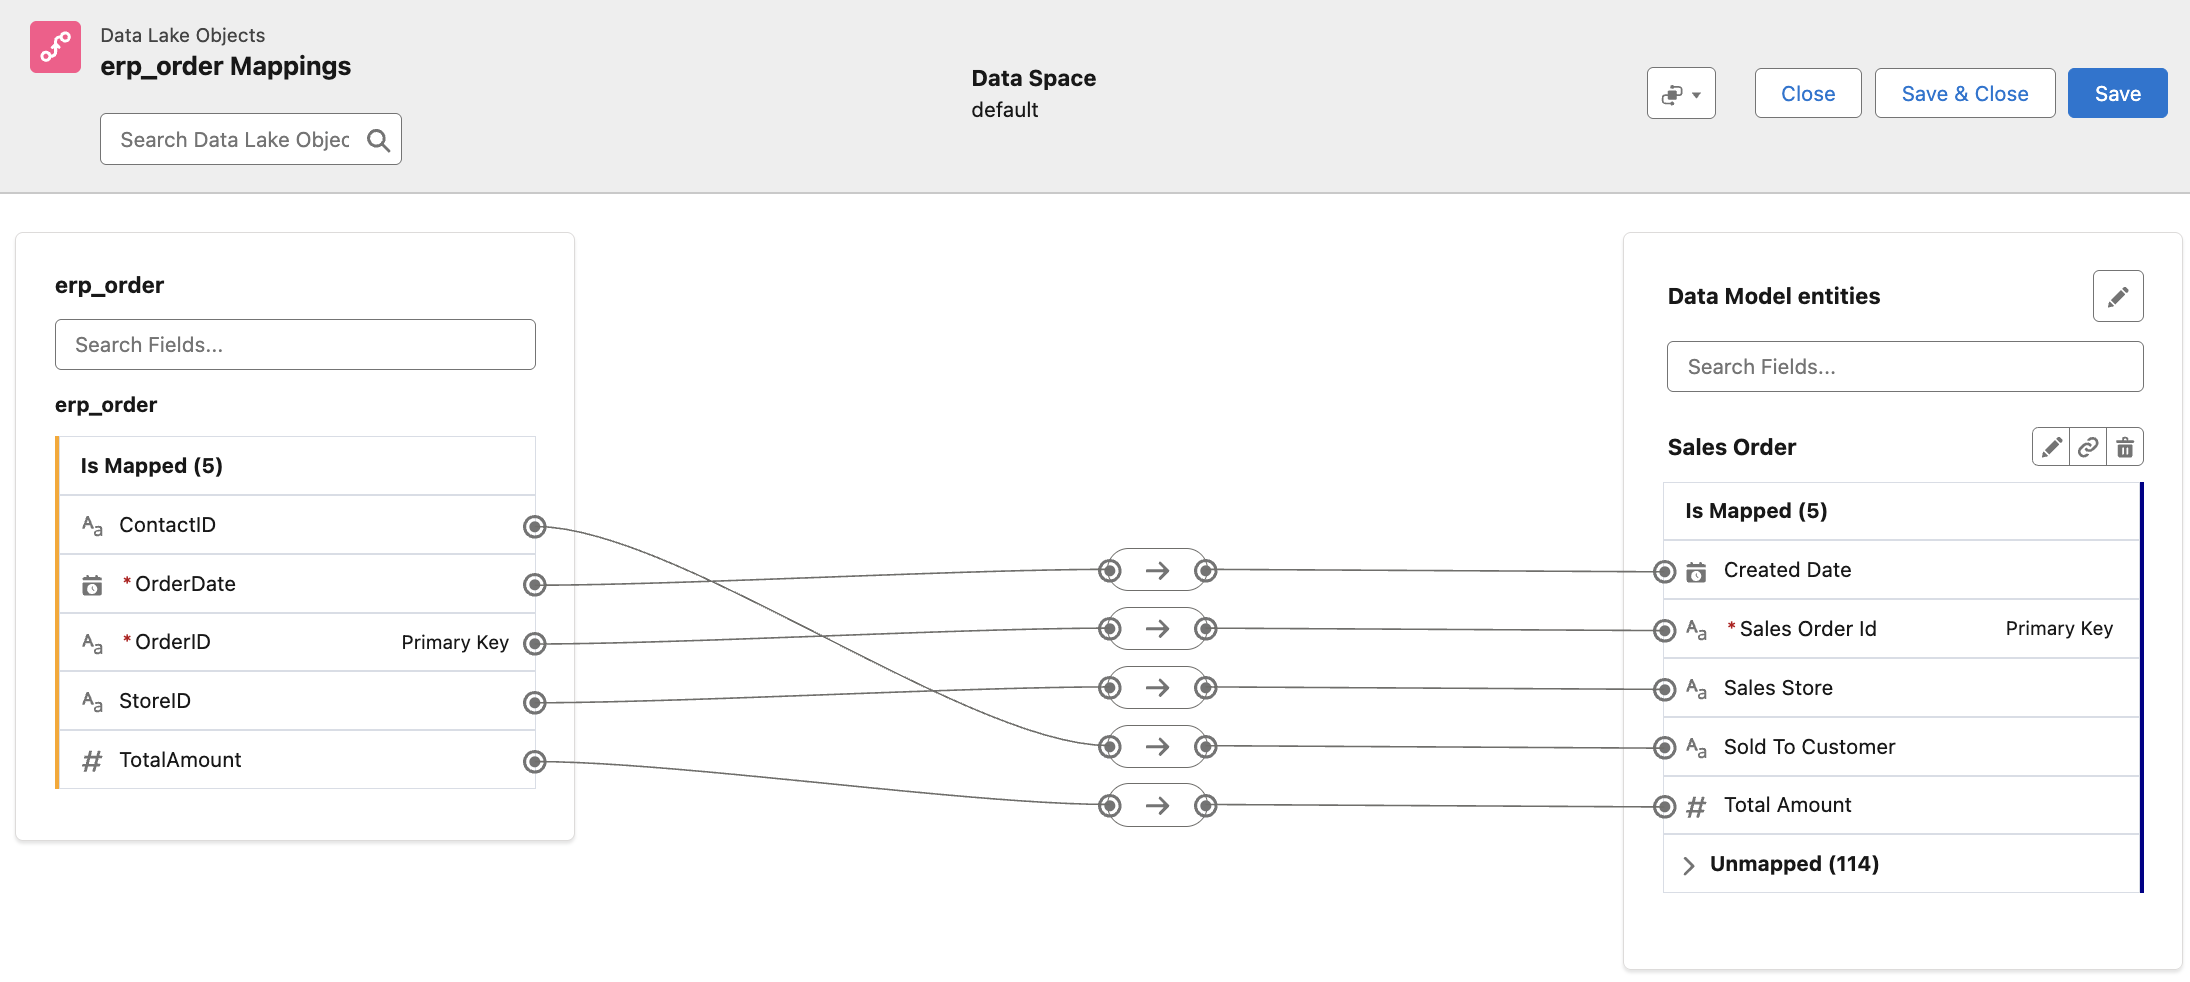
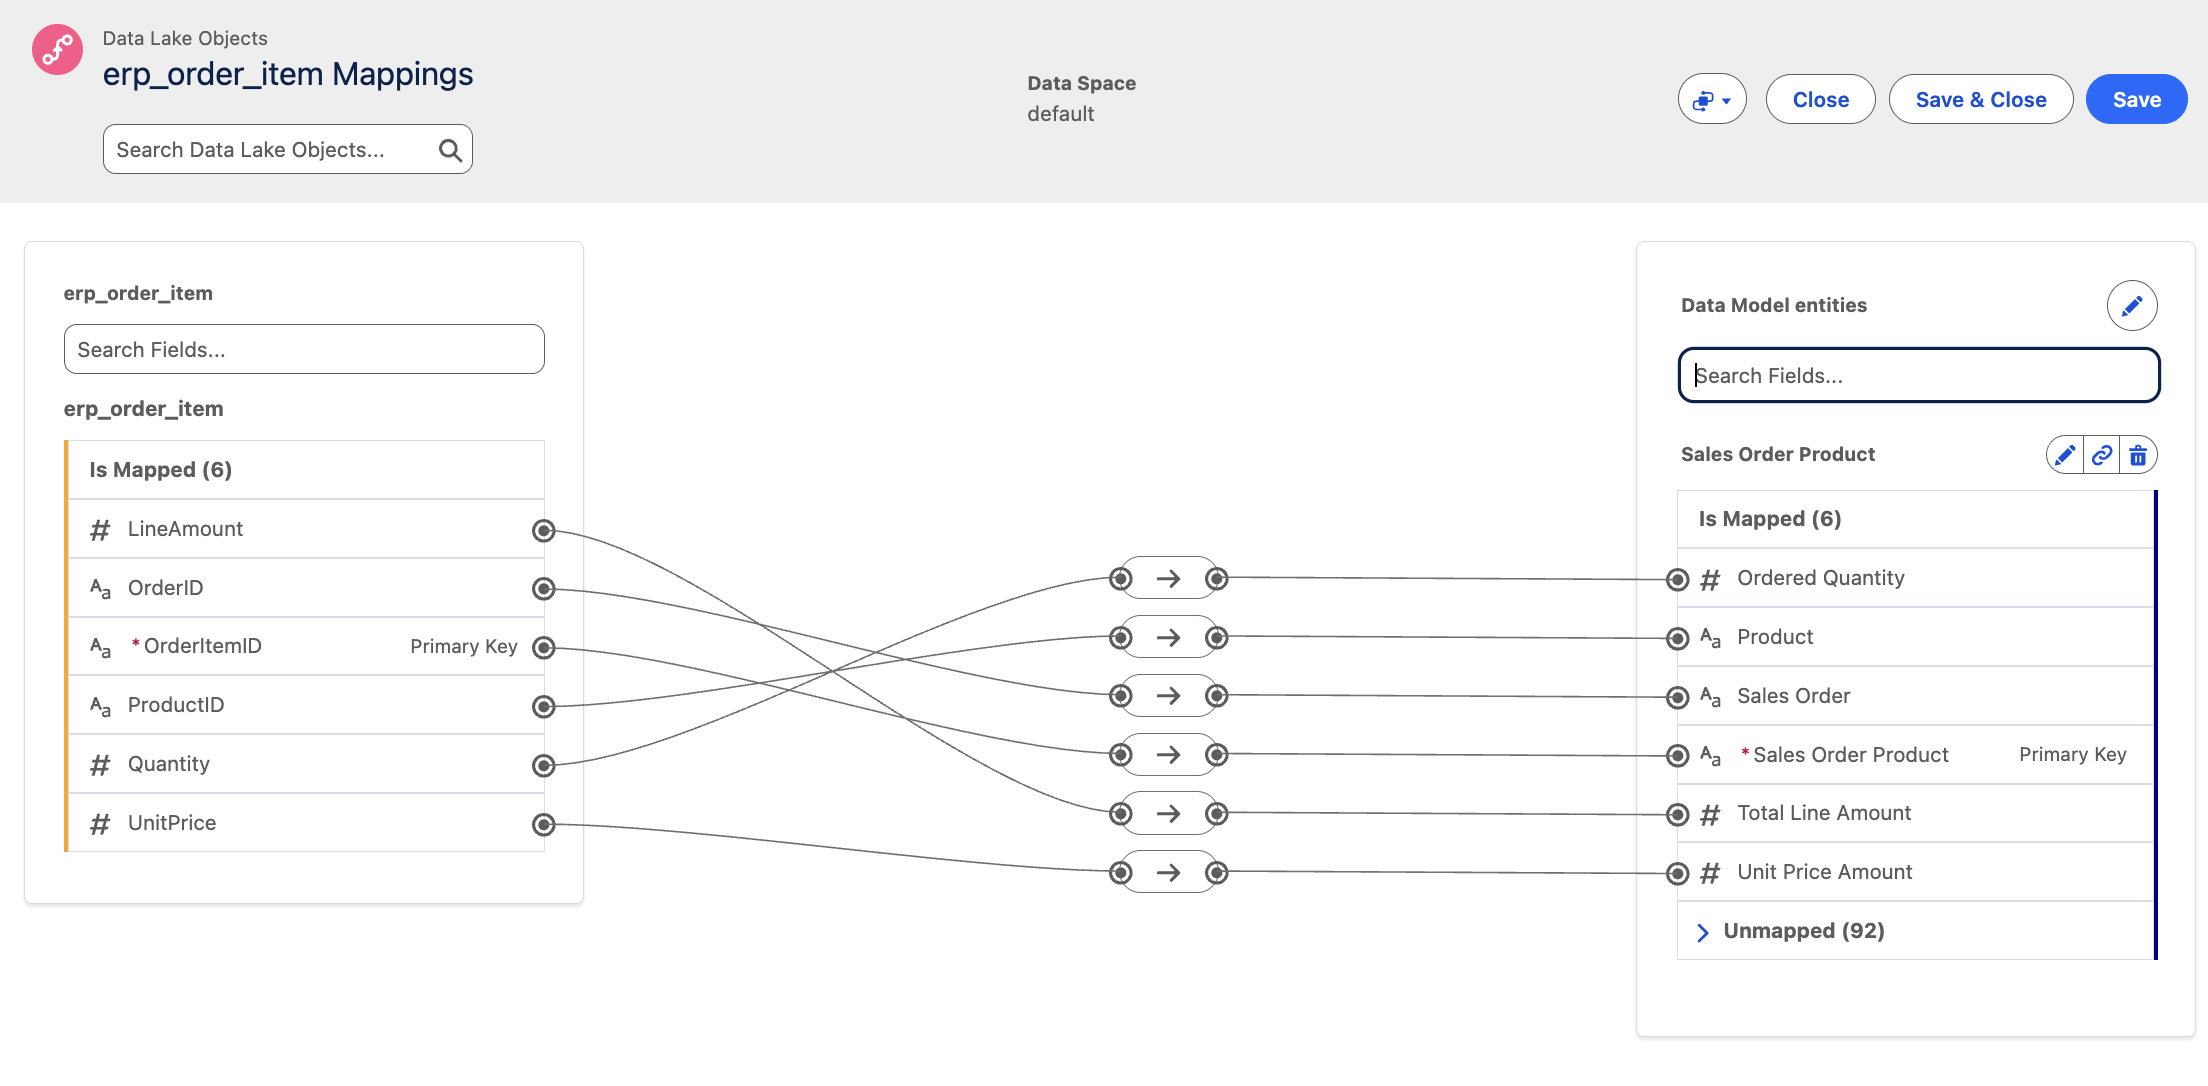
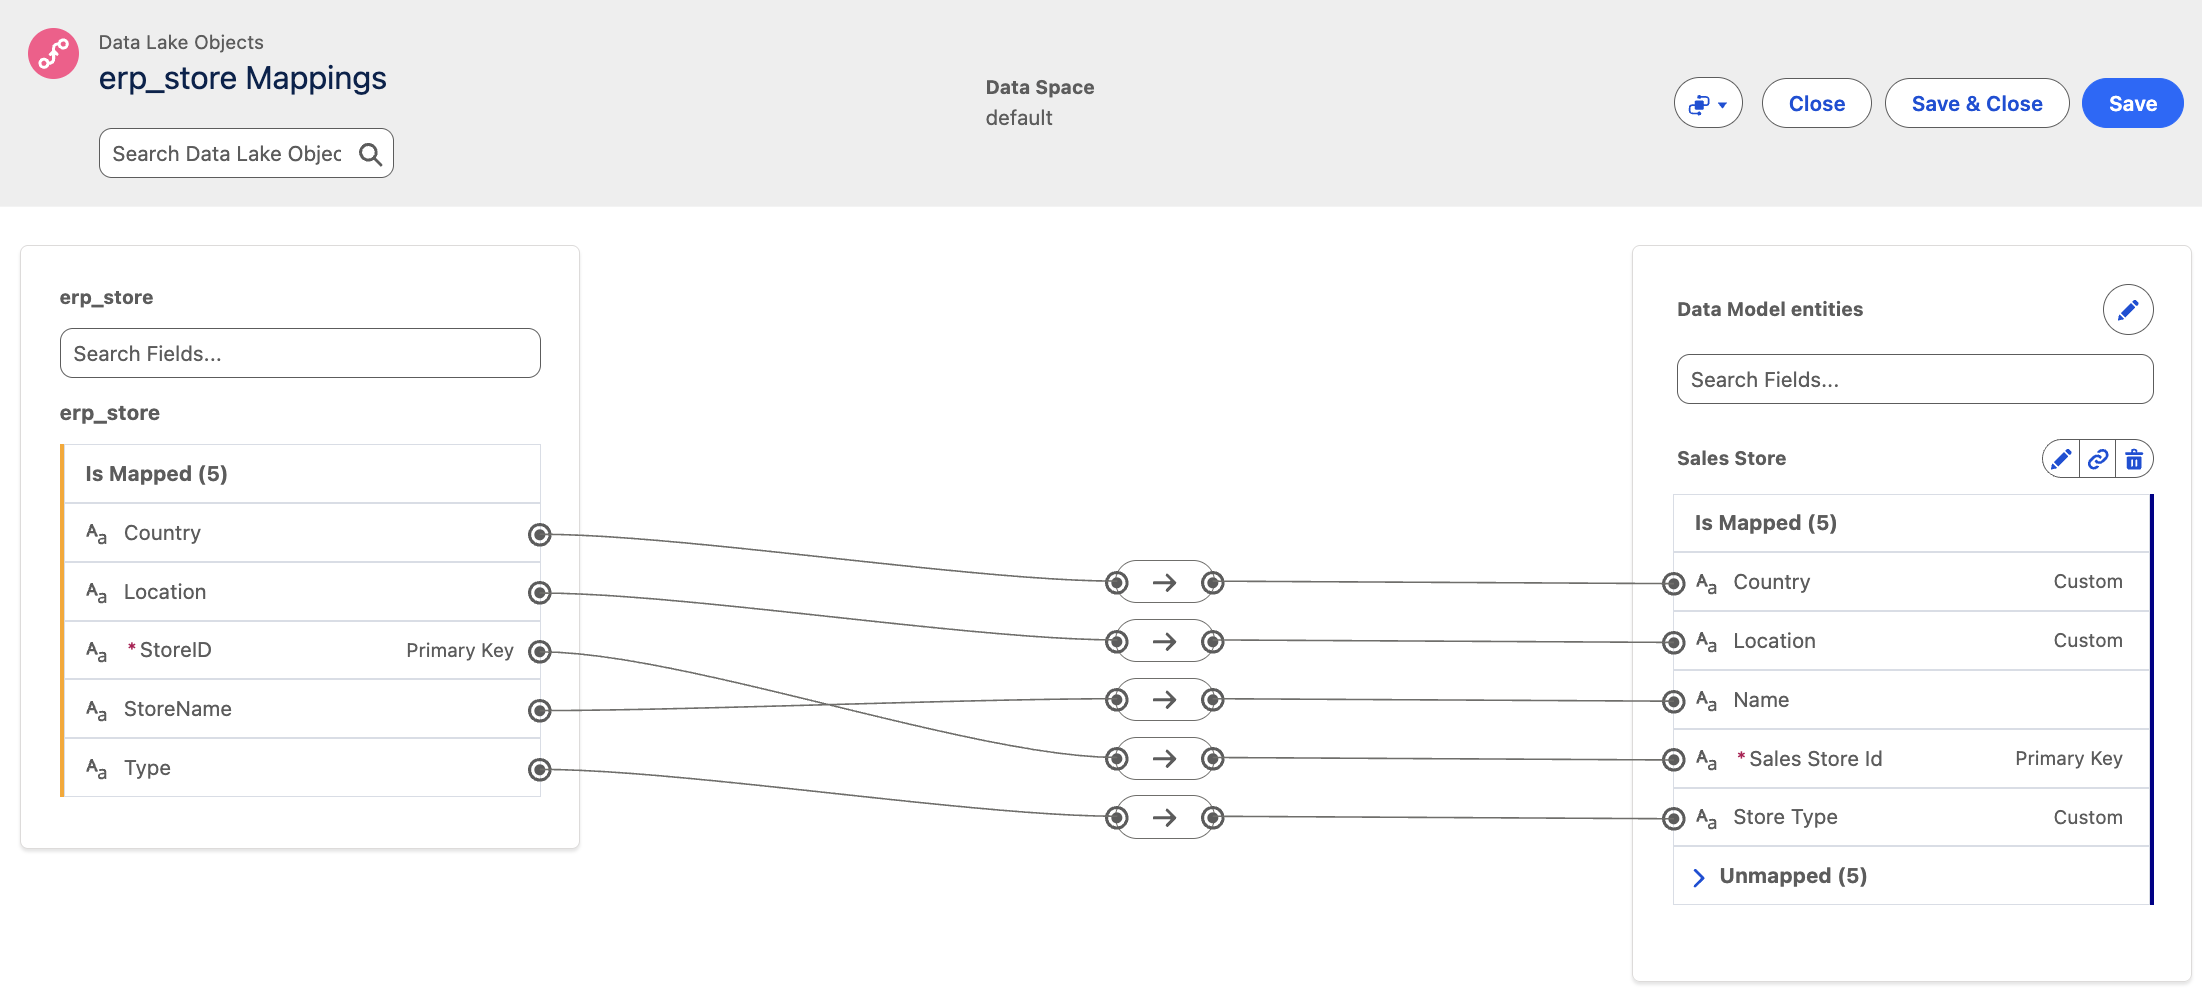
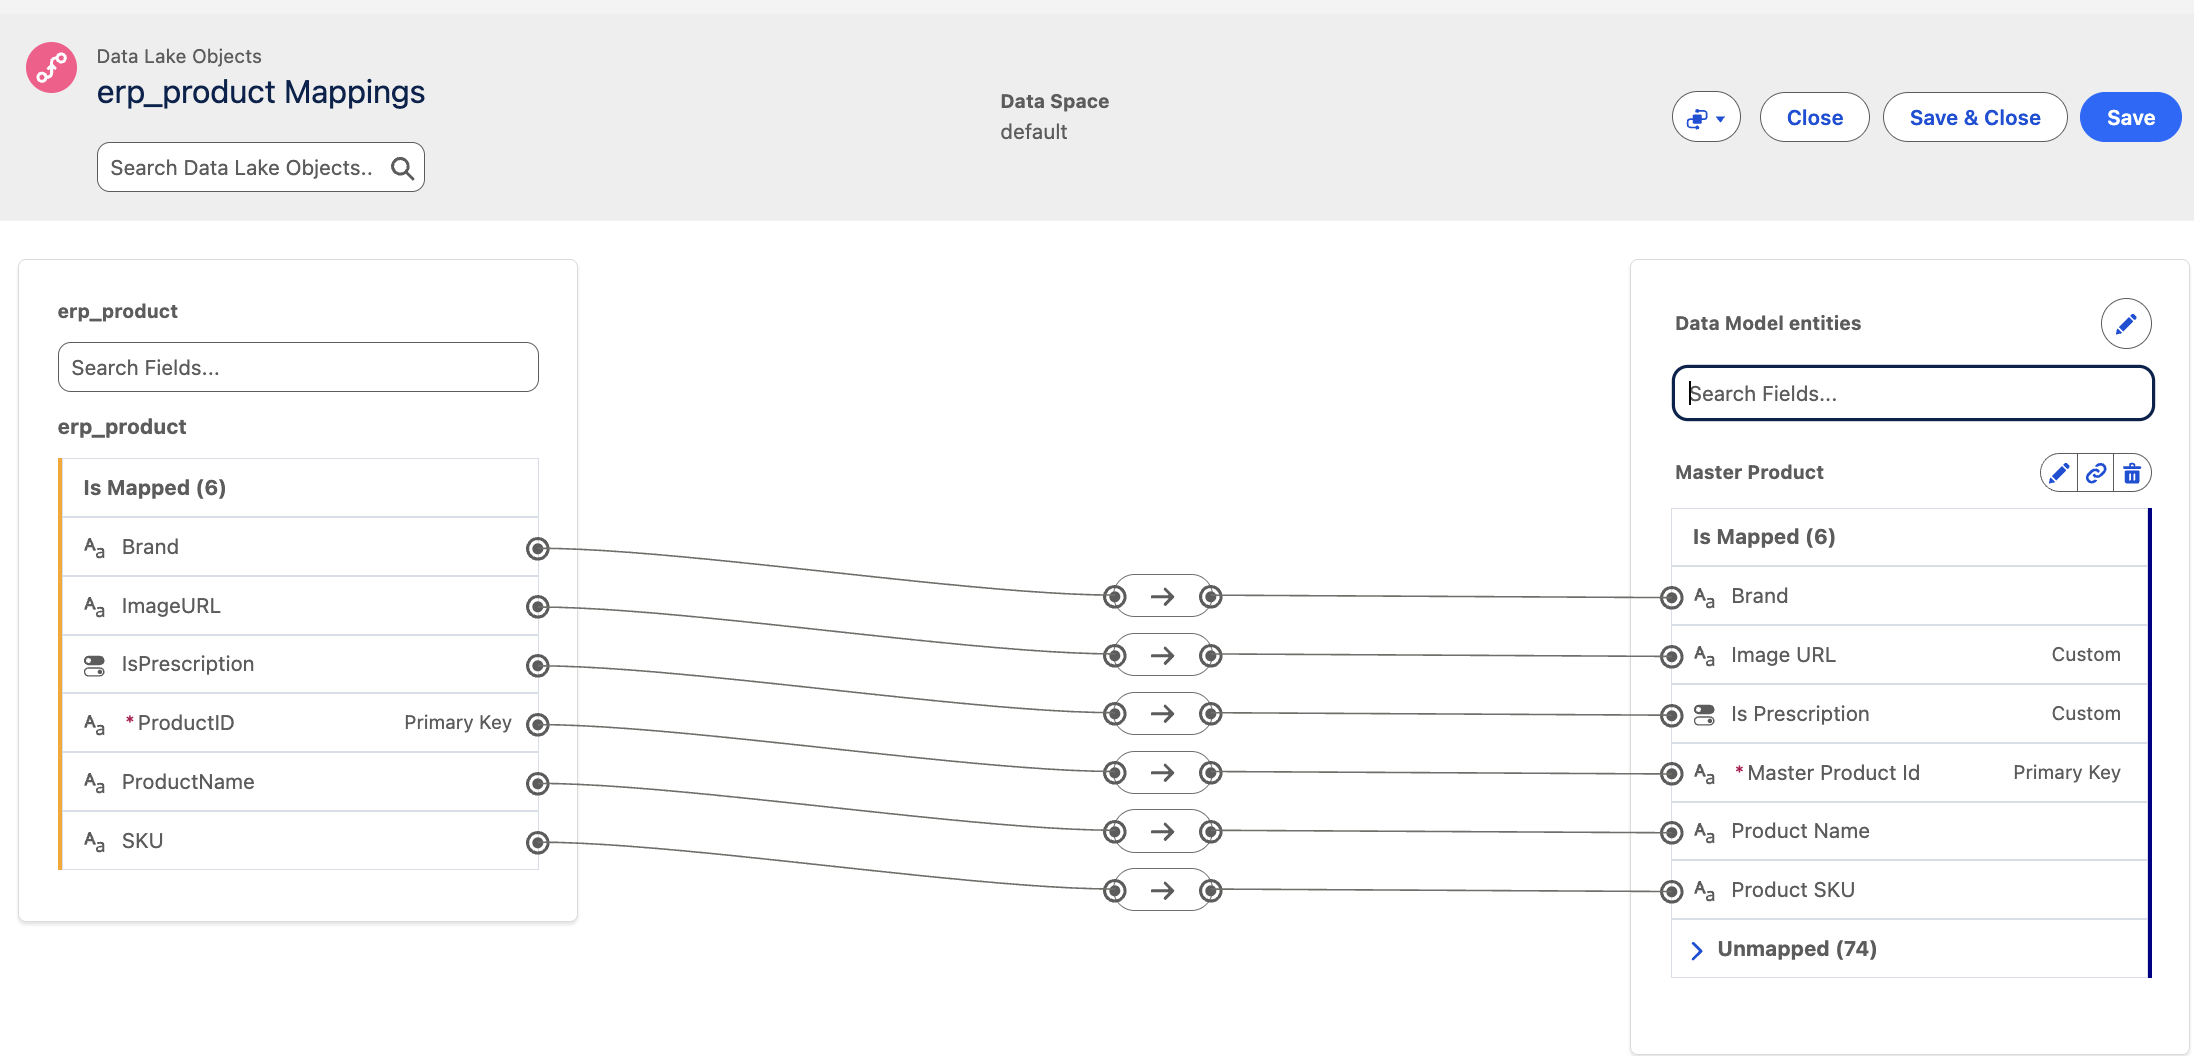
🧬 2. Data Mapping
In the Mapping tab for each Data Stream, configure the mappings as follows:
Contact
Order
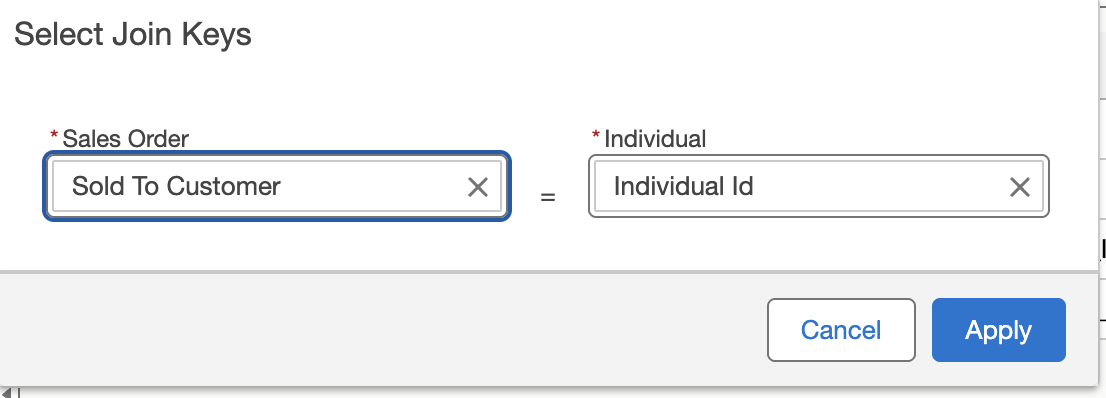
Out of the box, there is no relationship between Sales Order and Individual.
To add the relationship:
- In the Relationships tab of the Sales Order Data Model Object, click Edit.
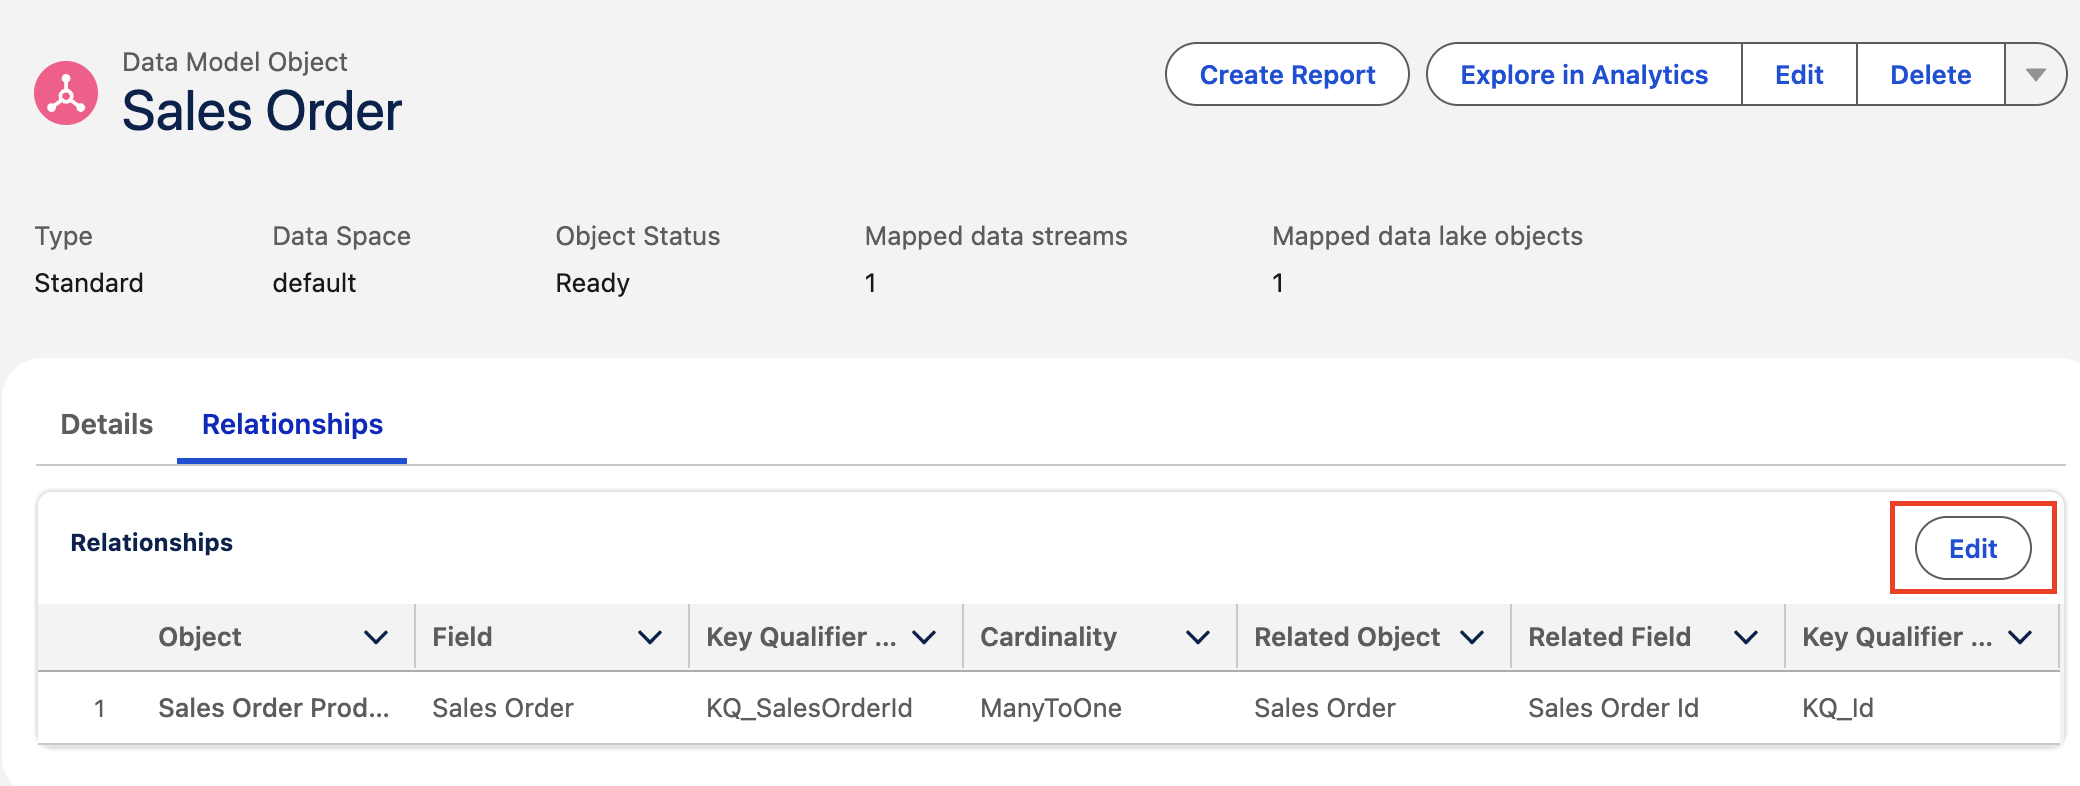
- Add a new relationship:
[Sales Order].[Sold To Customer] -> [Individual].[Individual Id](N:1)
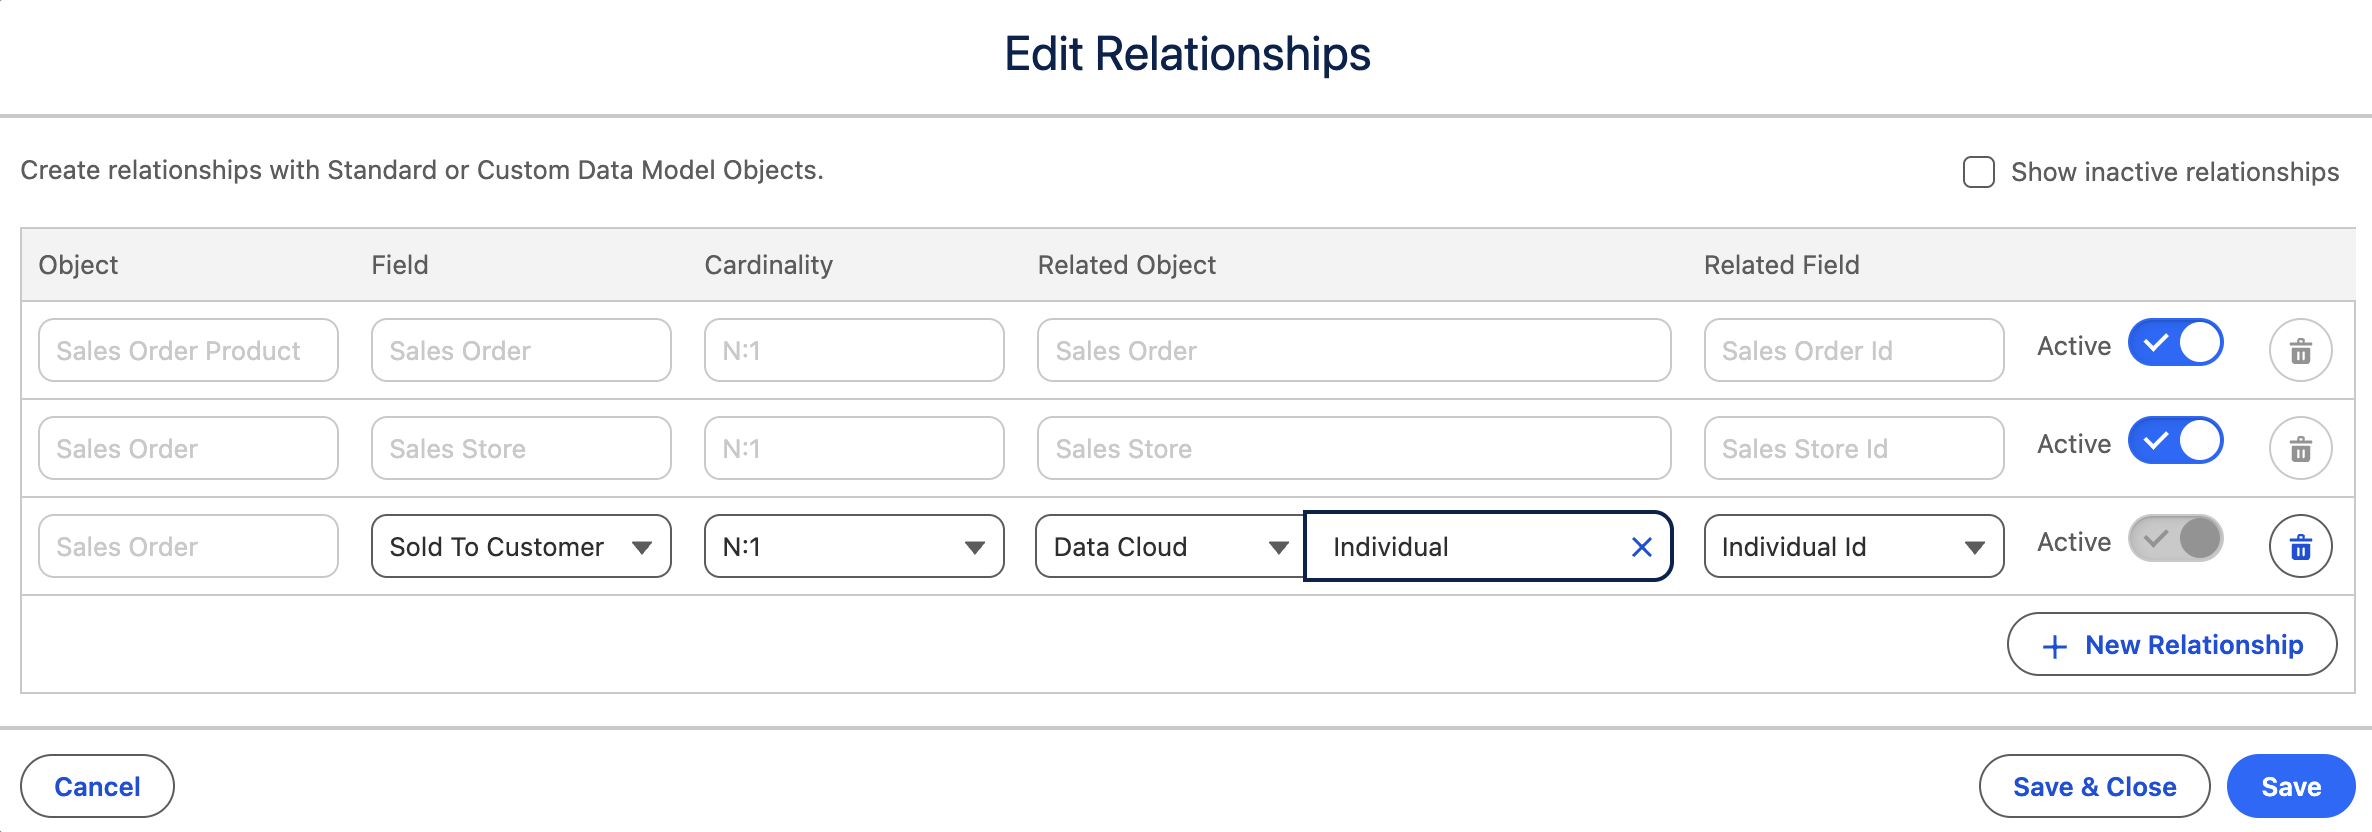
Save and Close.
Order Item
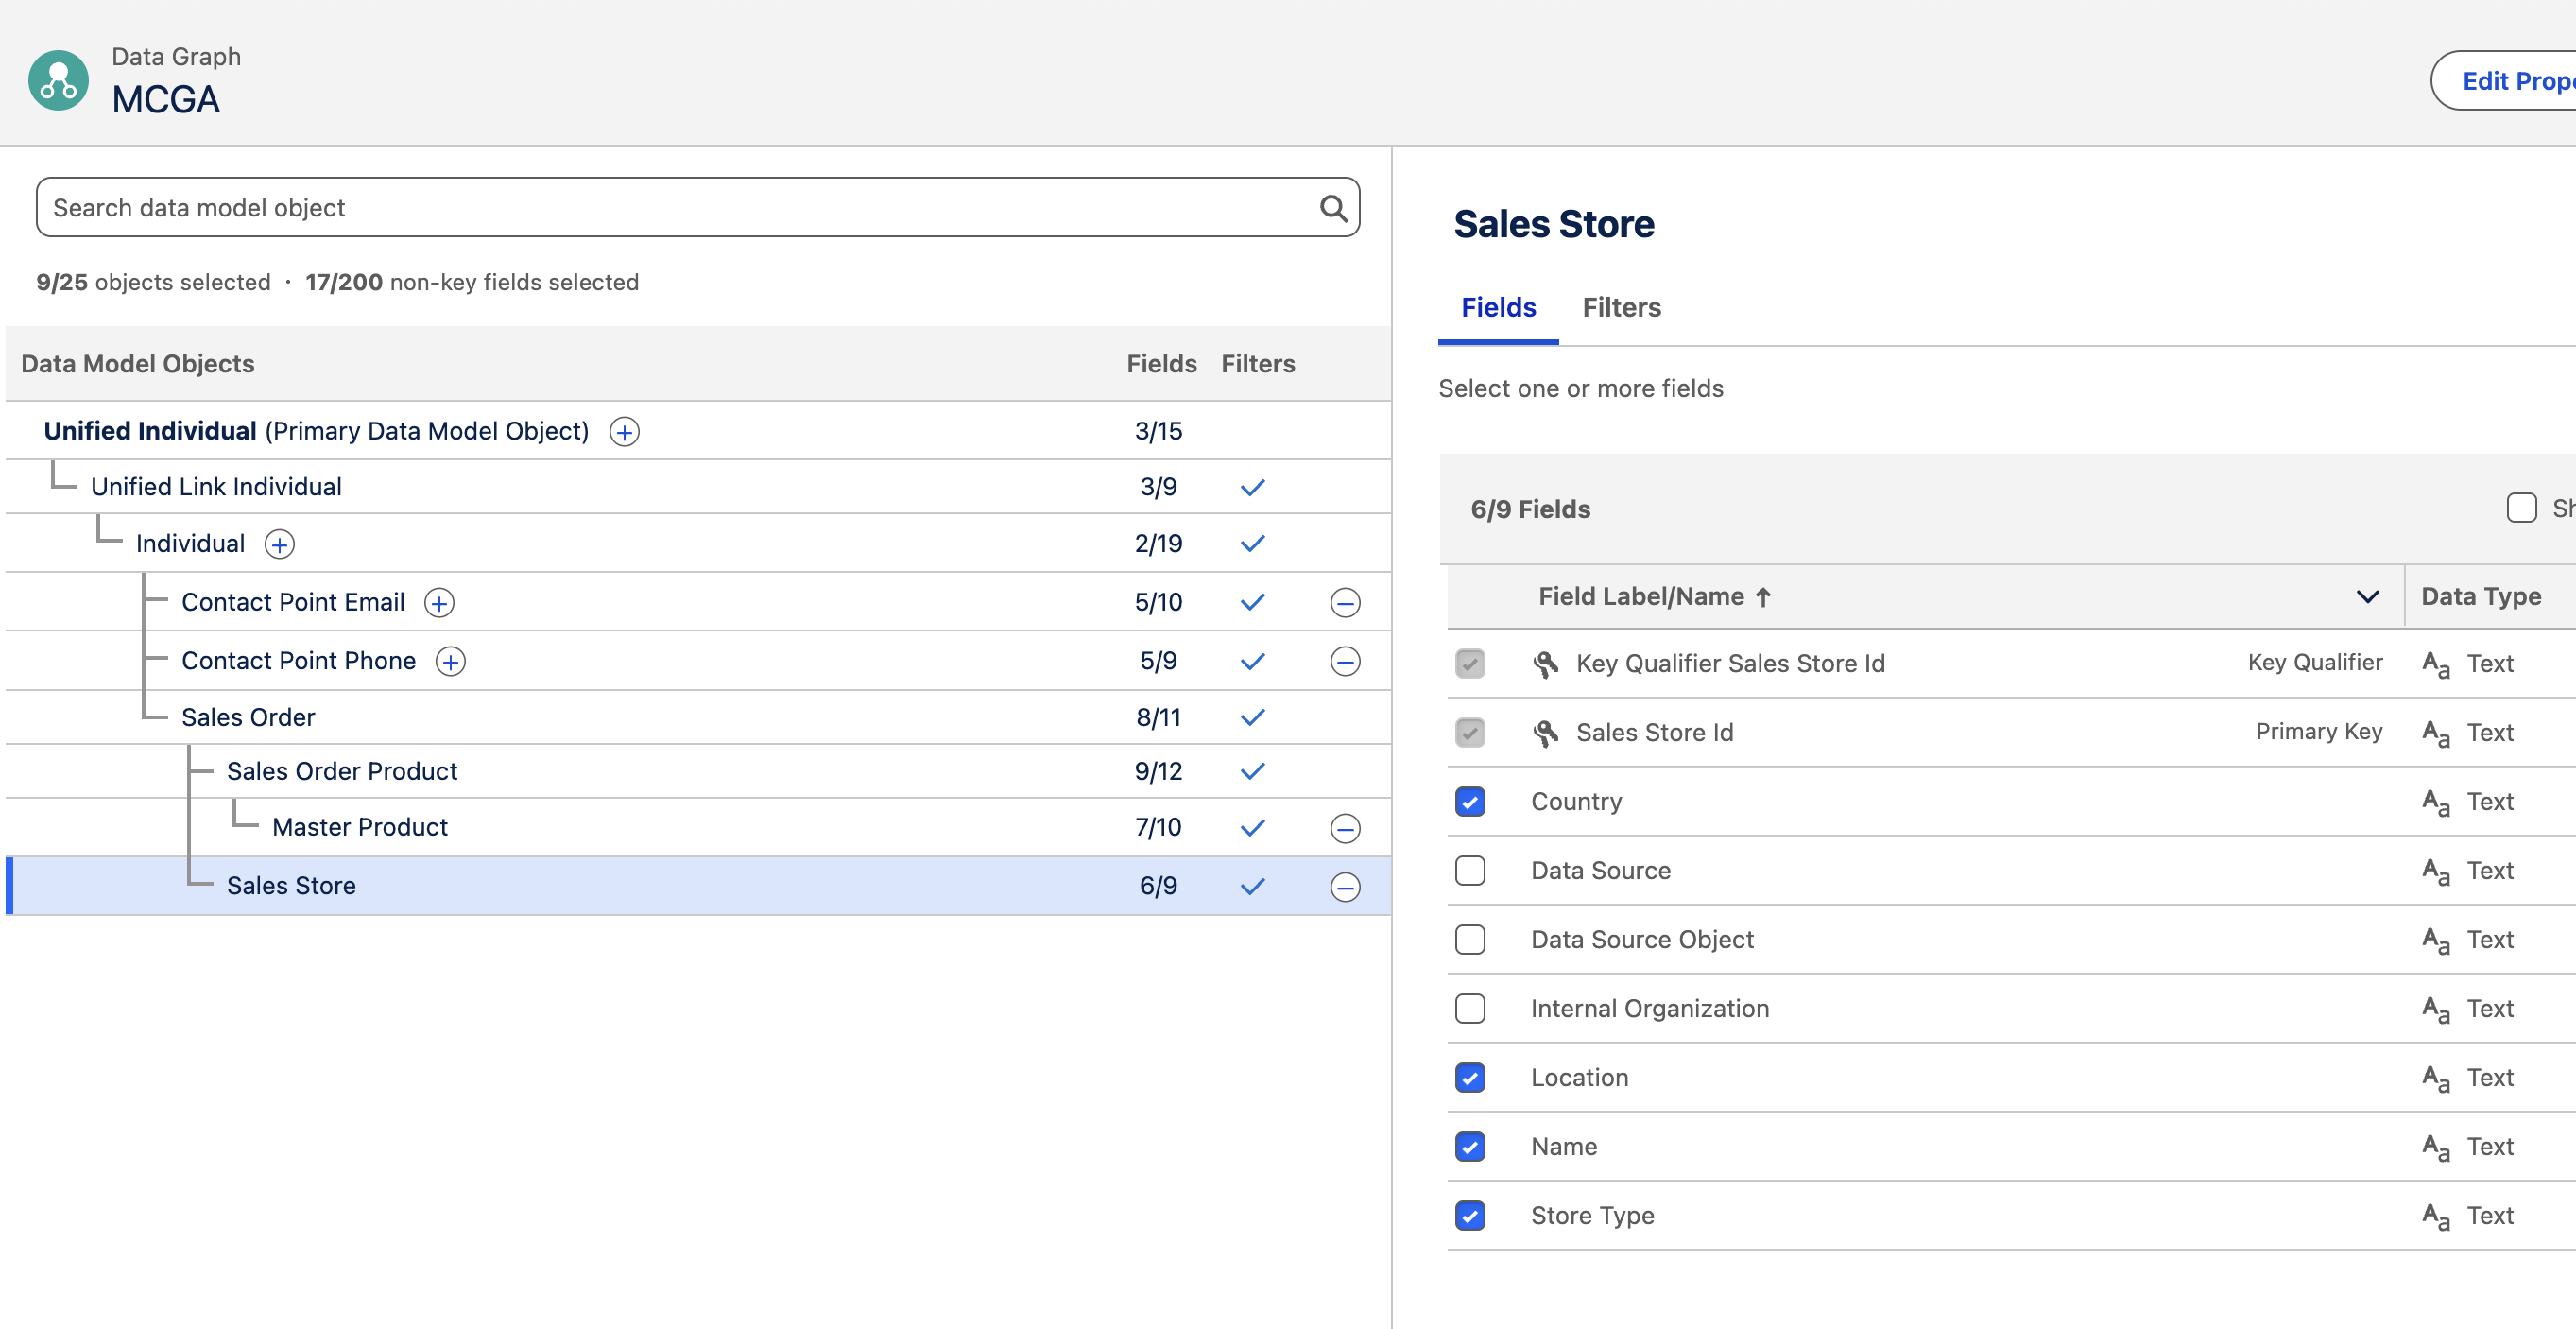
Store
Create the following custom fields on the Standard Sales Store Data Model Object:
| Field Name | Data Type |
|---|---|
| Country | Text |
| Location | Text |
| Store Type | Text |
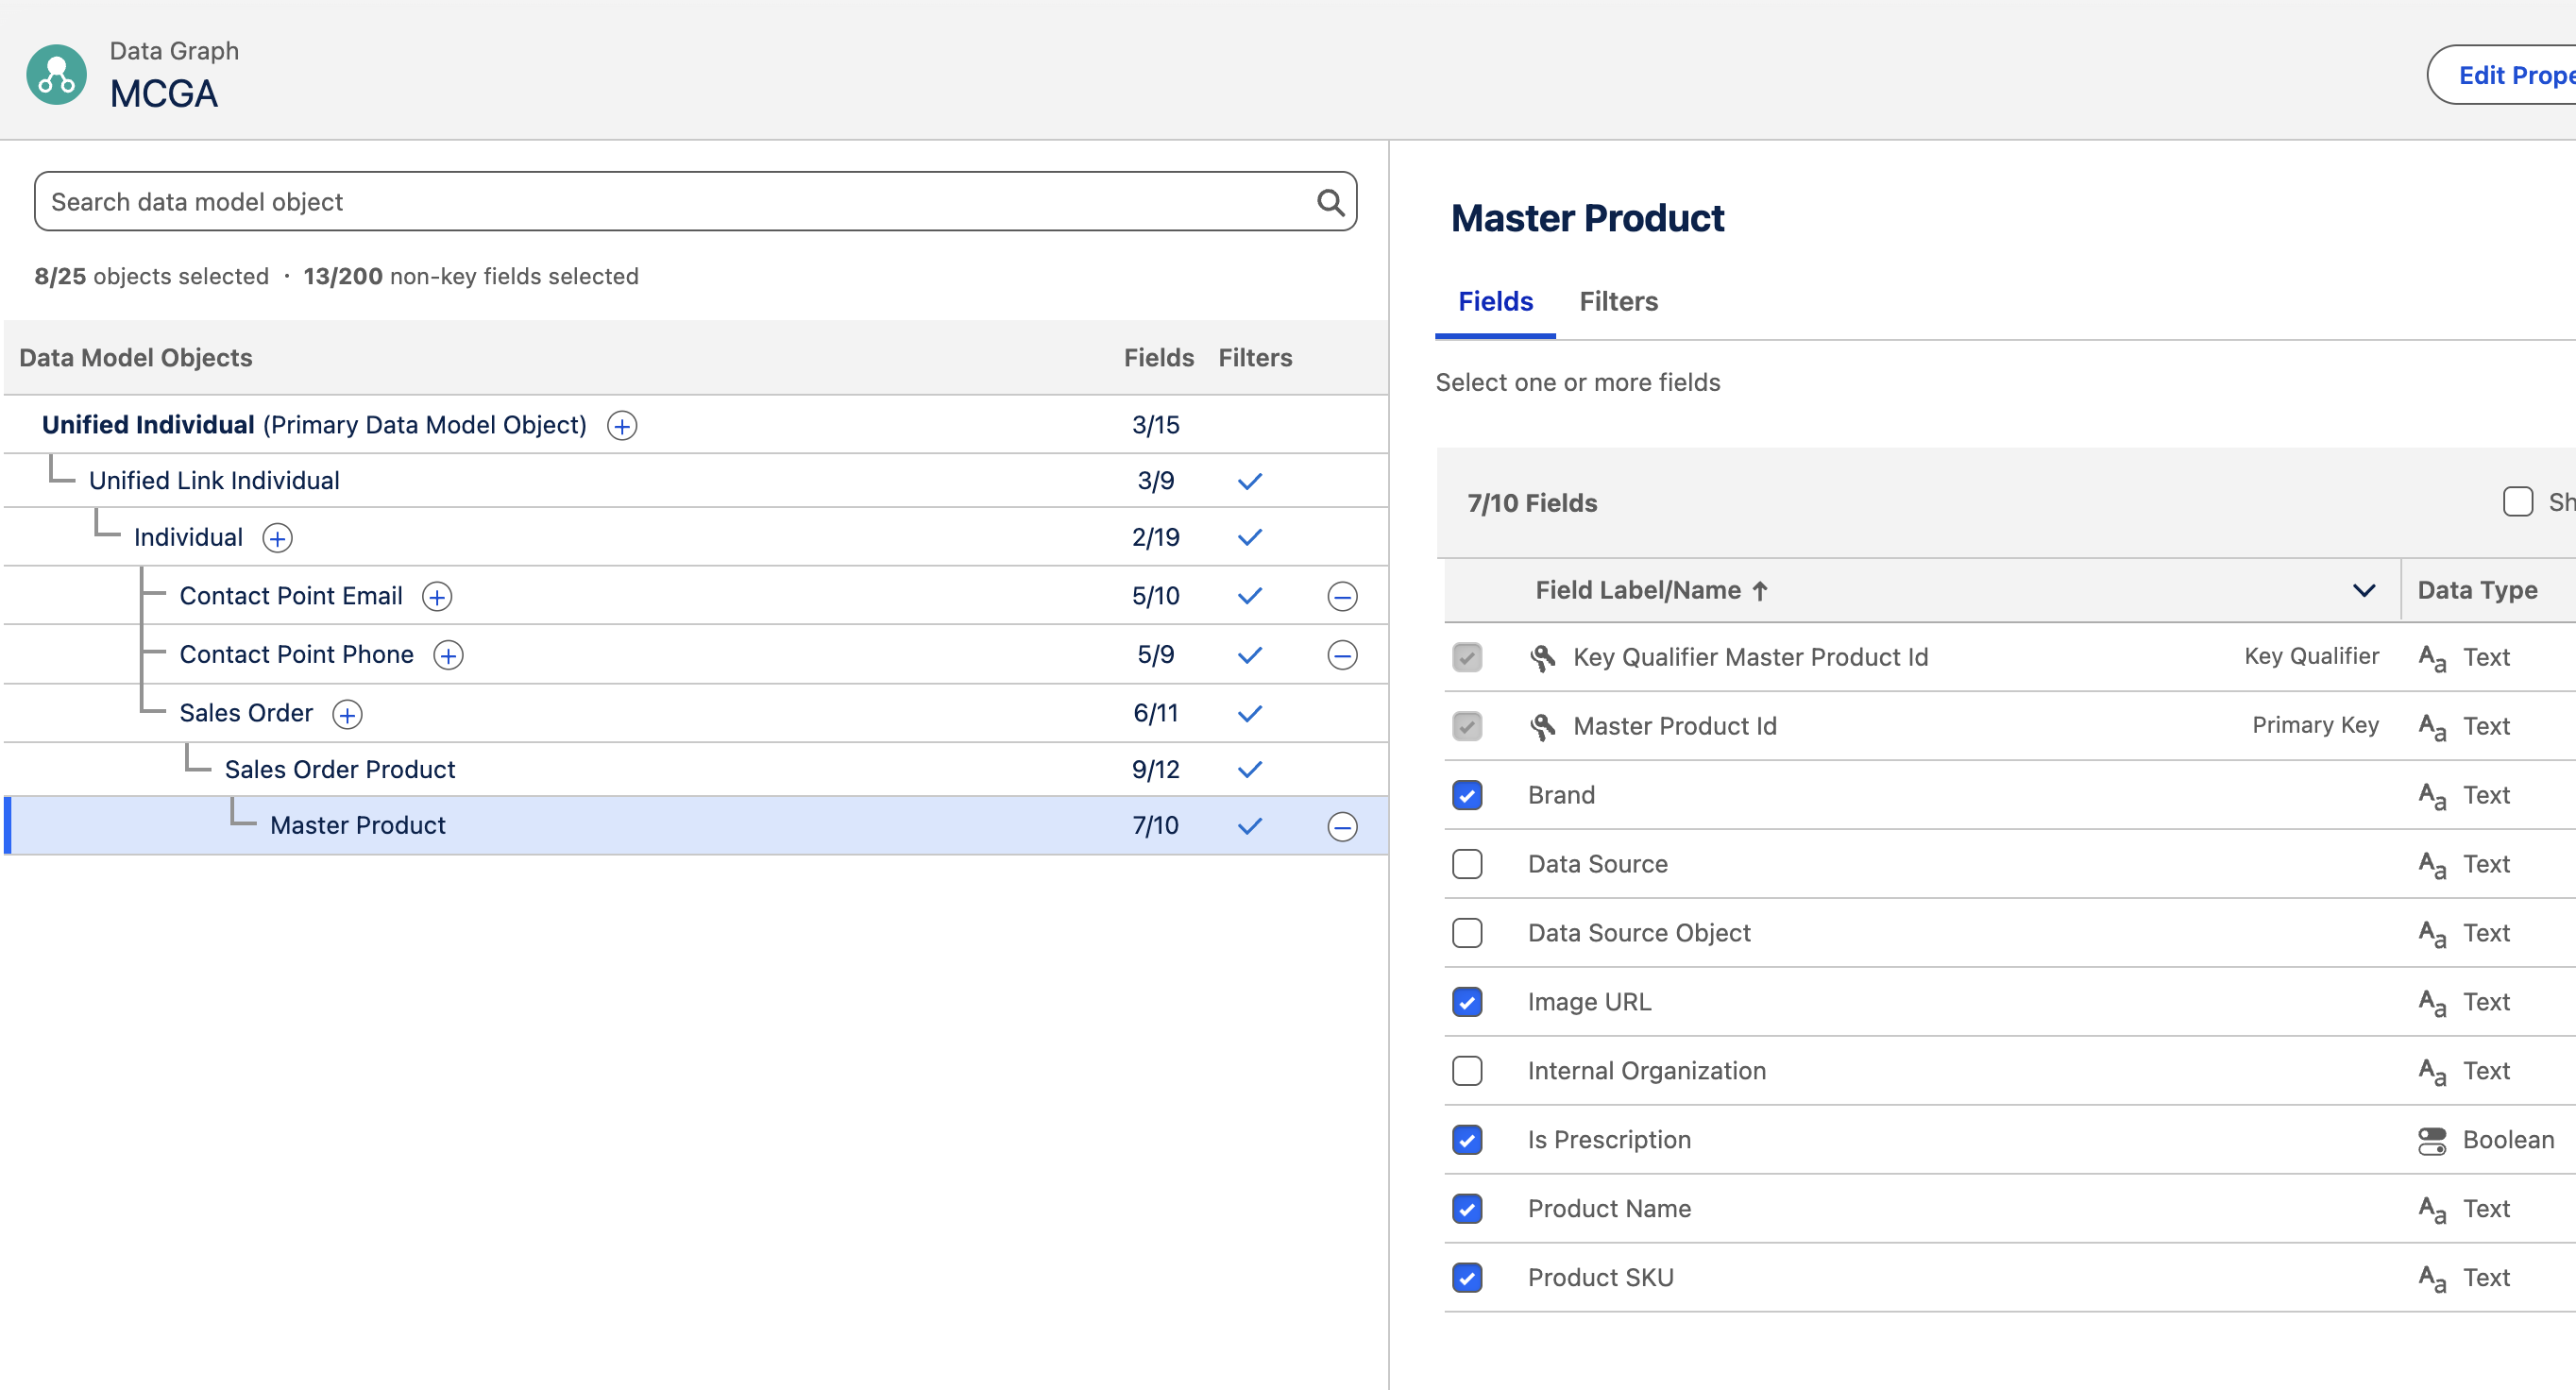
Product
Create the following custom fields on the Standard Master Product Data Model Object:
| Field Name | Data Type |
|---|---|
| Is Prescription | Boolean |
| Image URL | Text |
🧑💼 3. Identity Resolution
As of July 10th, 2025, Marketing Cloud Growth/Advanced only supports Unified Individuals, making Identity Resolution a hard requirement.
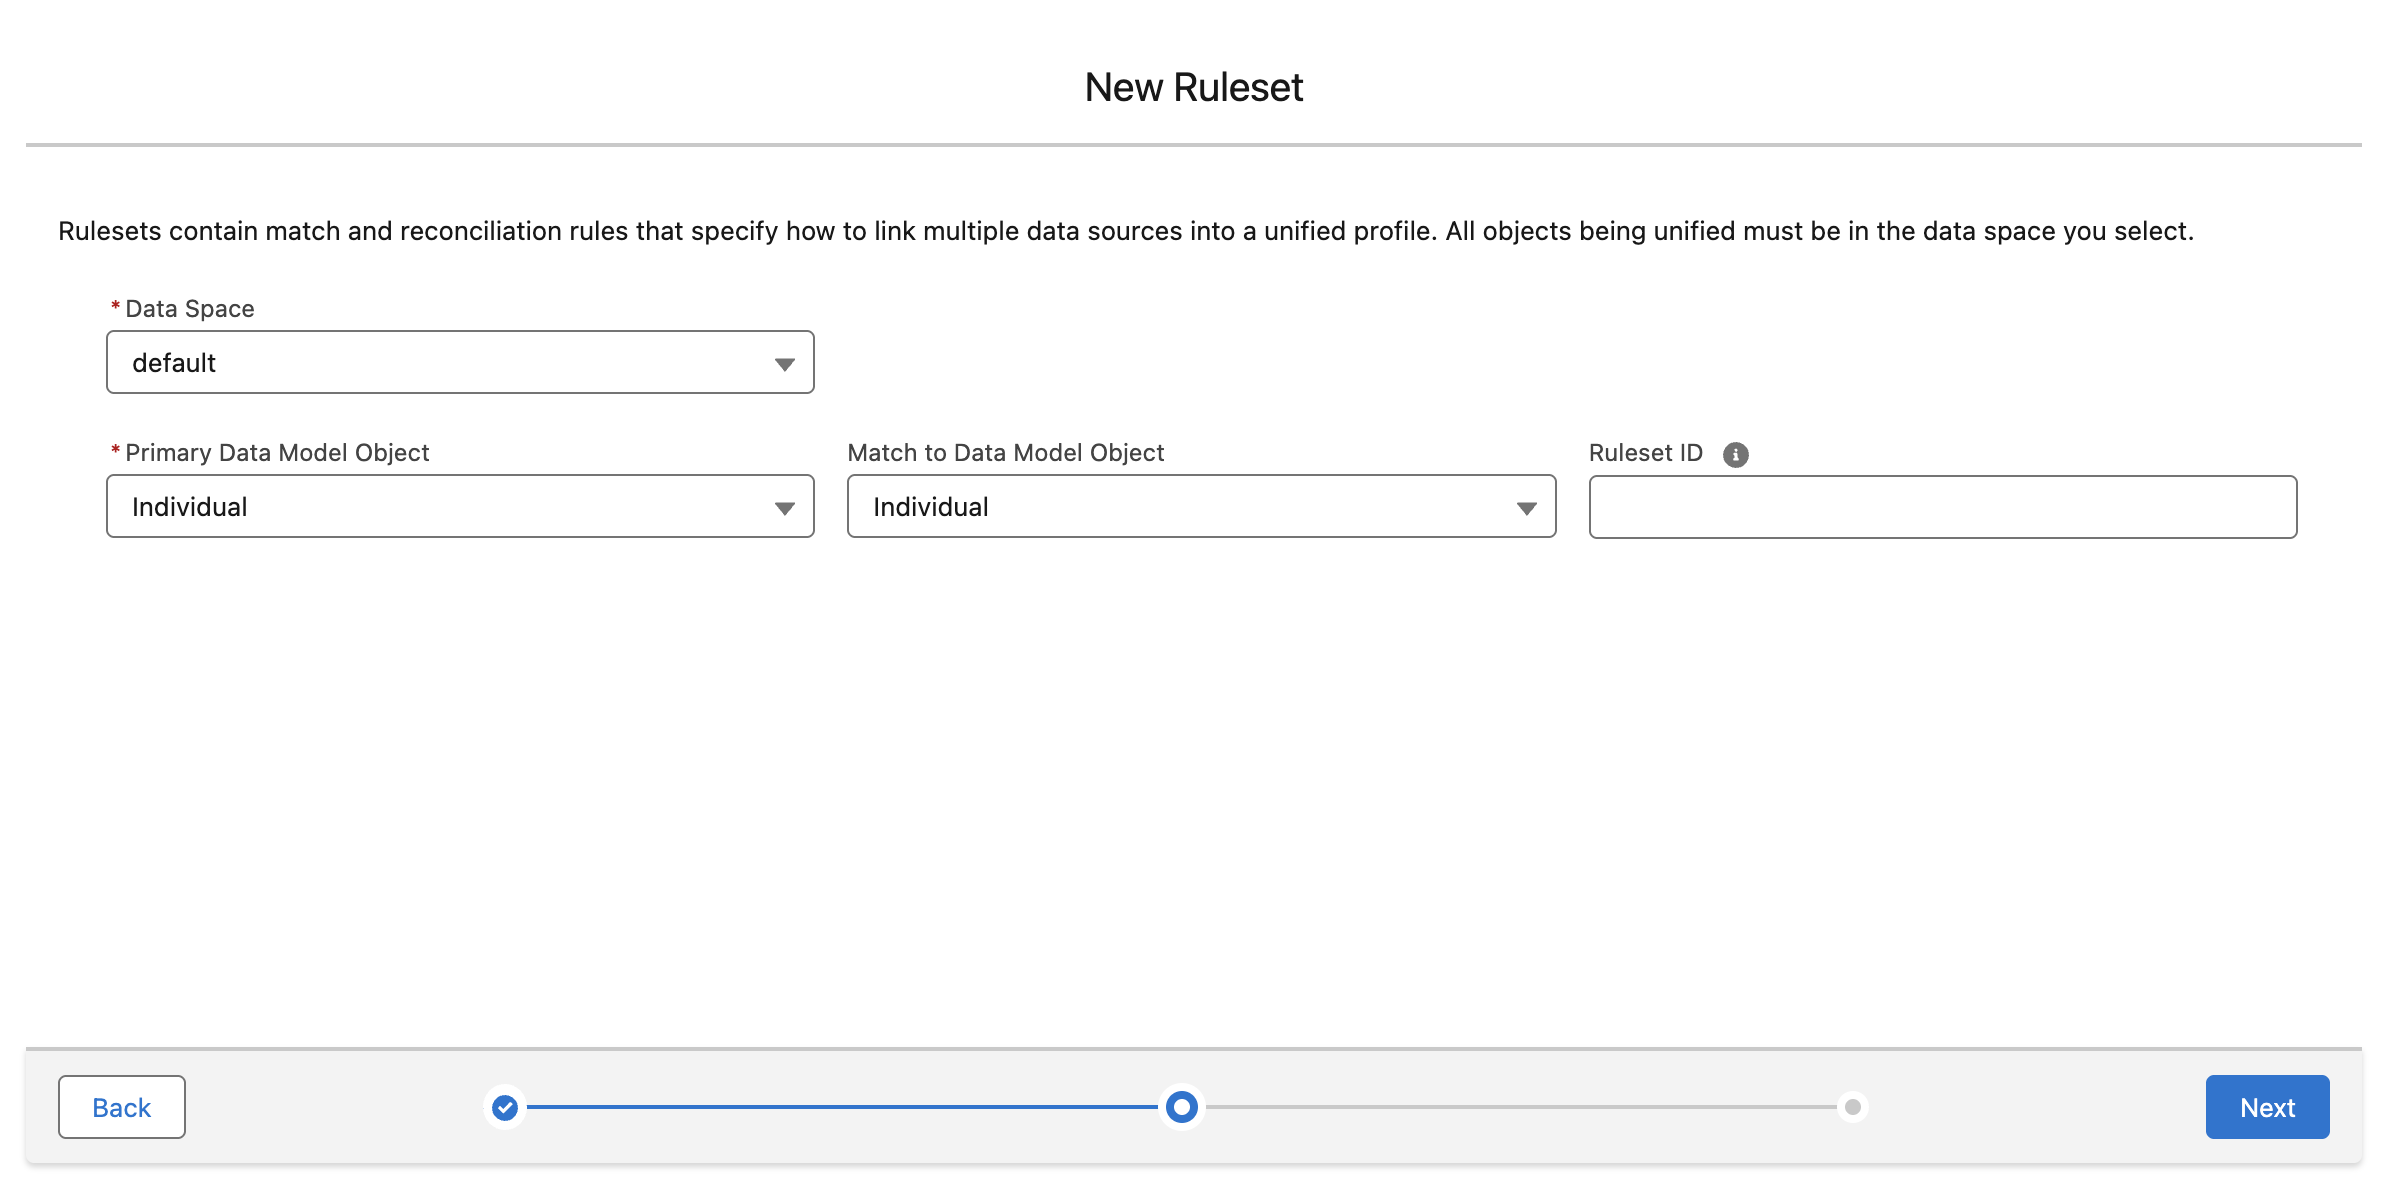
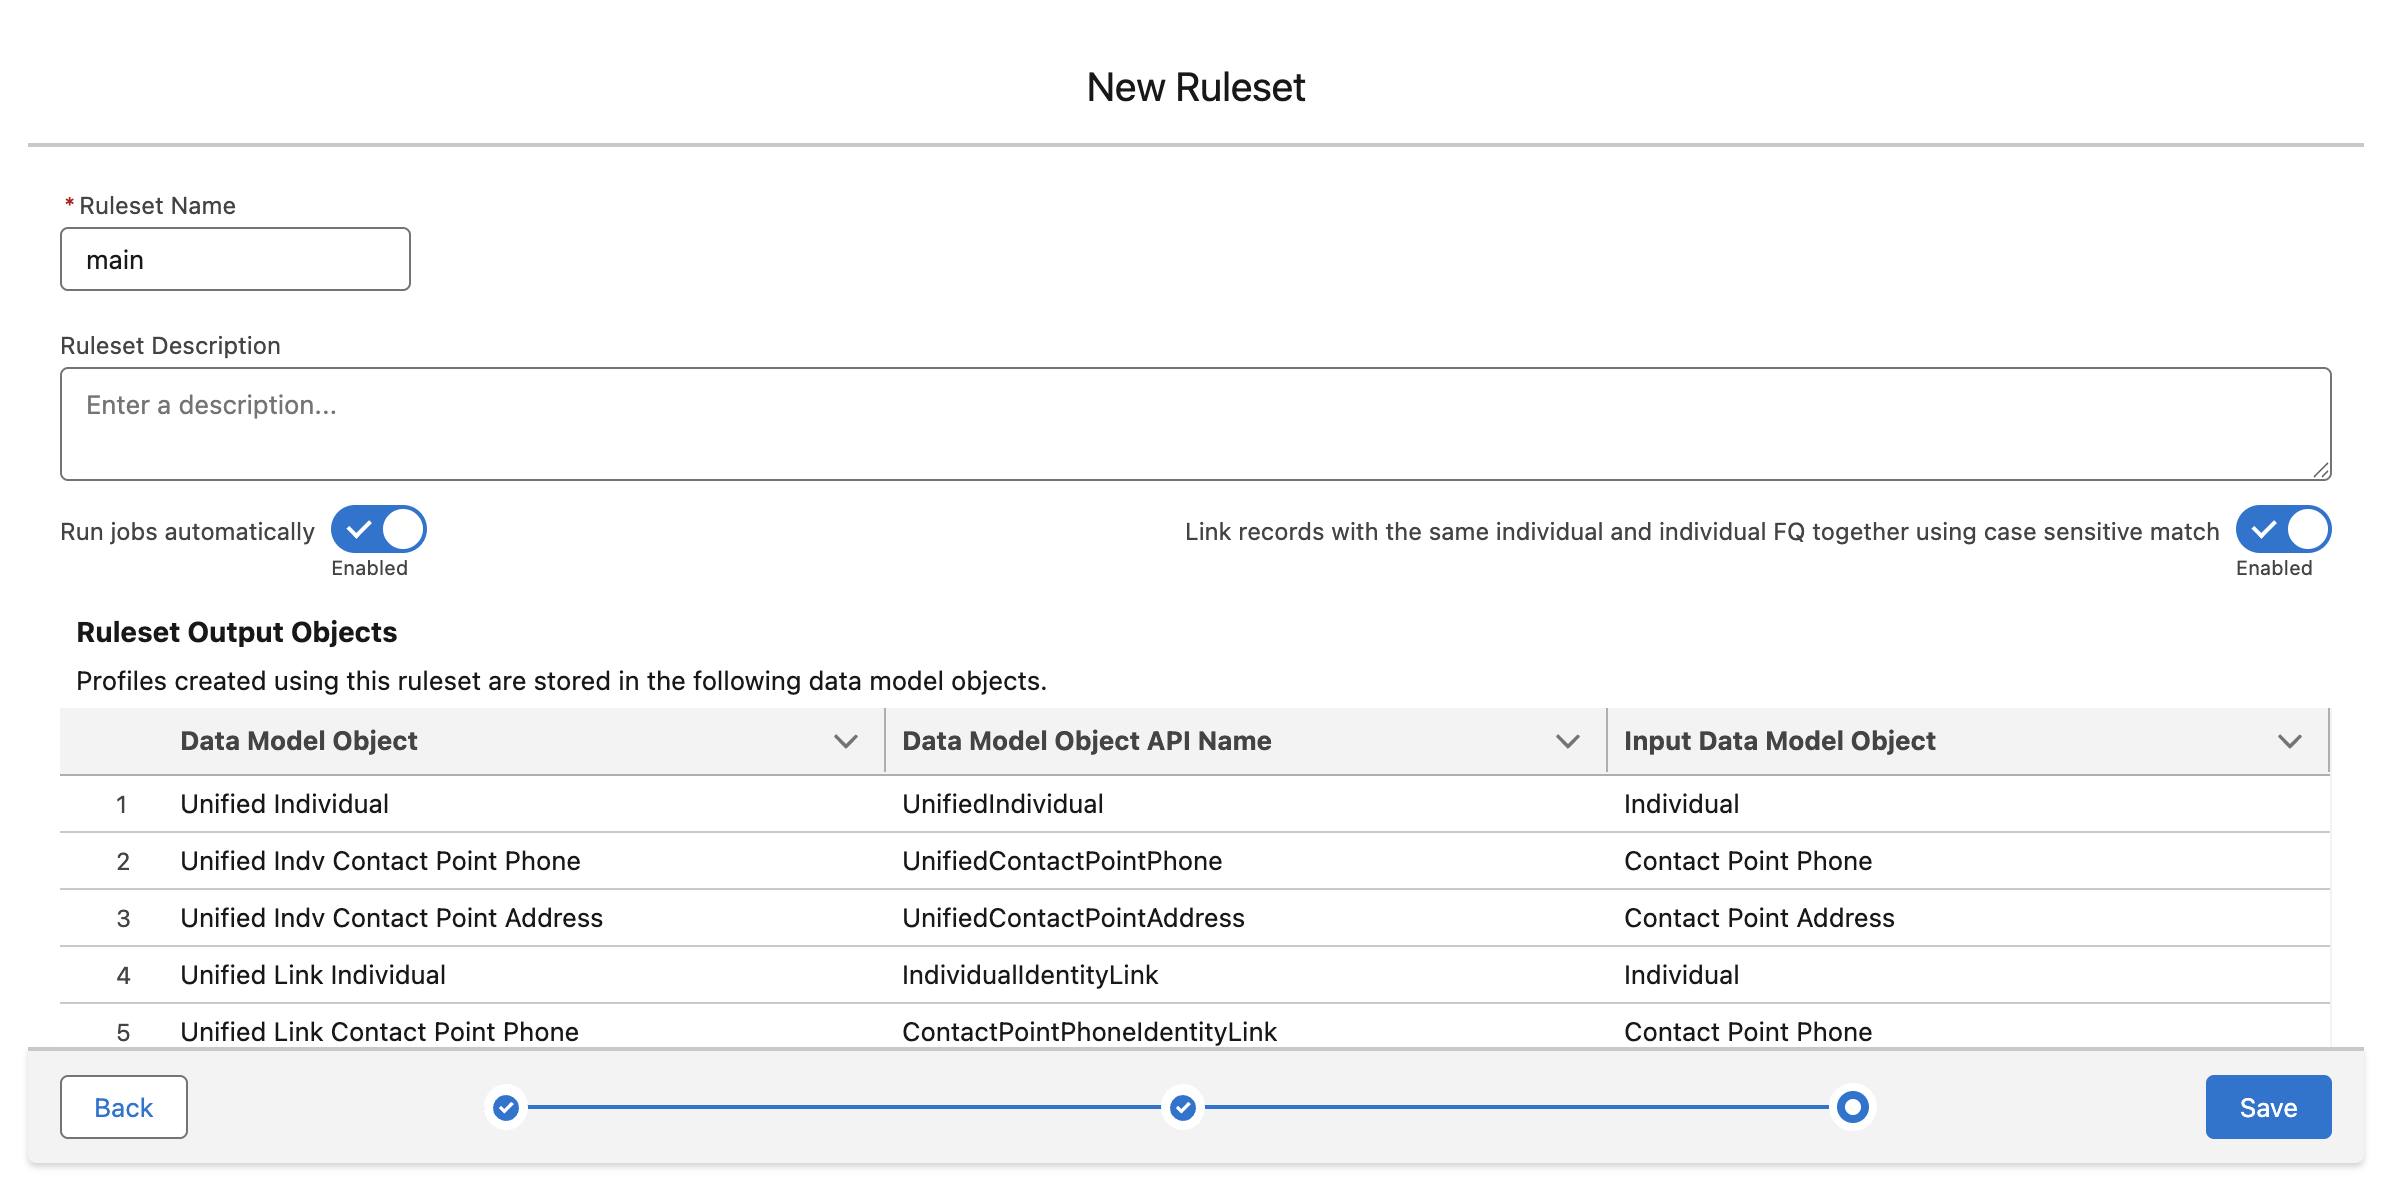
Create a new Rule Set
Go to Identity Resolutions and create a new Rule Set:
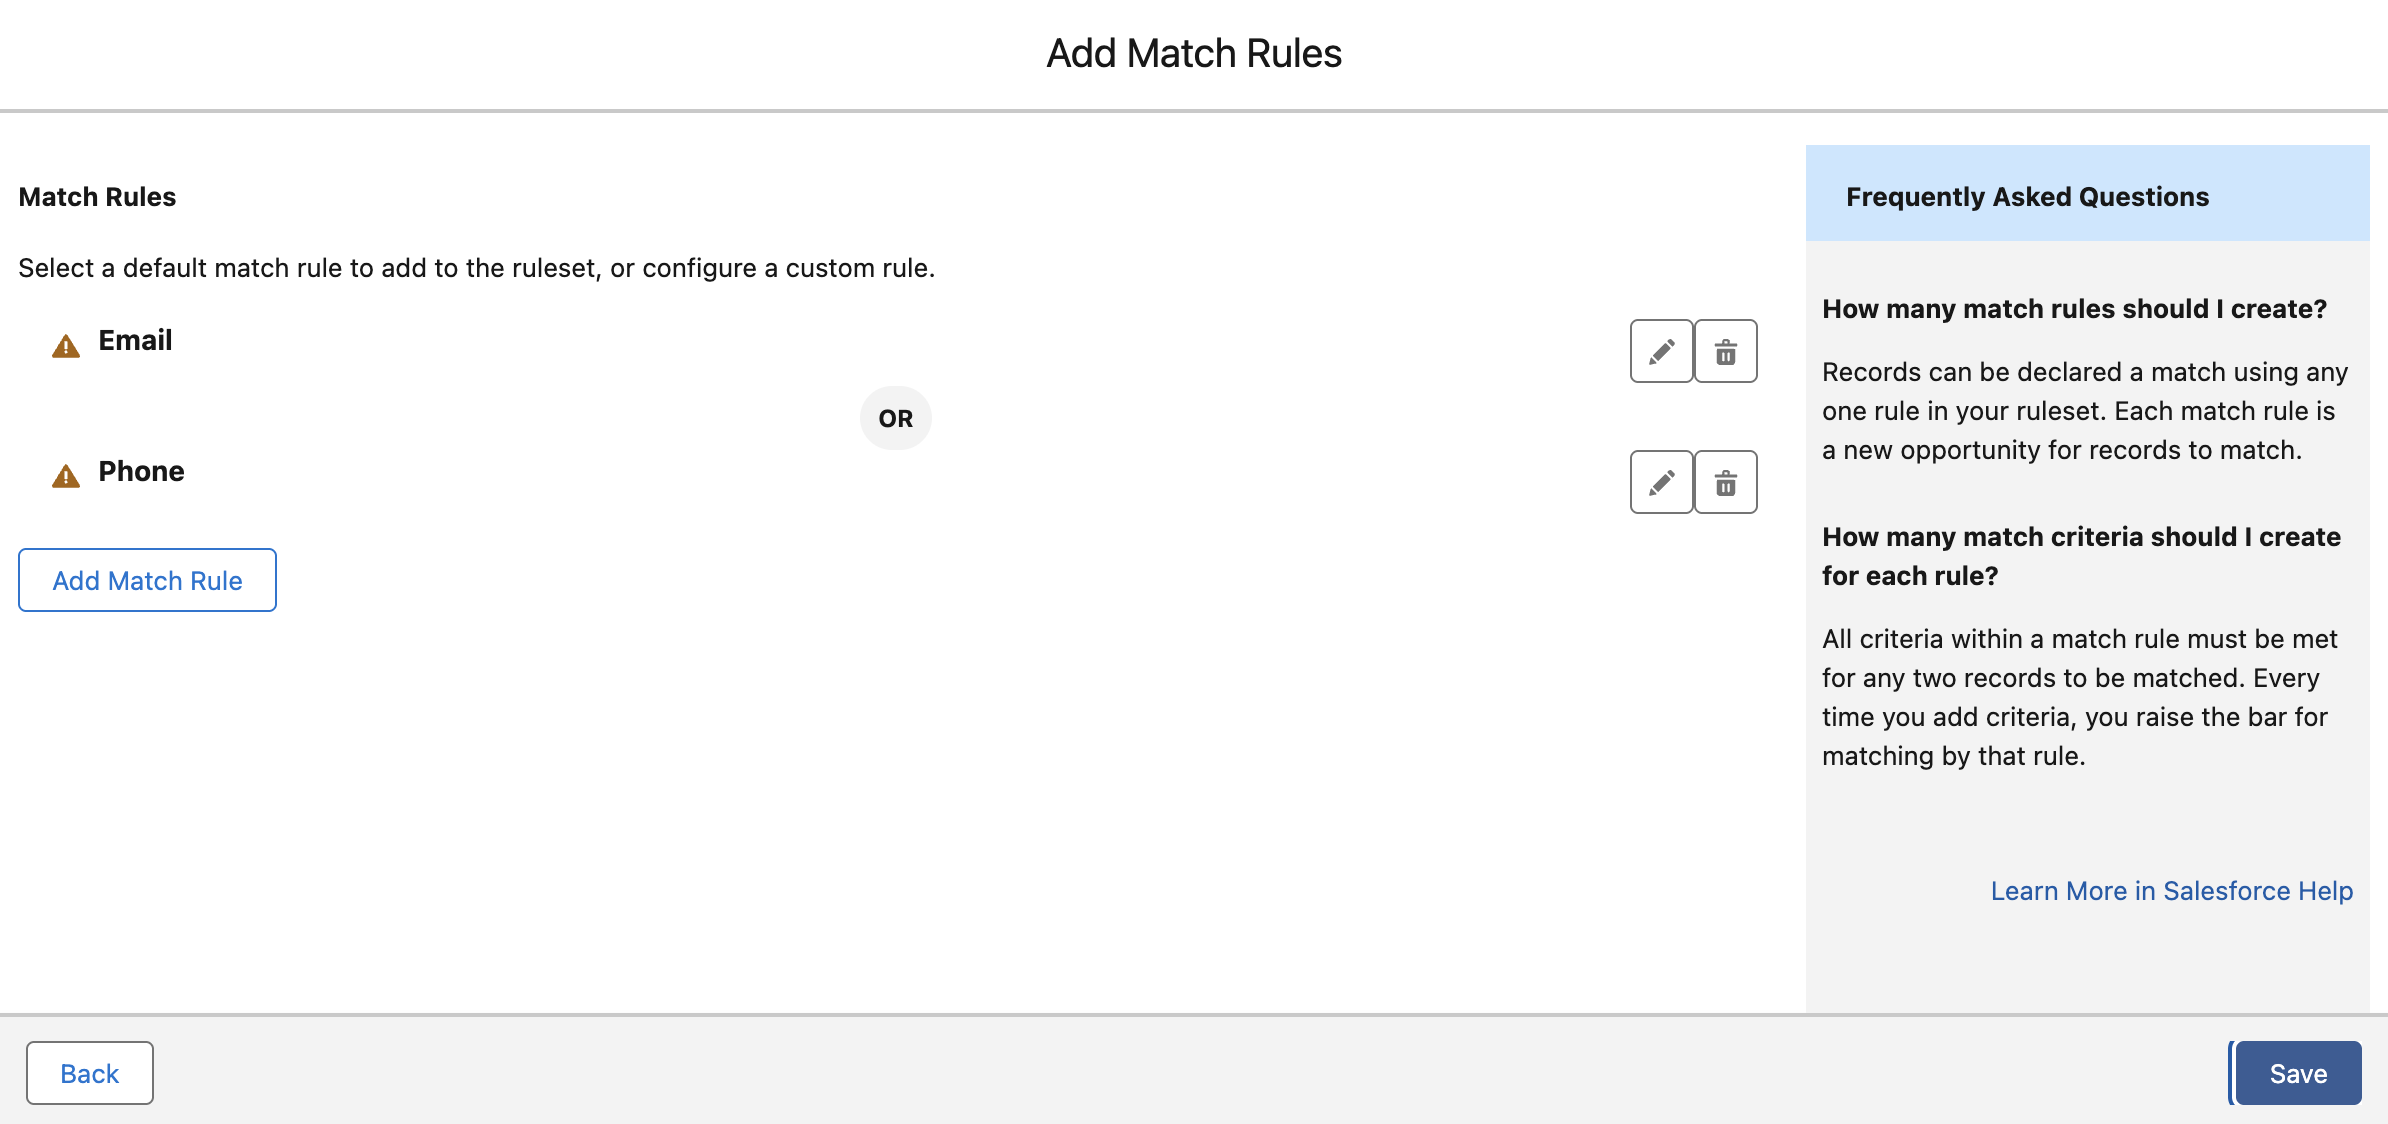
Add Matching Rules
Email Match Criteria
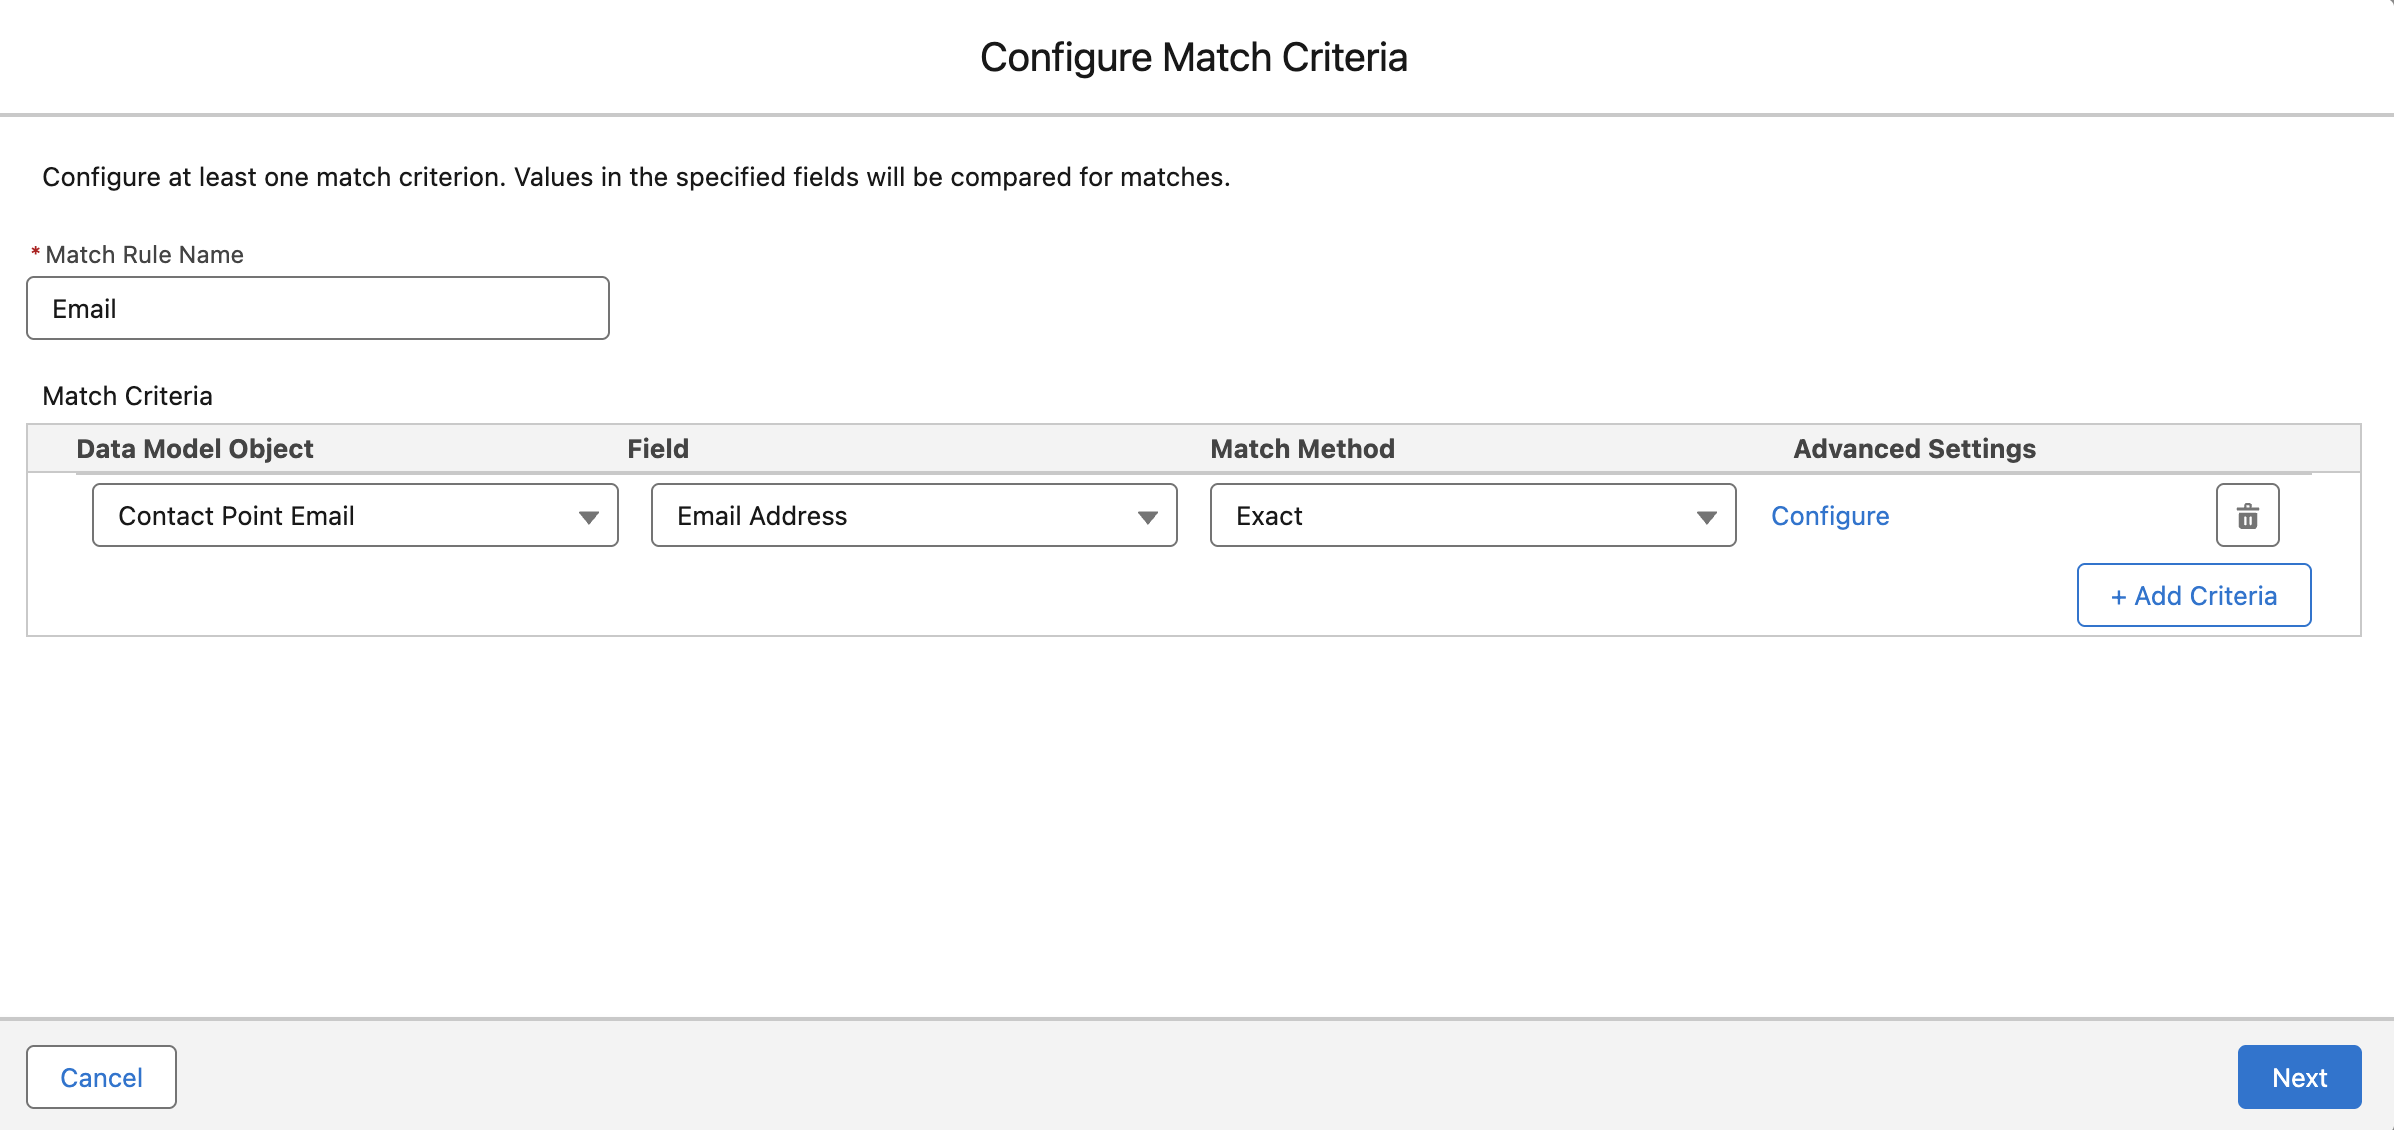
Phone Match Criteria
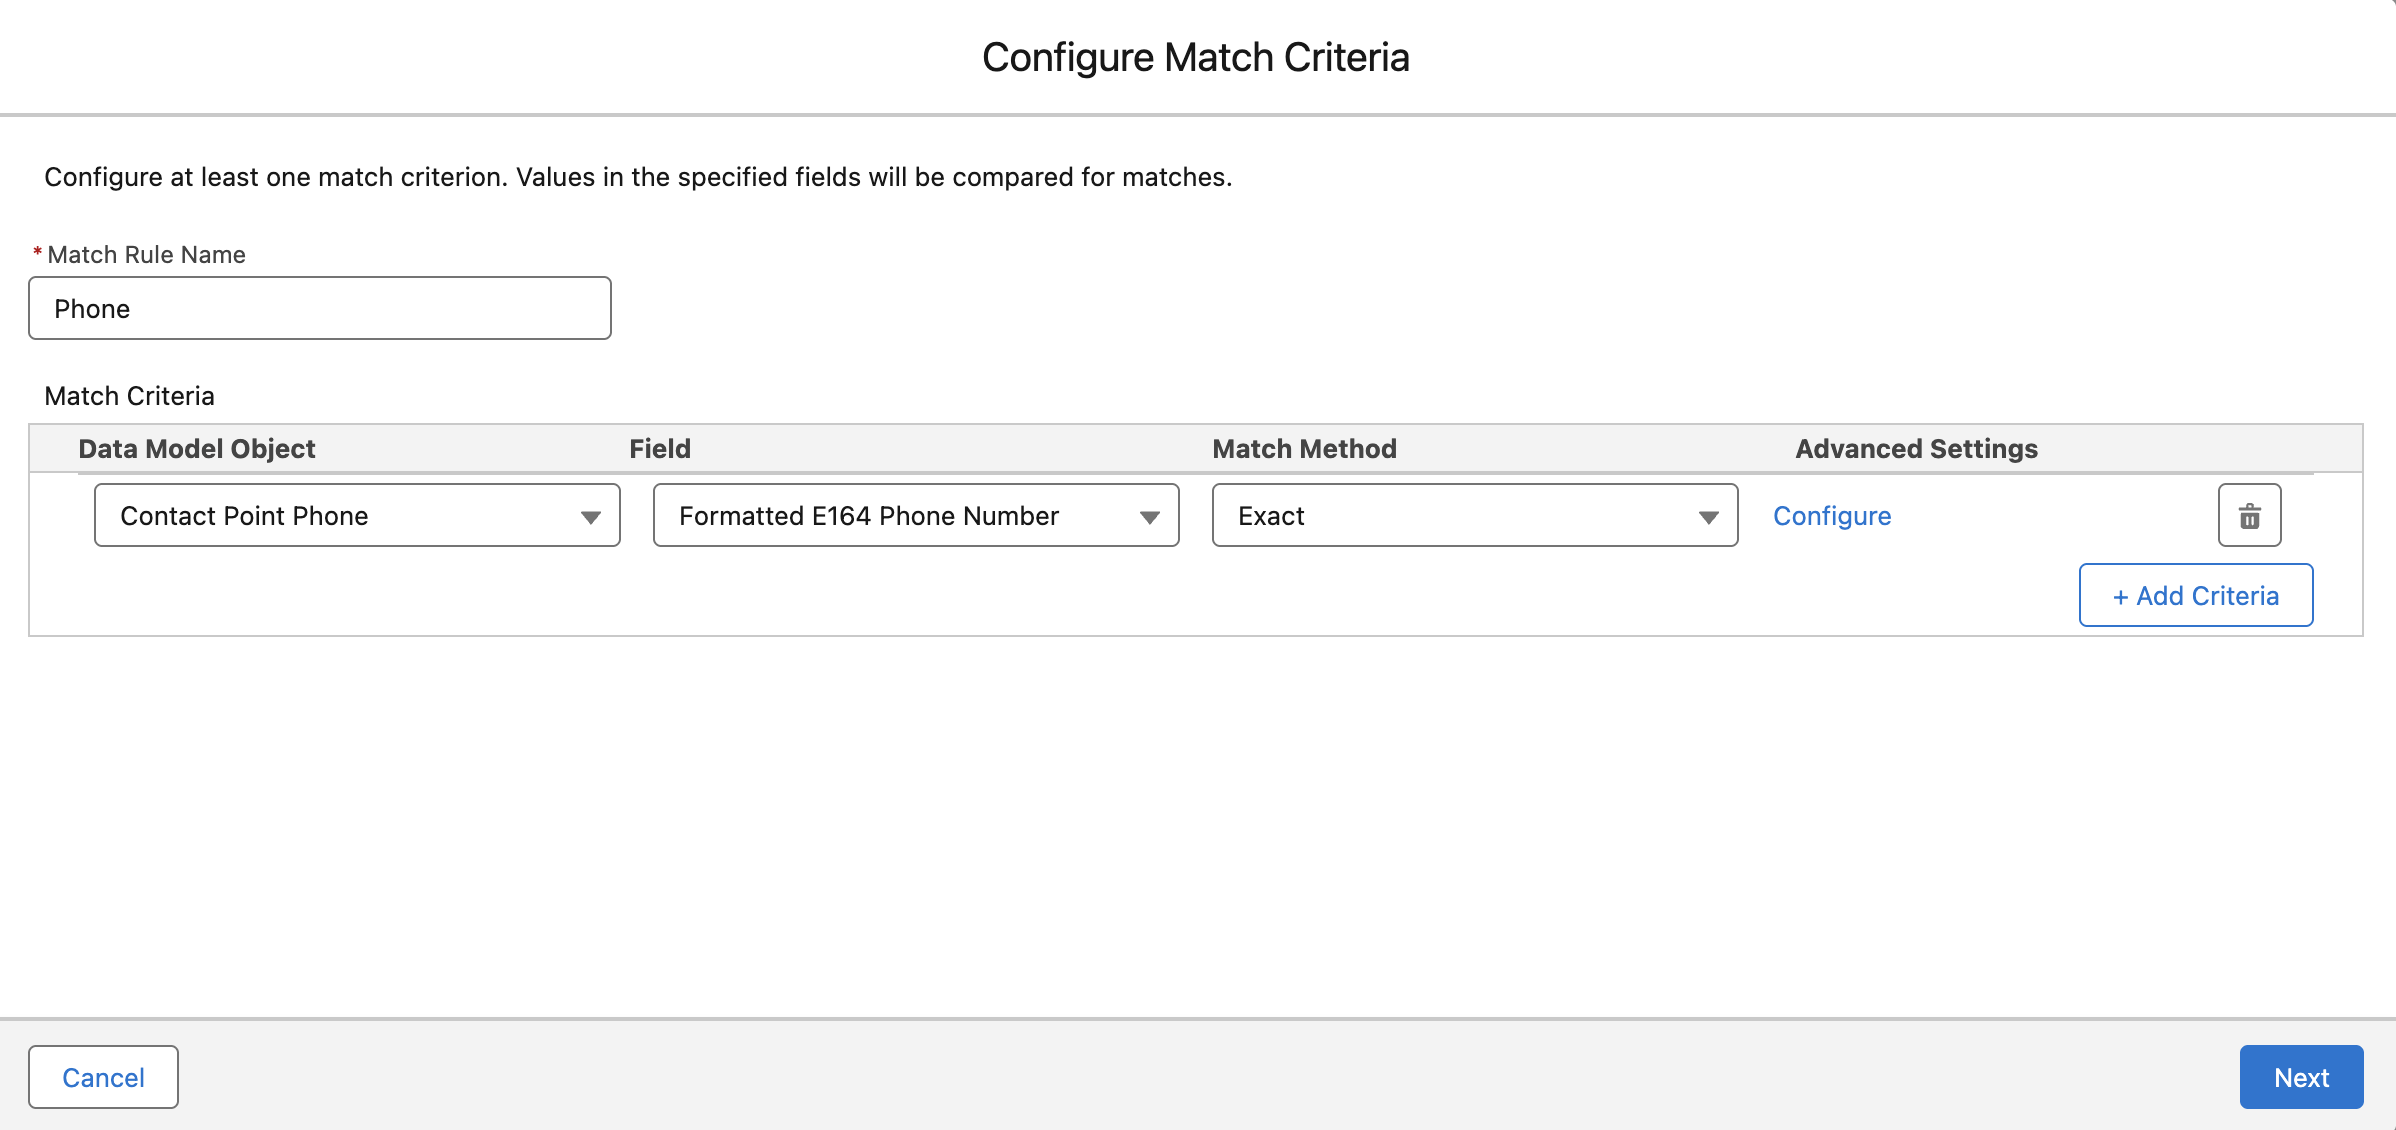
Matching Rule
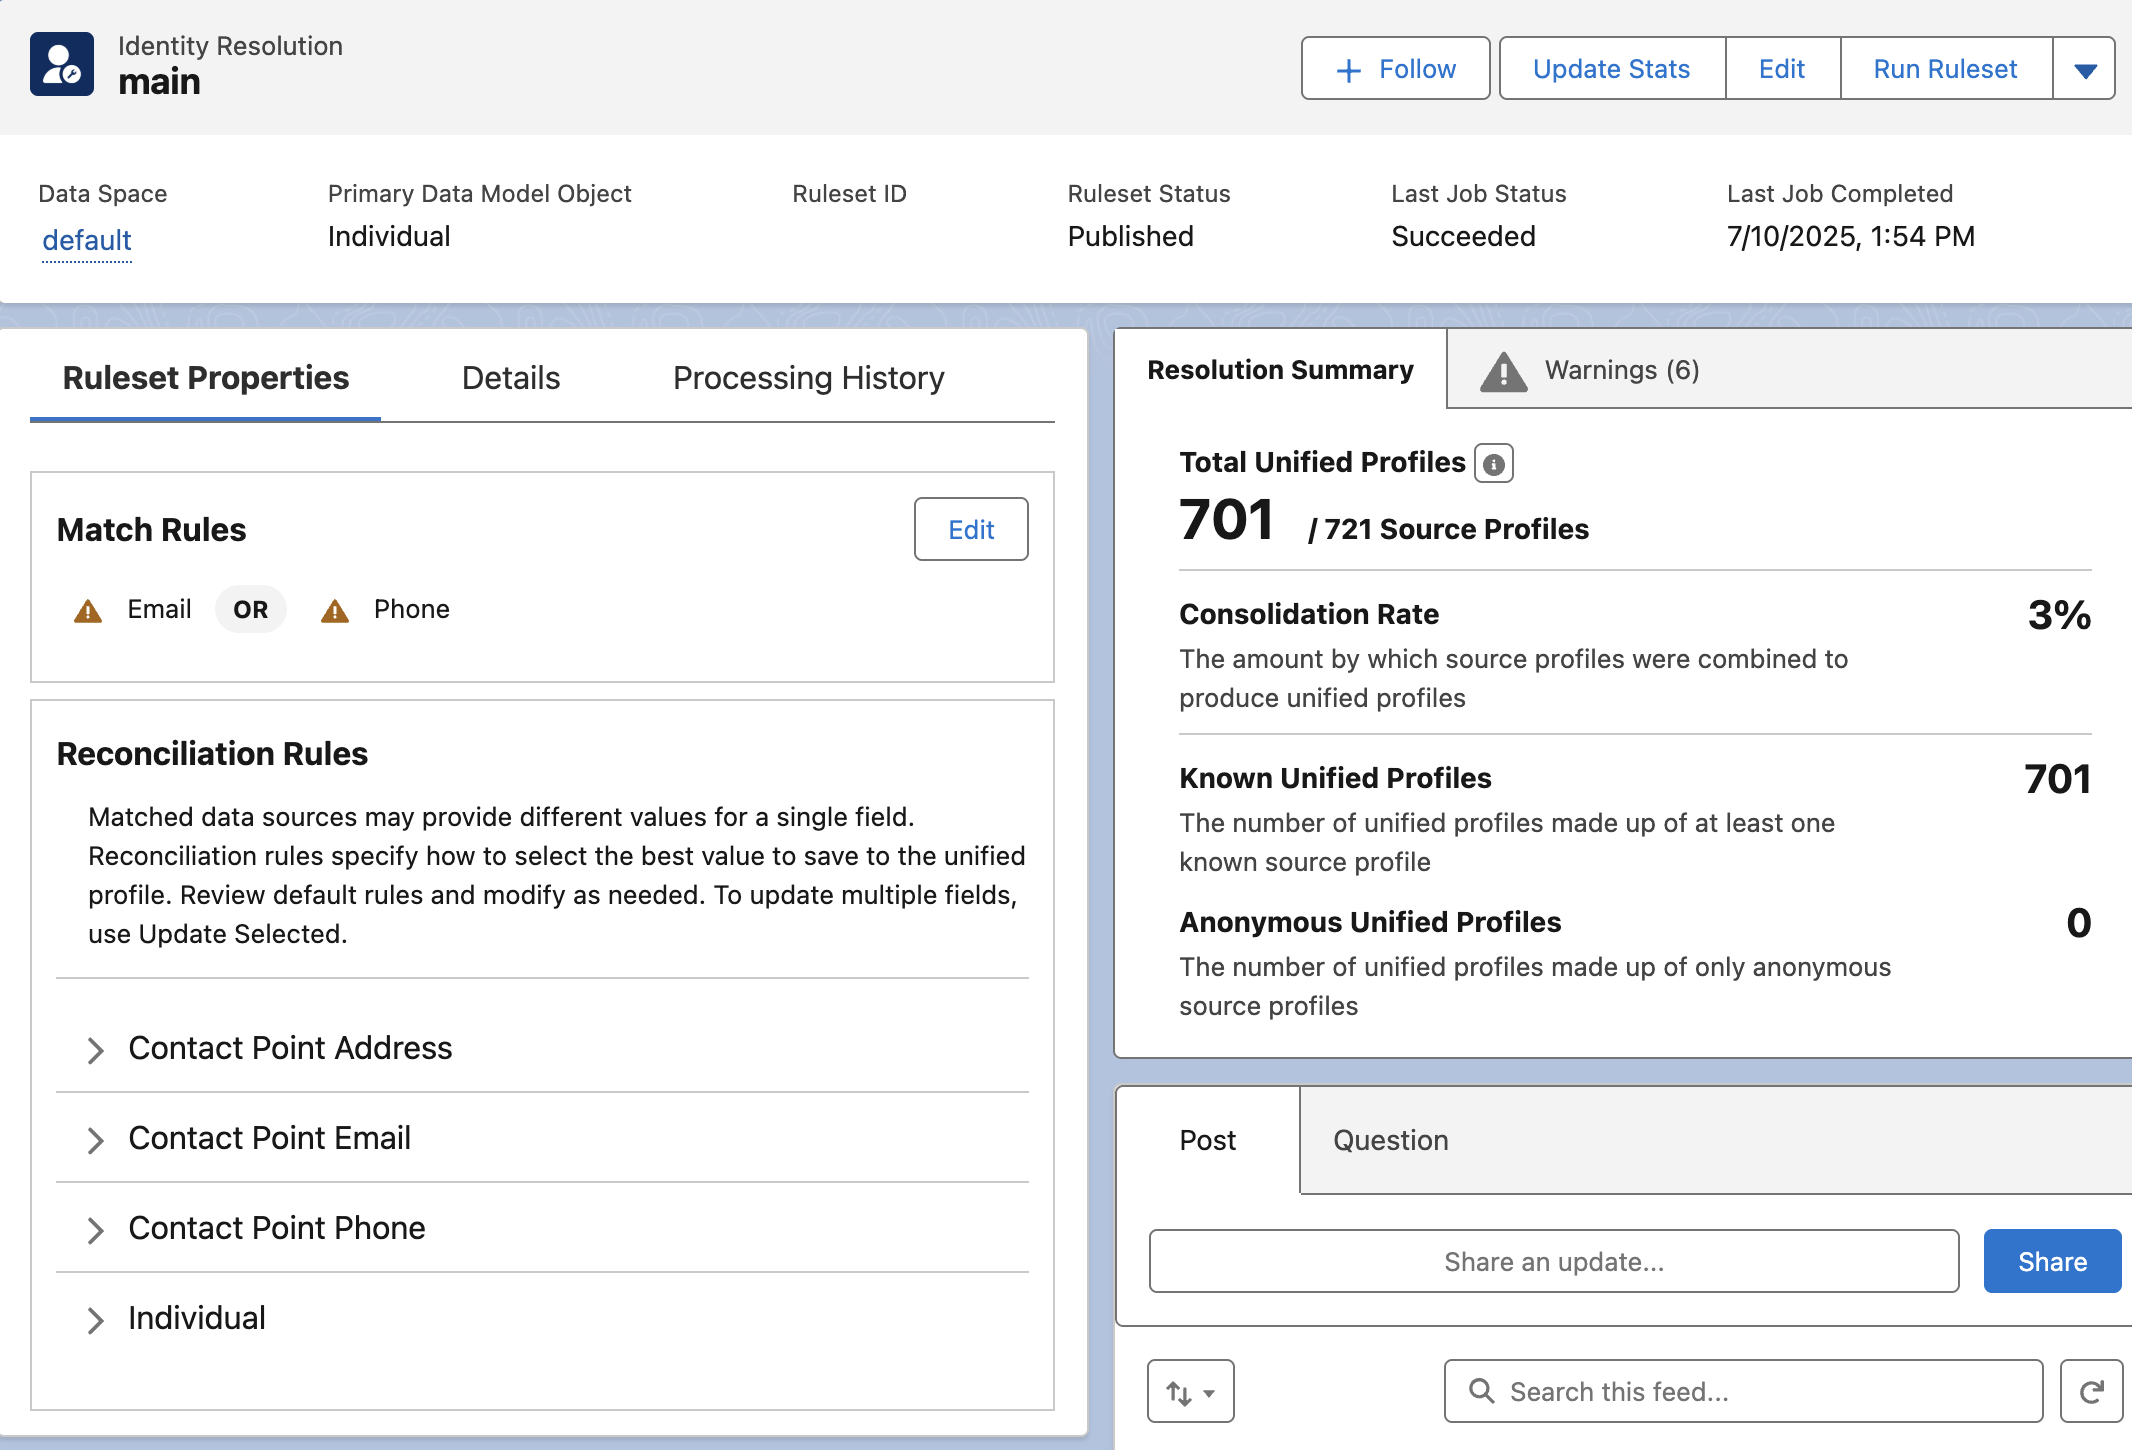
Publish, Run, and Validate
- Publish the Rule Set.
- Run the Rule Set.
- Validate that you get the following results:
📊 4. Calculated Insights
Create and Select Source
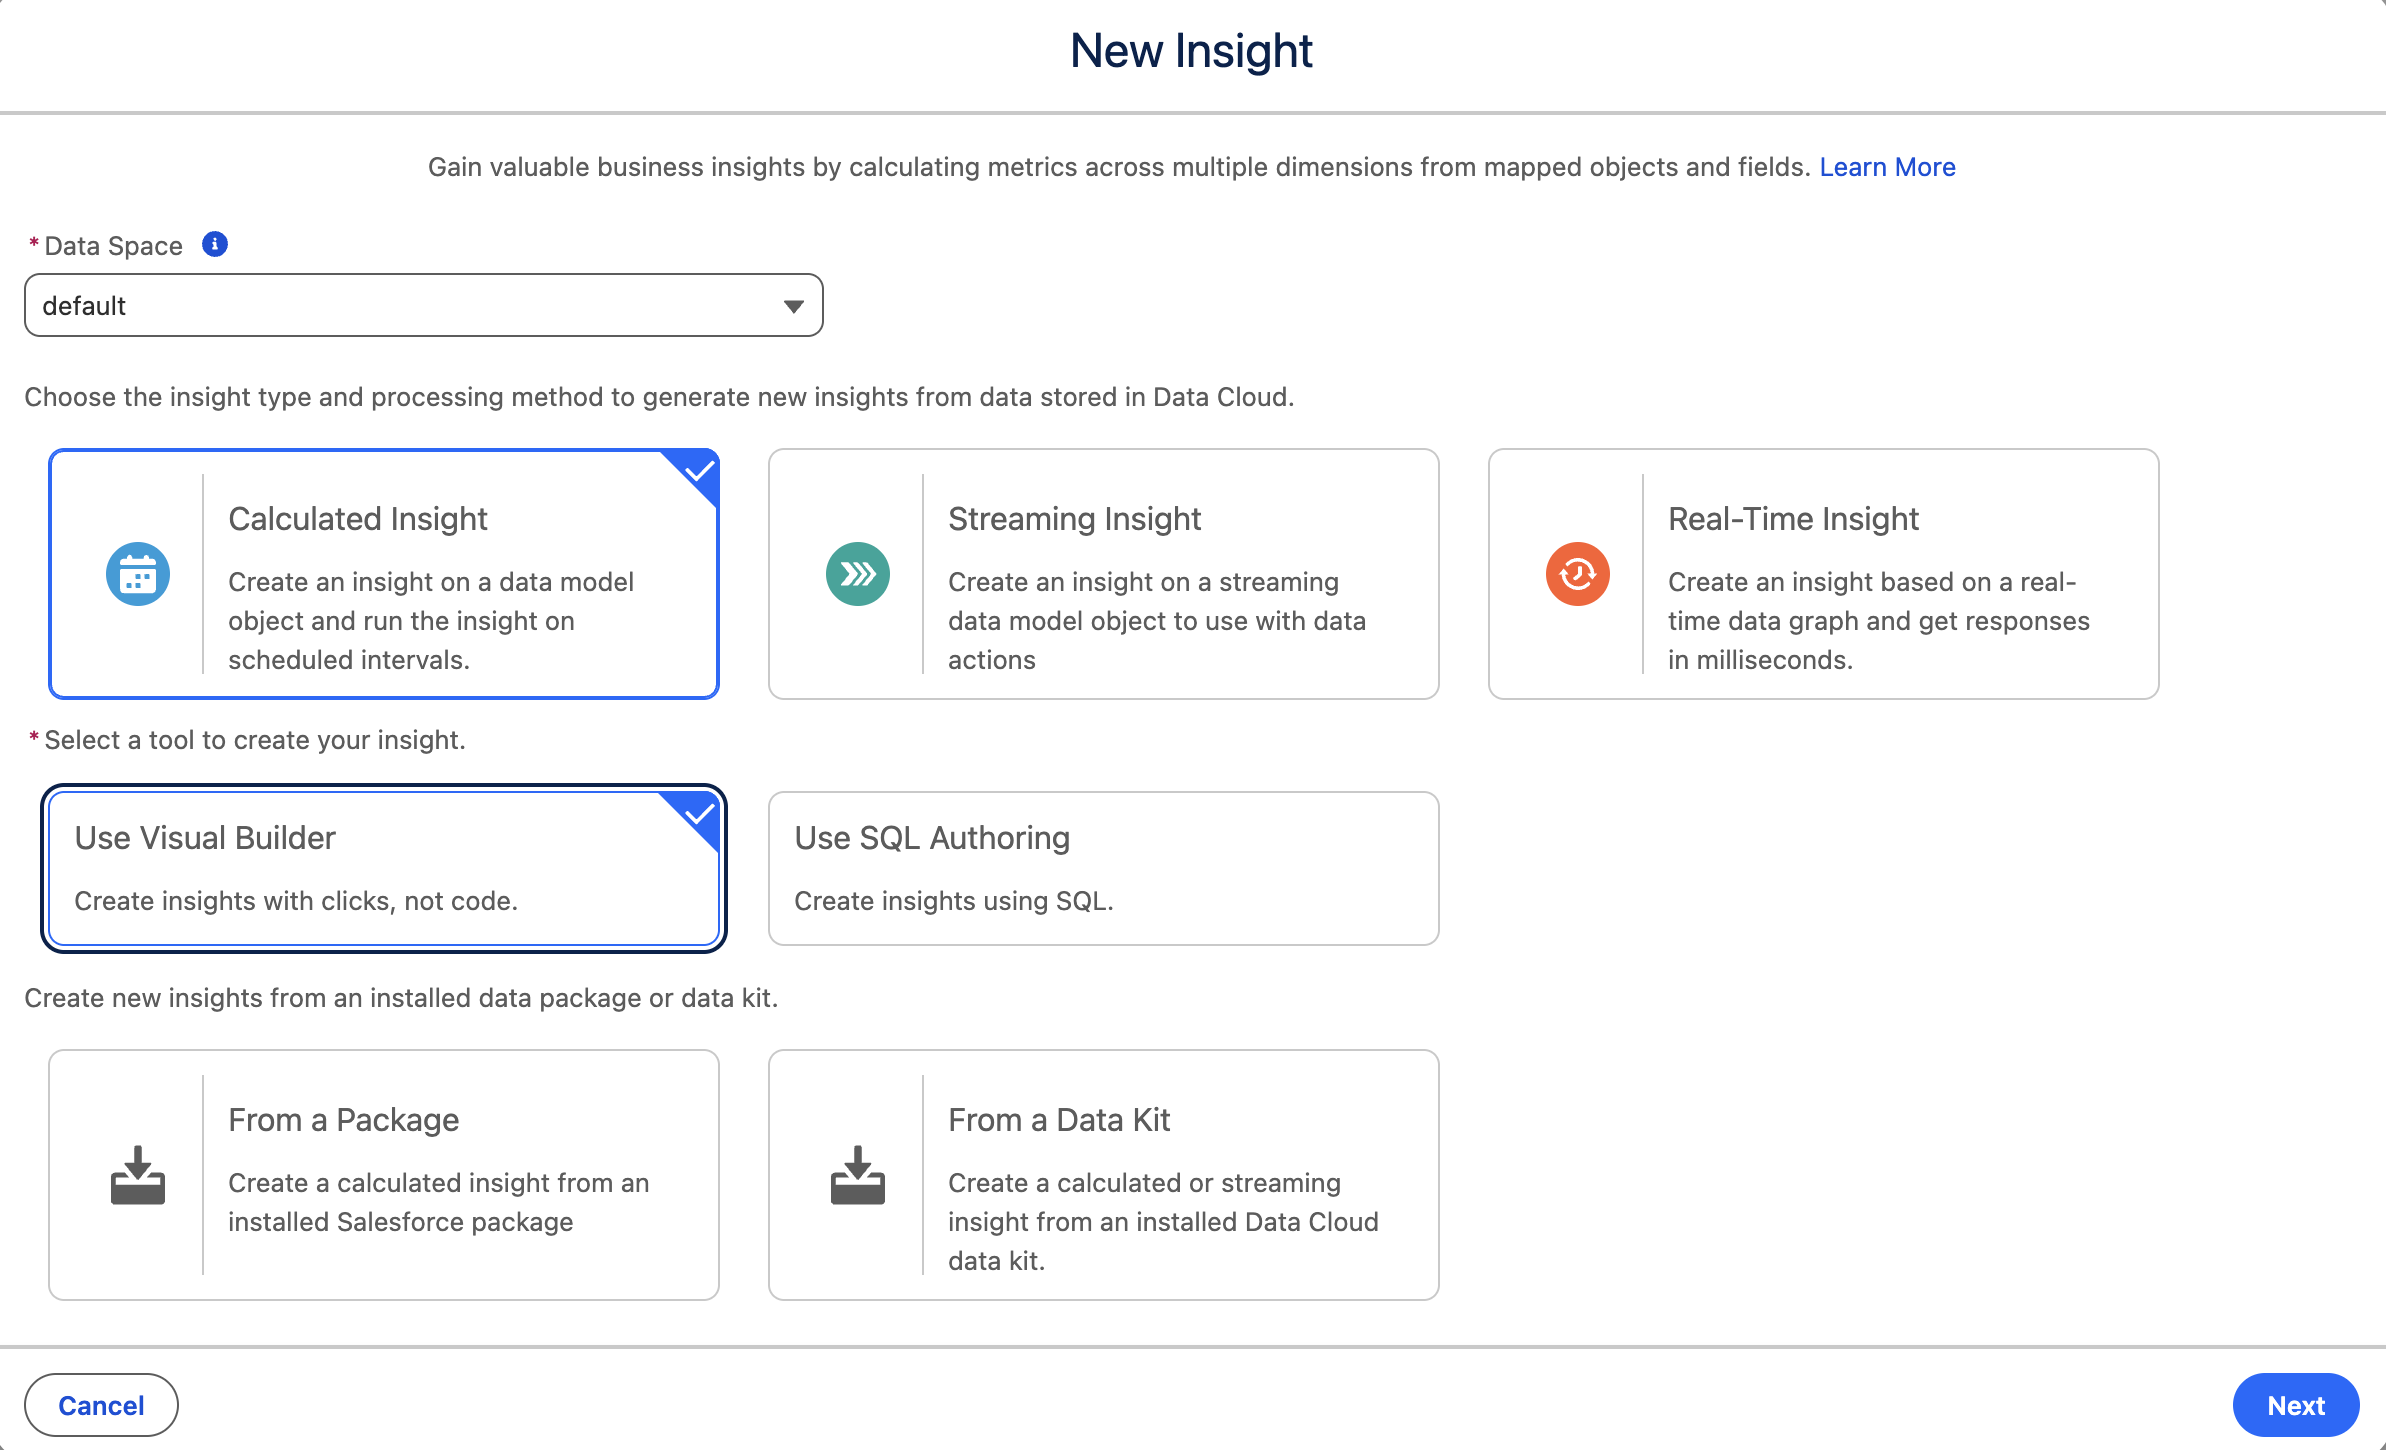
- Go to Calculated Insights.
- Click New Calculated Insight.
- Select Calculated Insight as the type and Visual Builder as the tool.
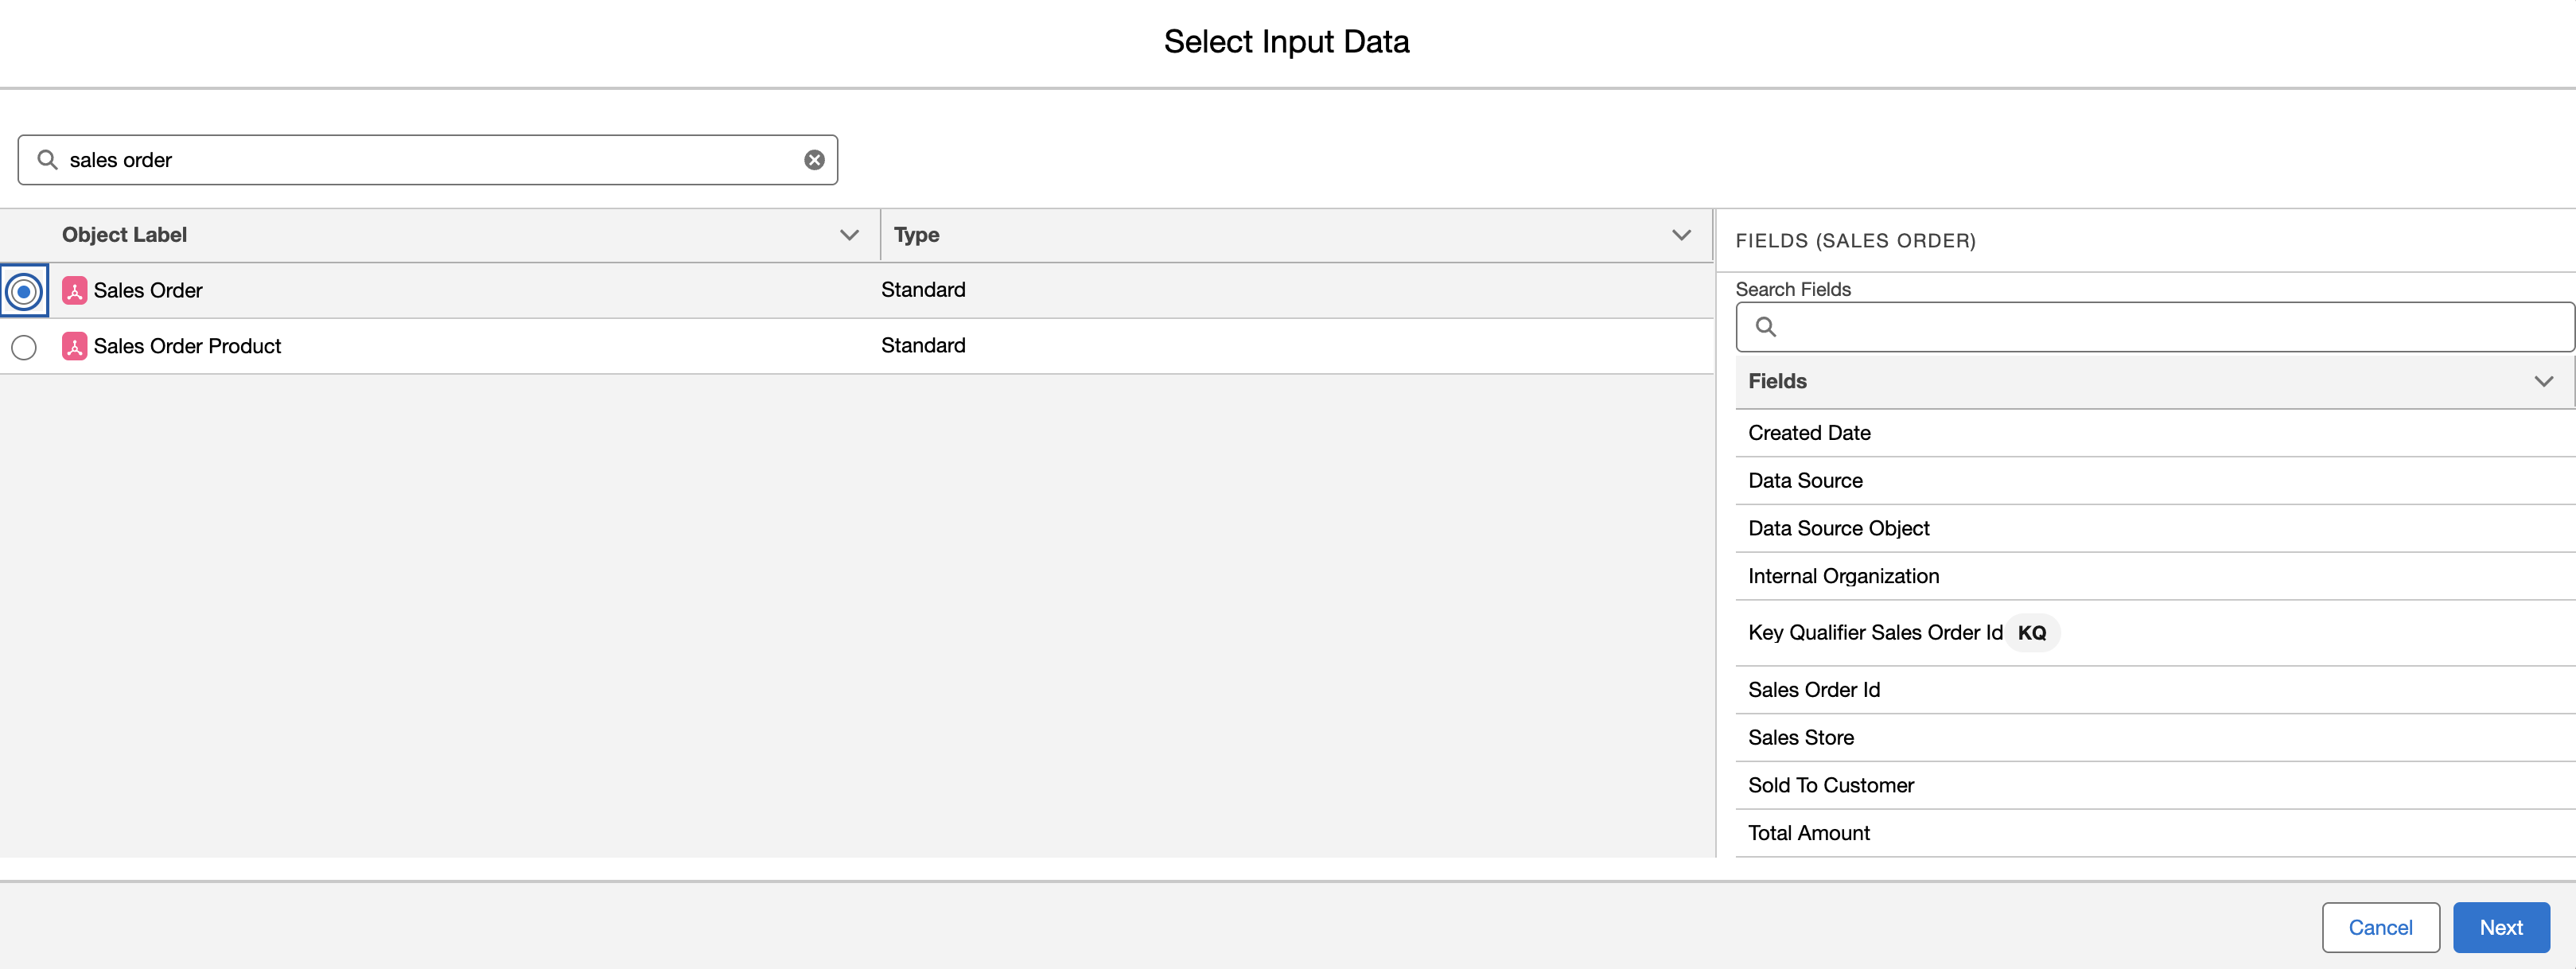
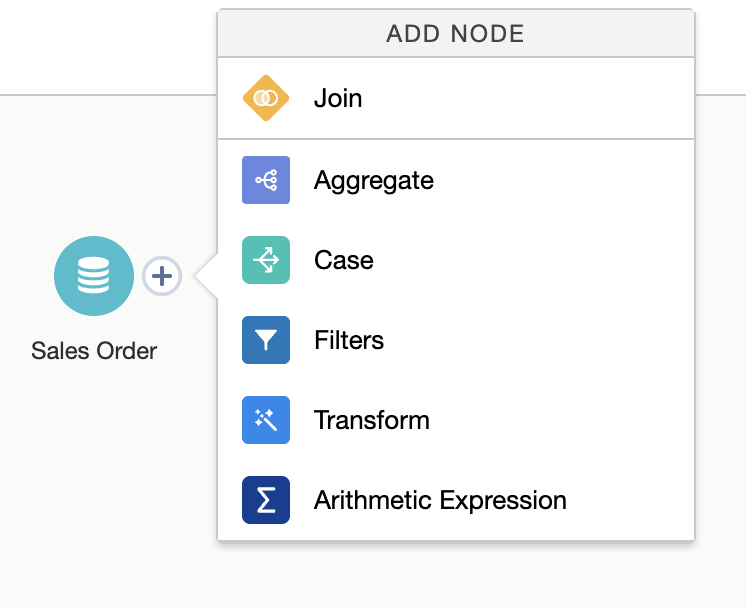
Join Objects
- Join the Sales Order object with the Individual object using the SoldToCustomerId field.
Configure the join as follows:
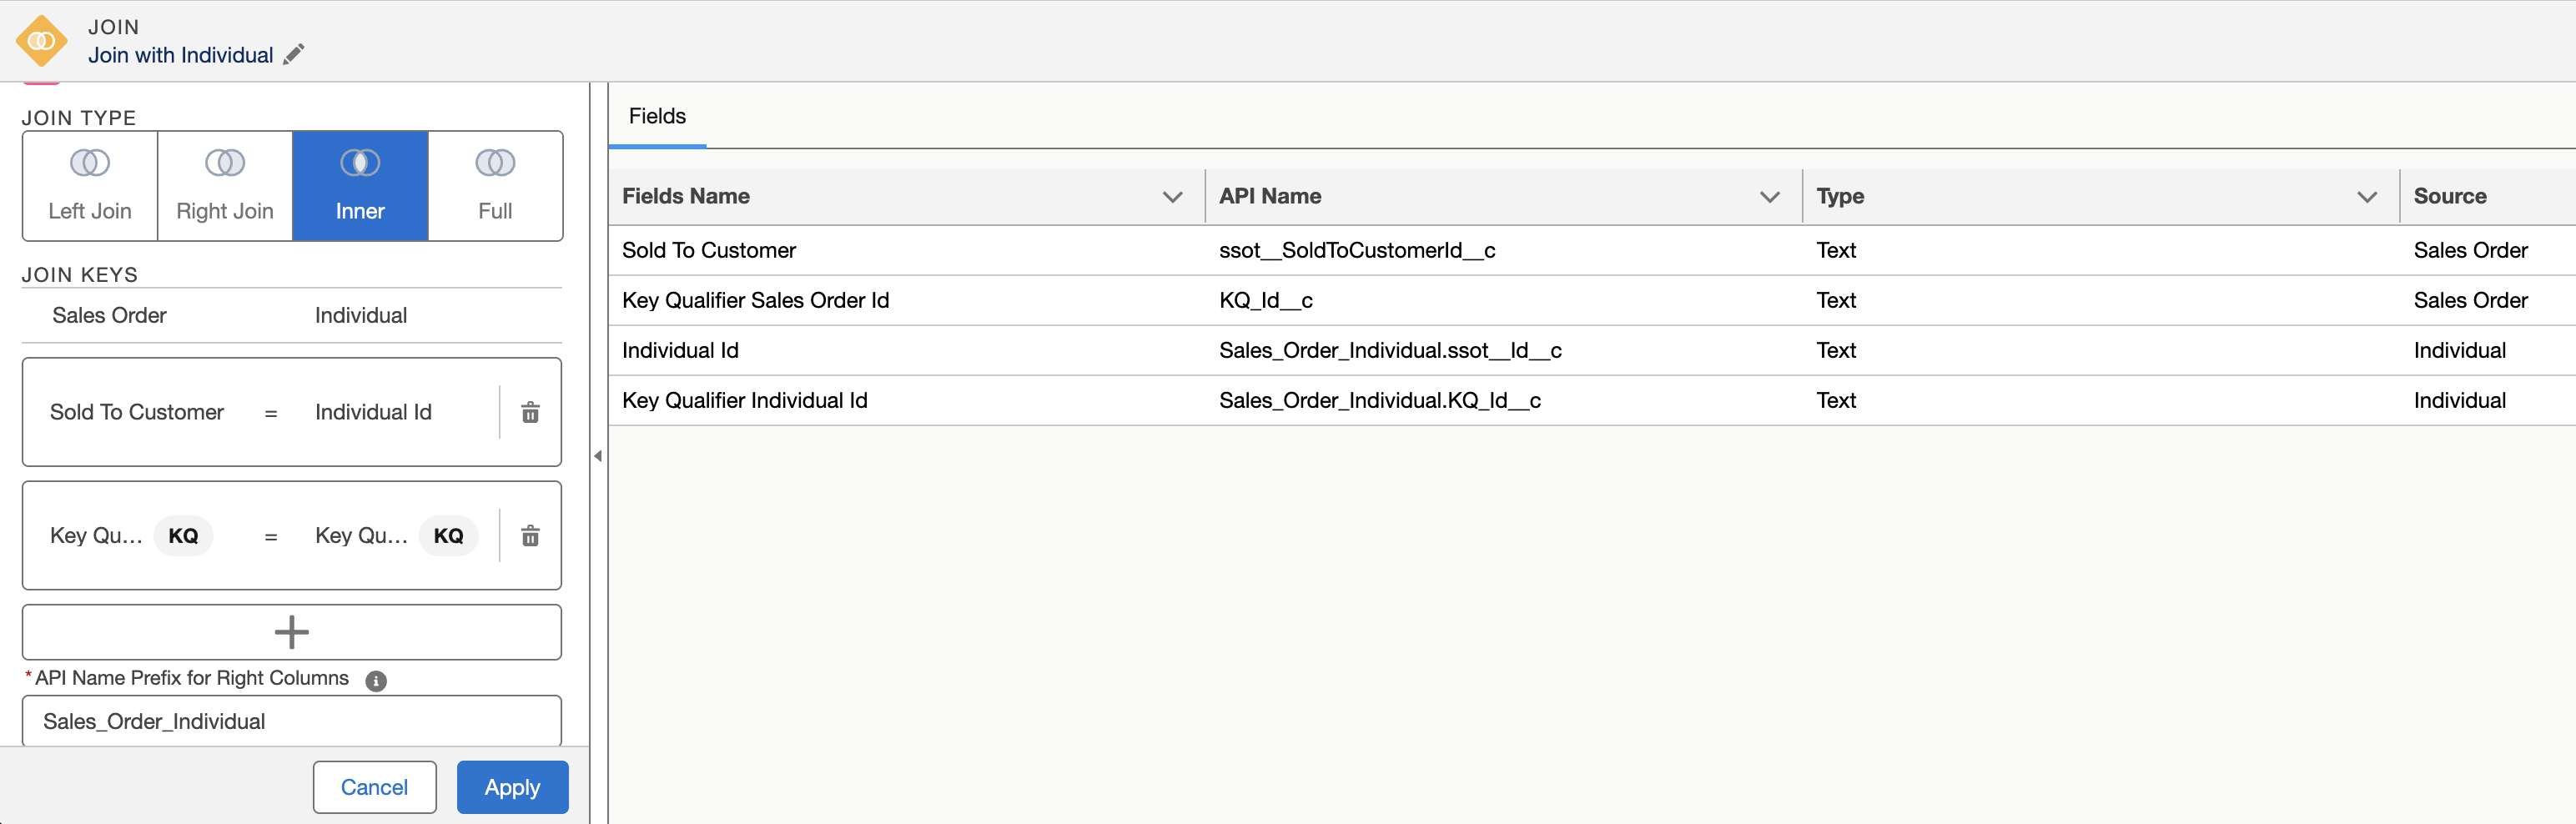
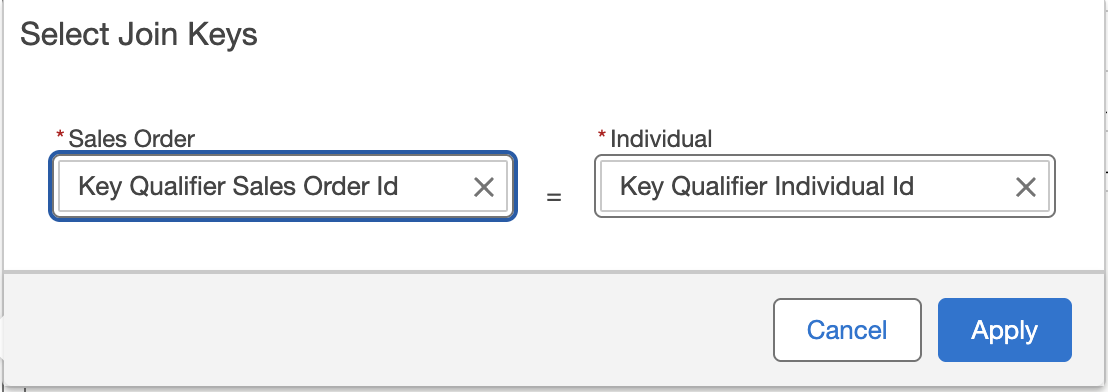
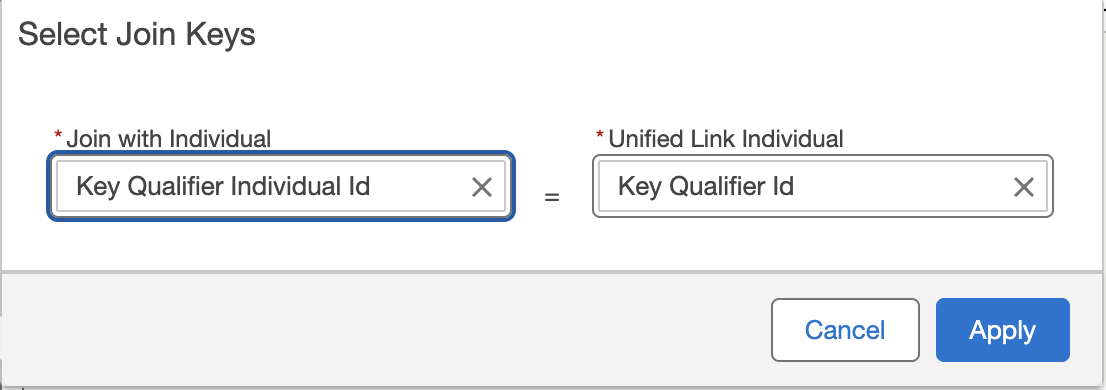
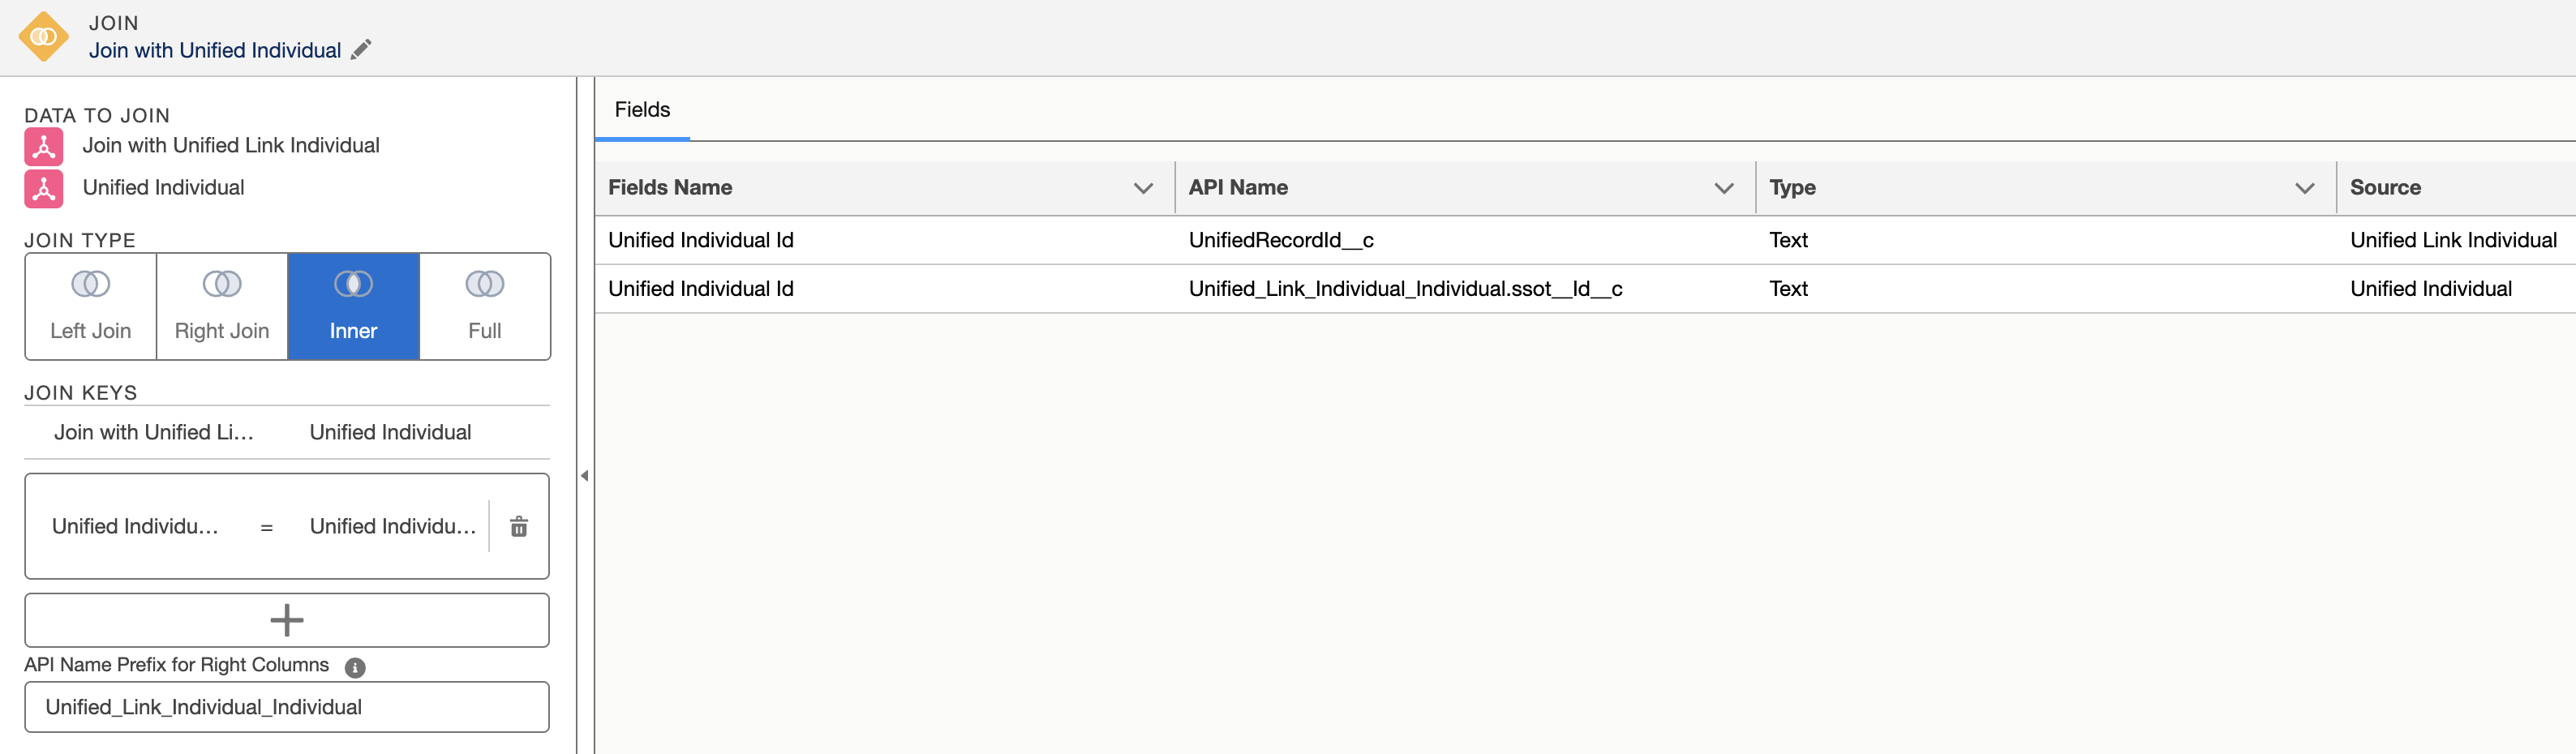
- Join the previous join with the Unified Link Individual object using the Individual id field.
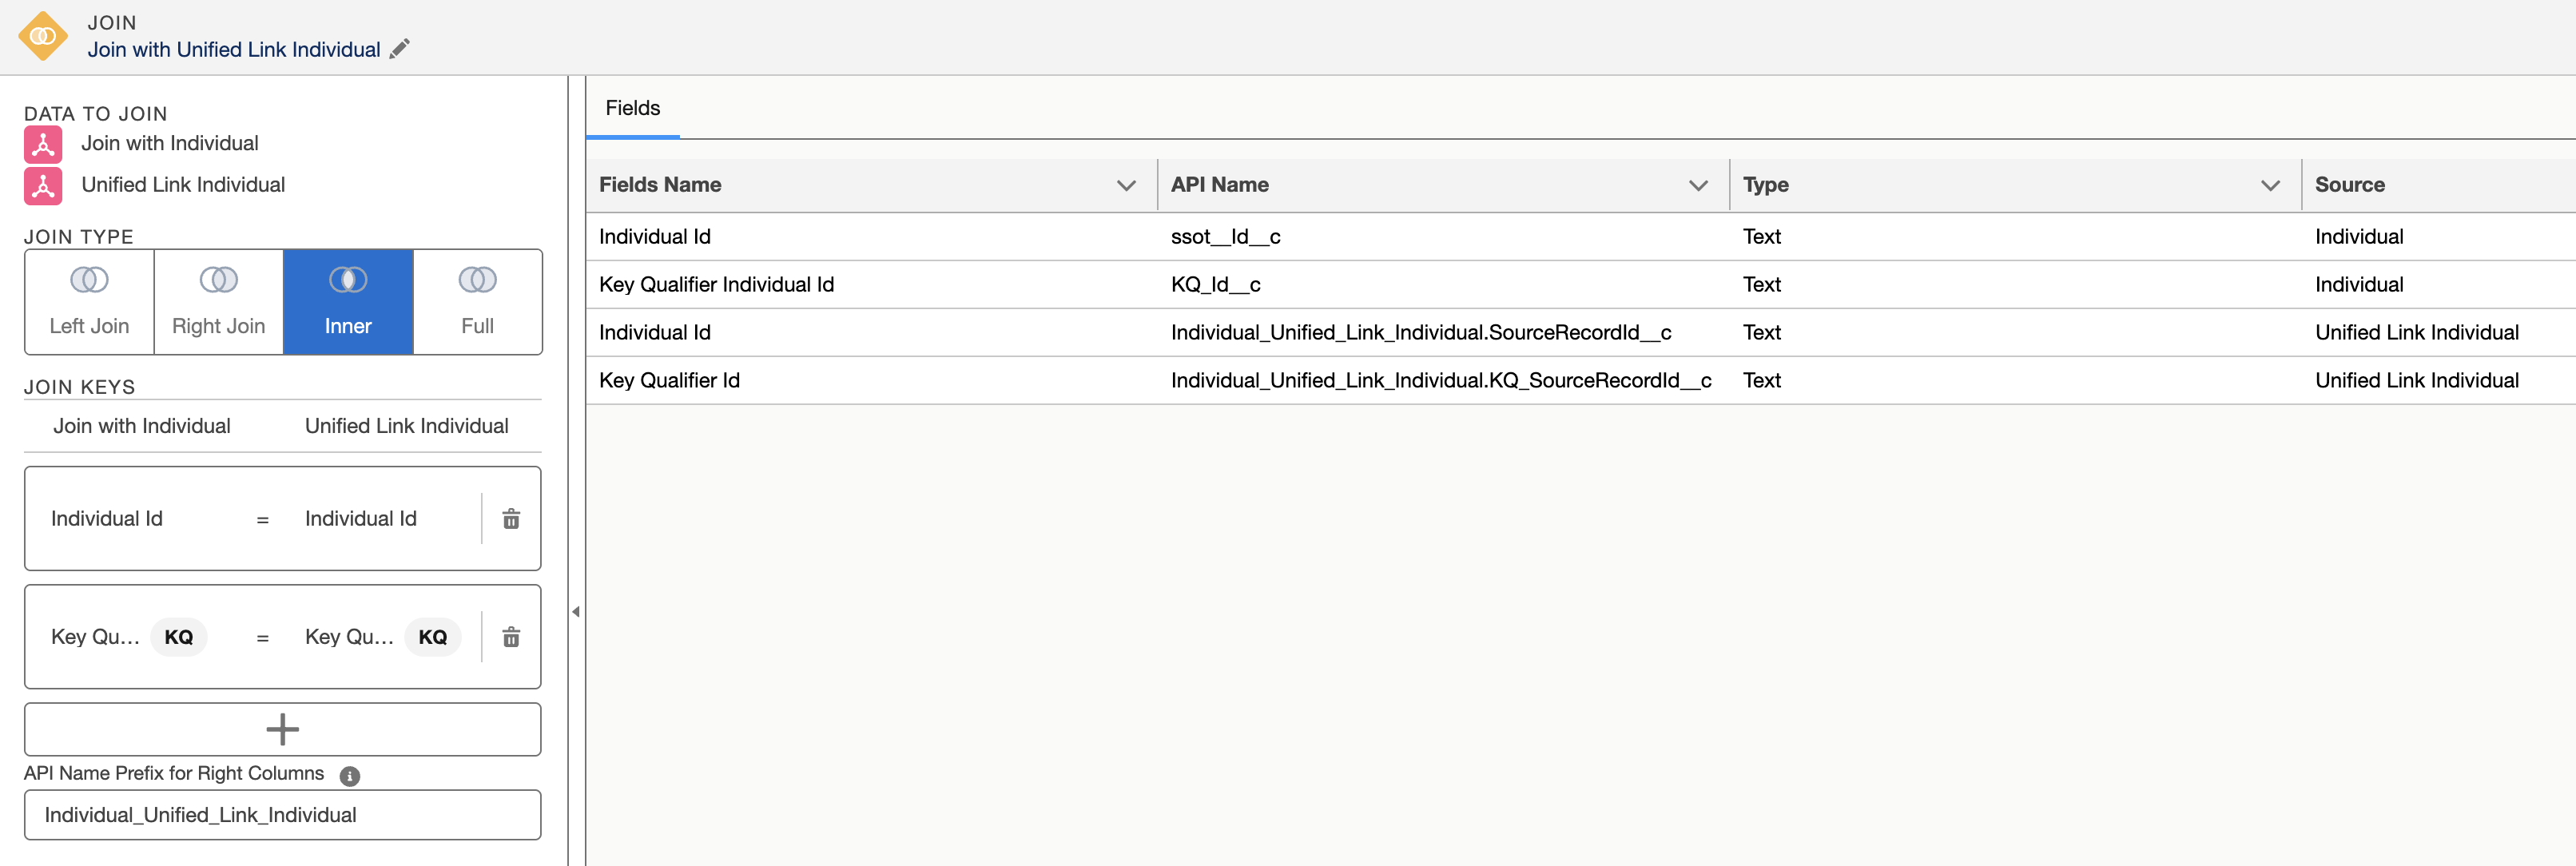
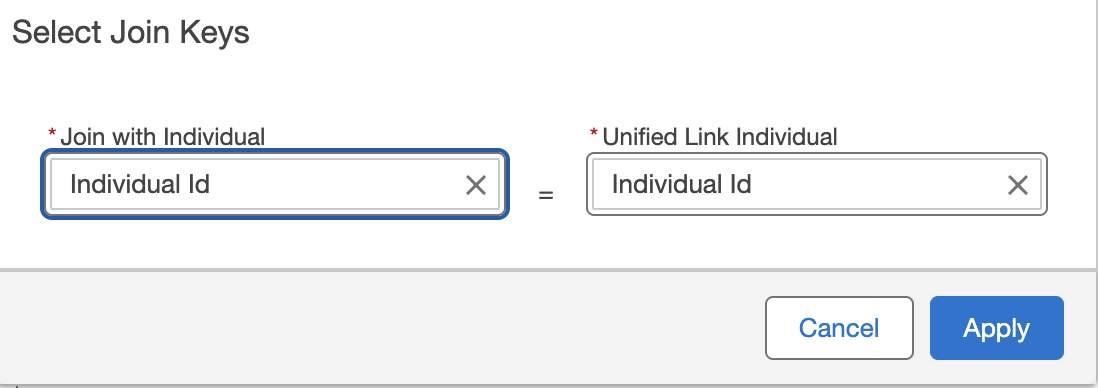
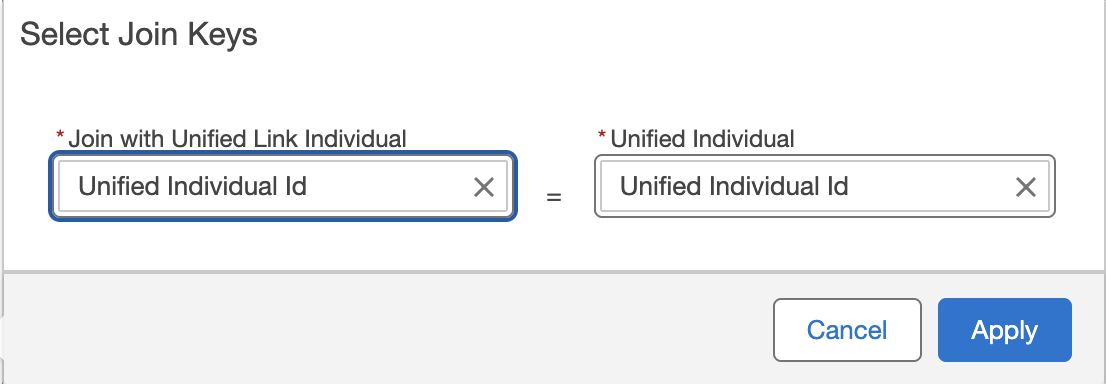
- Join the previous join with the Unified Individual object using the Unified Individual id field.
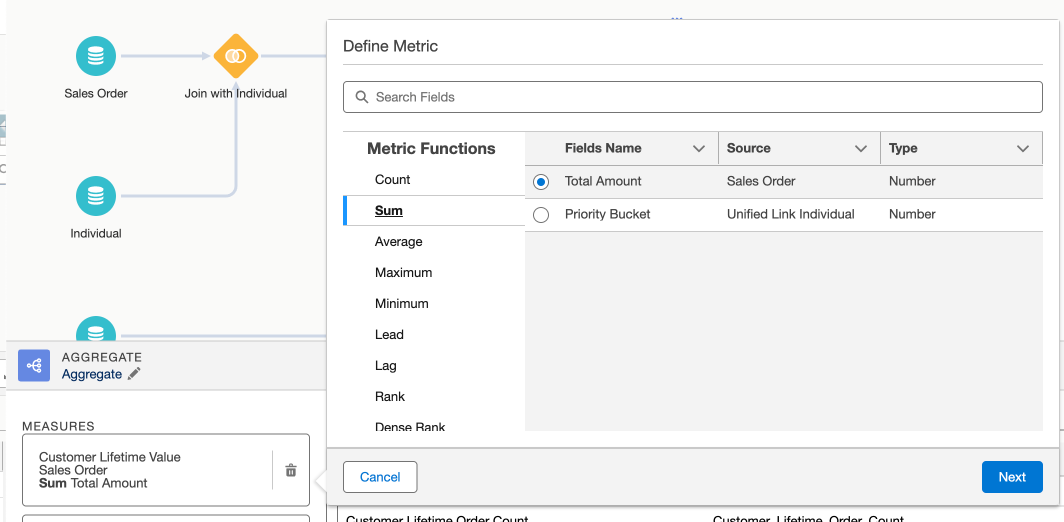
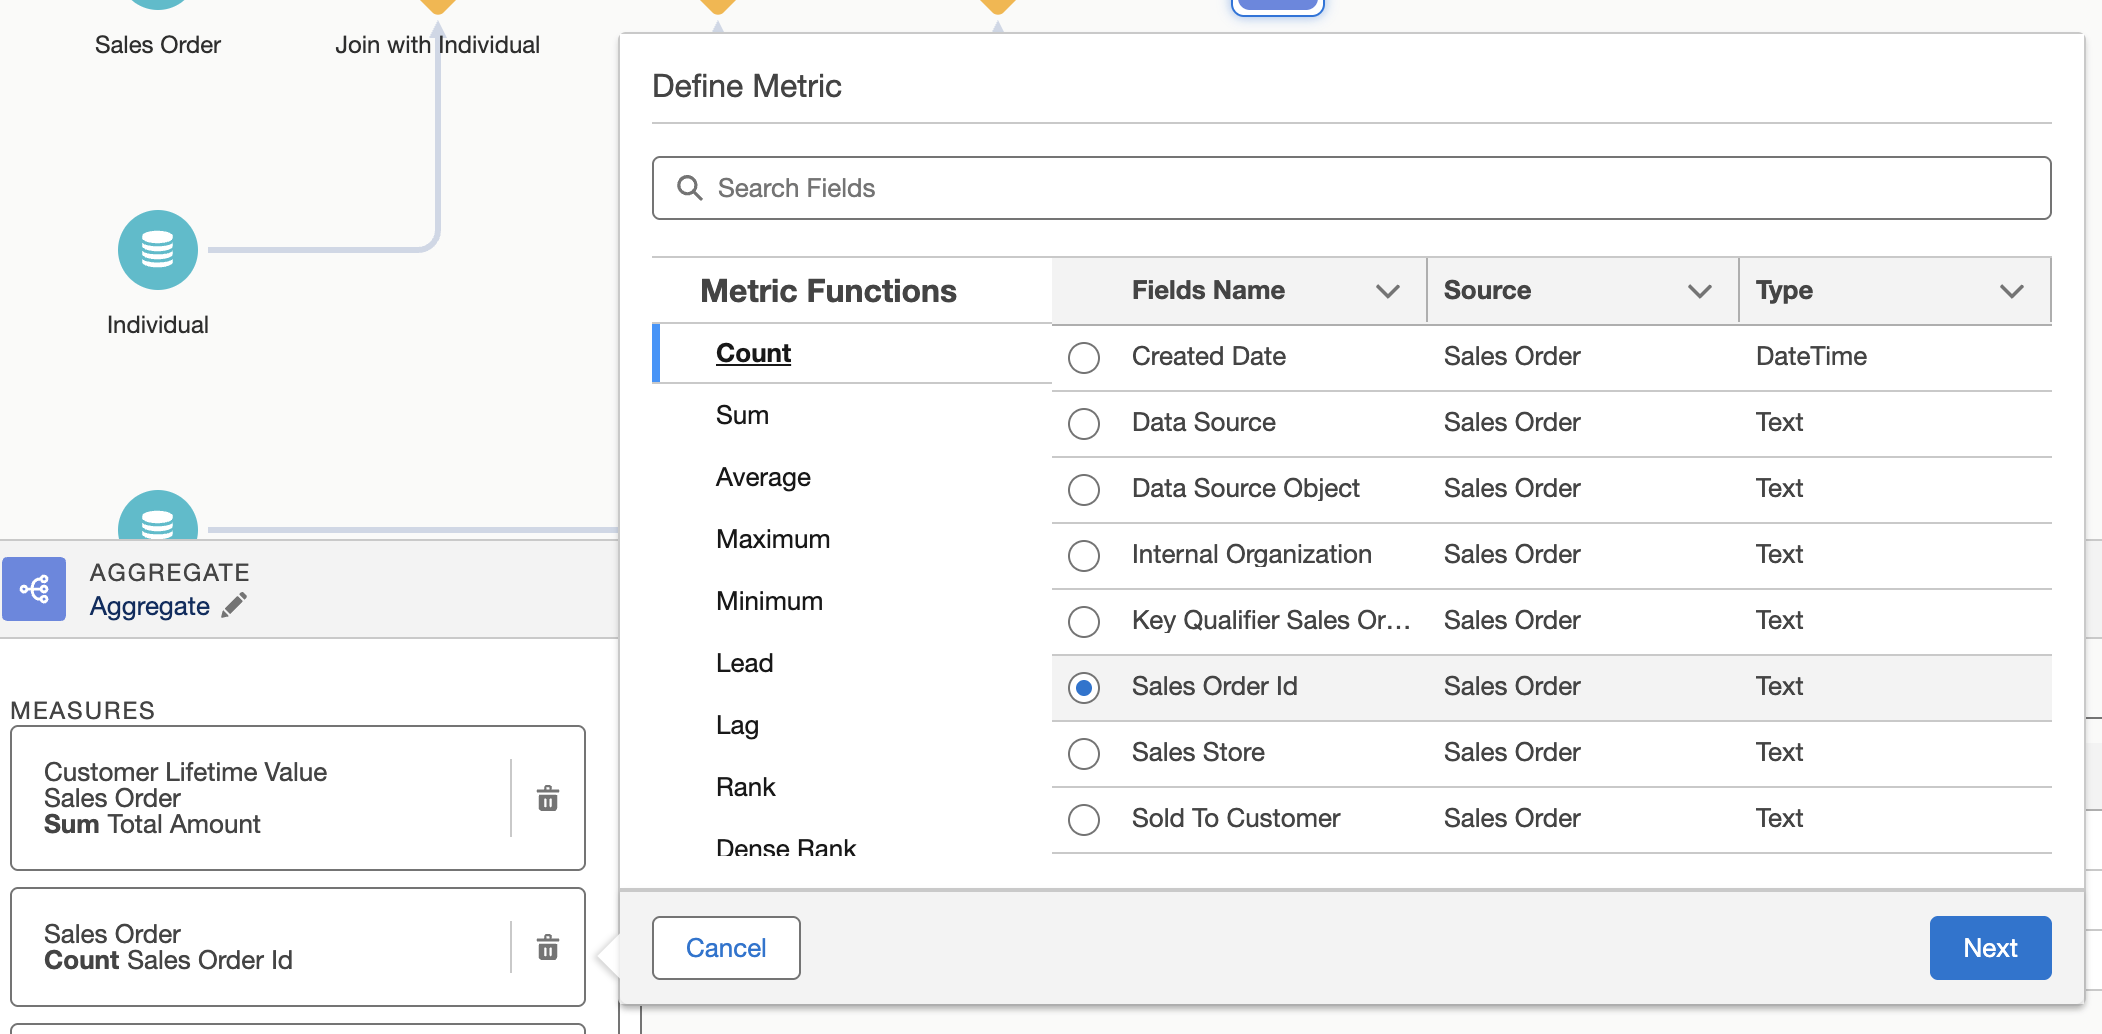
Define Aggregations
- Add an Aggregate node to calculate the total number of Sales Orders and the total amount of Sales Orders.

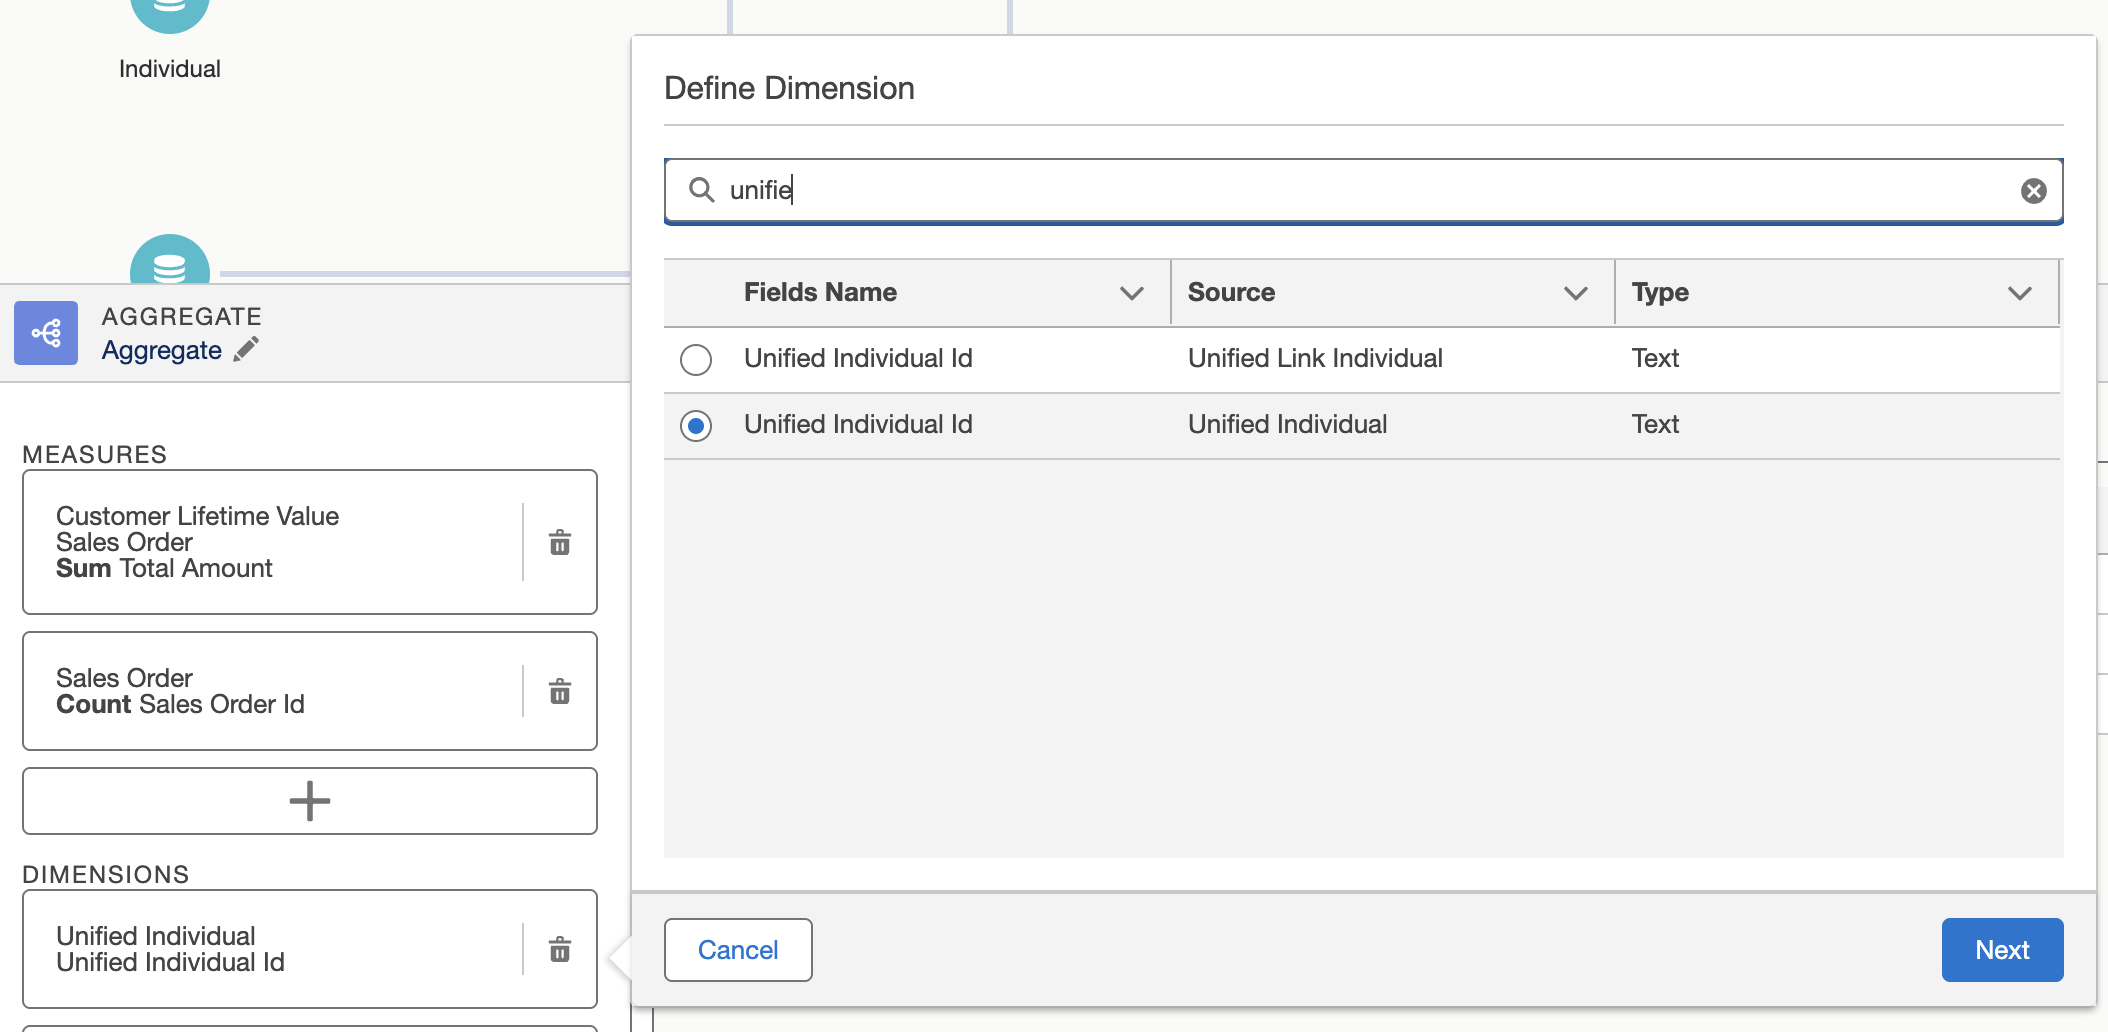
- Configure the following Measures and Dimensions:
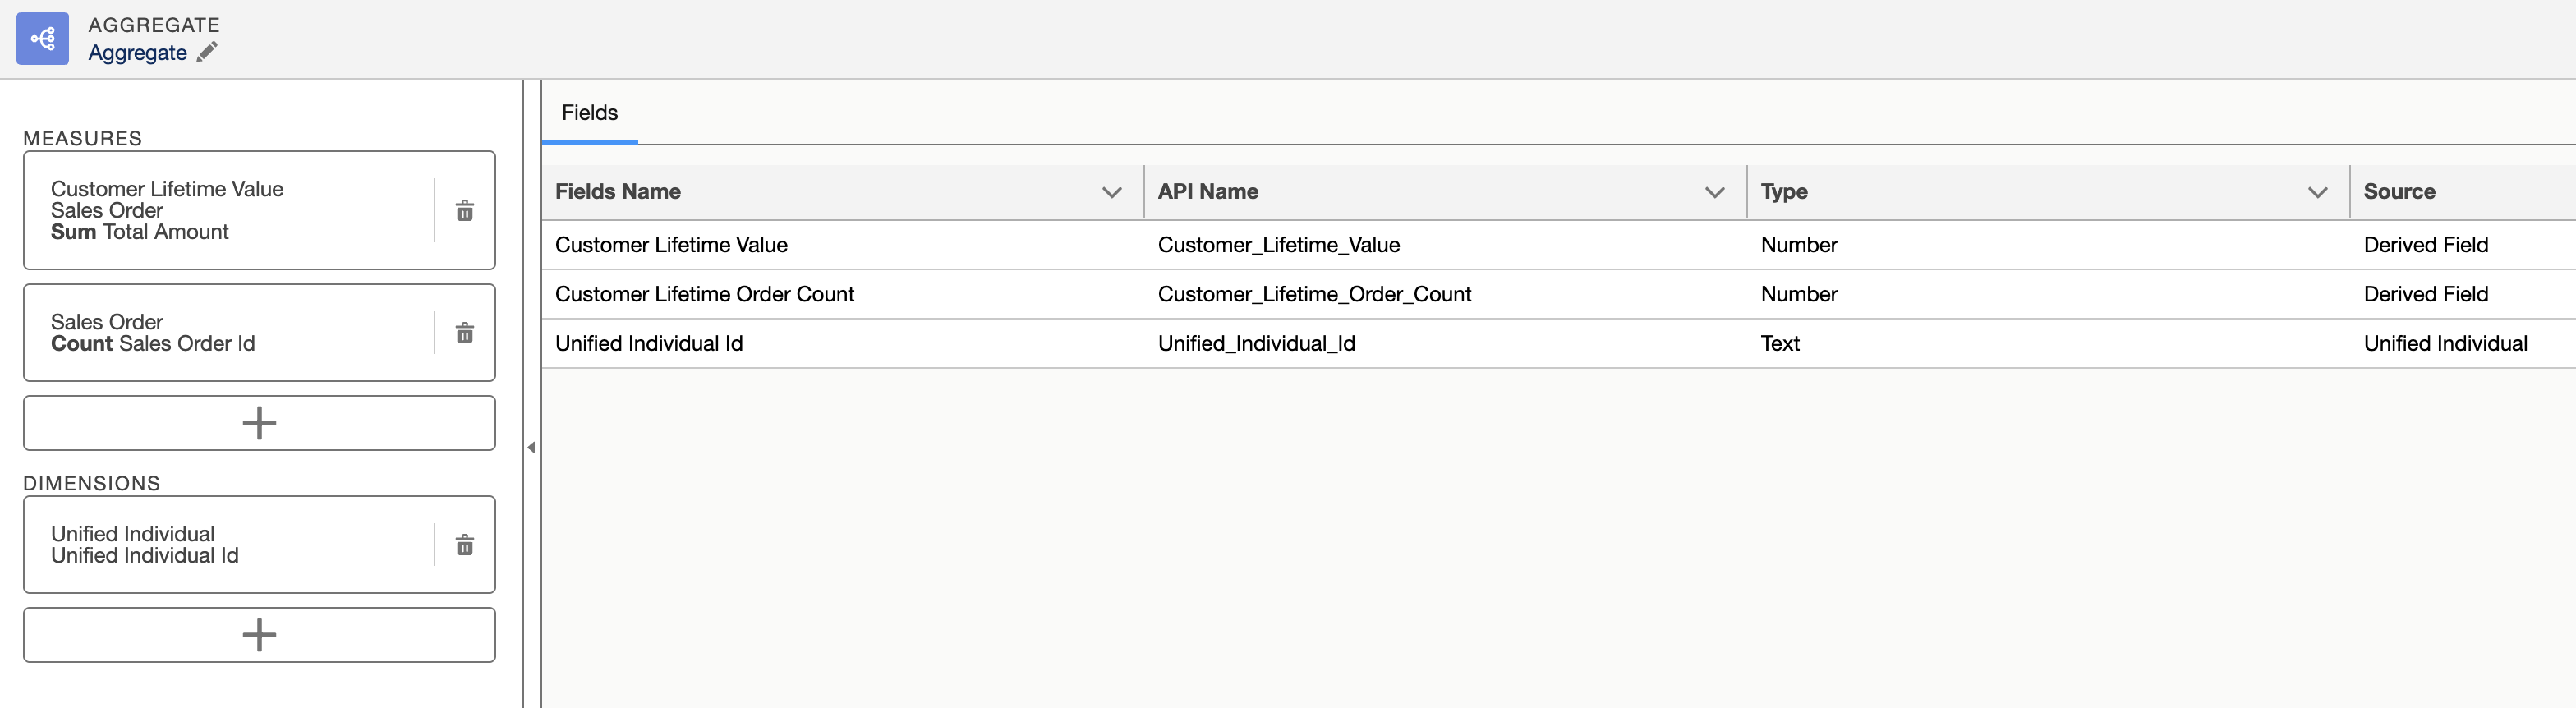
Make sure to select the Unified Individual object as the Source Object for the Unified Individual Id field.
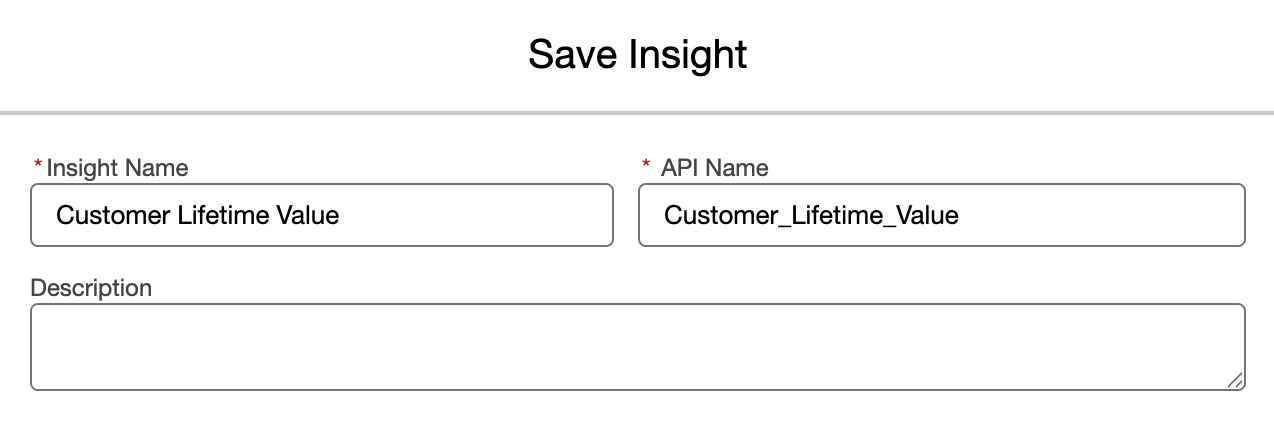
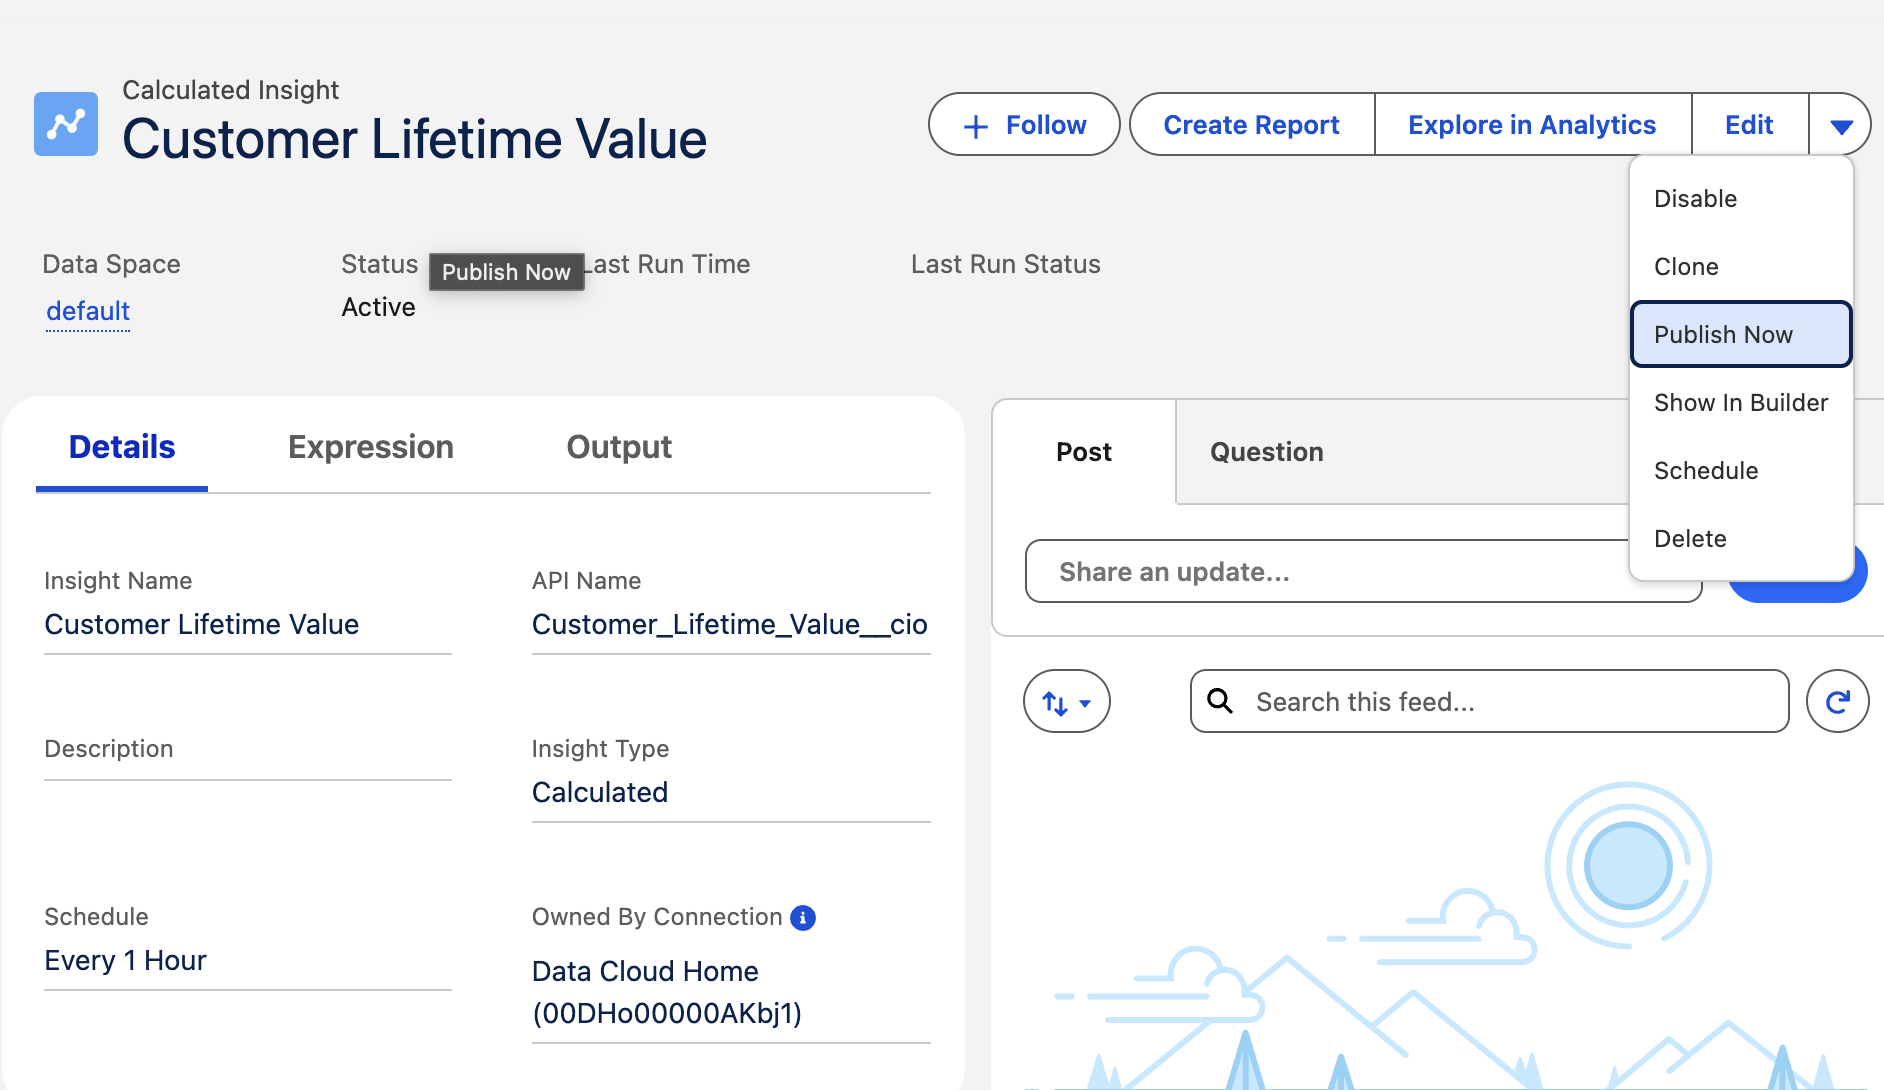
Save, Schedule, and Publish
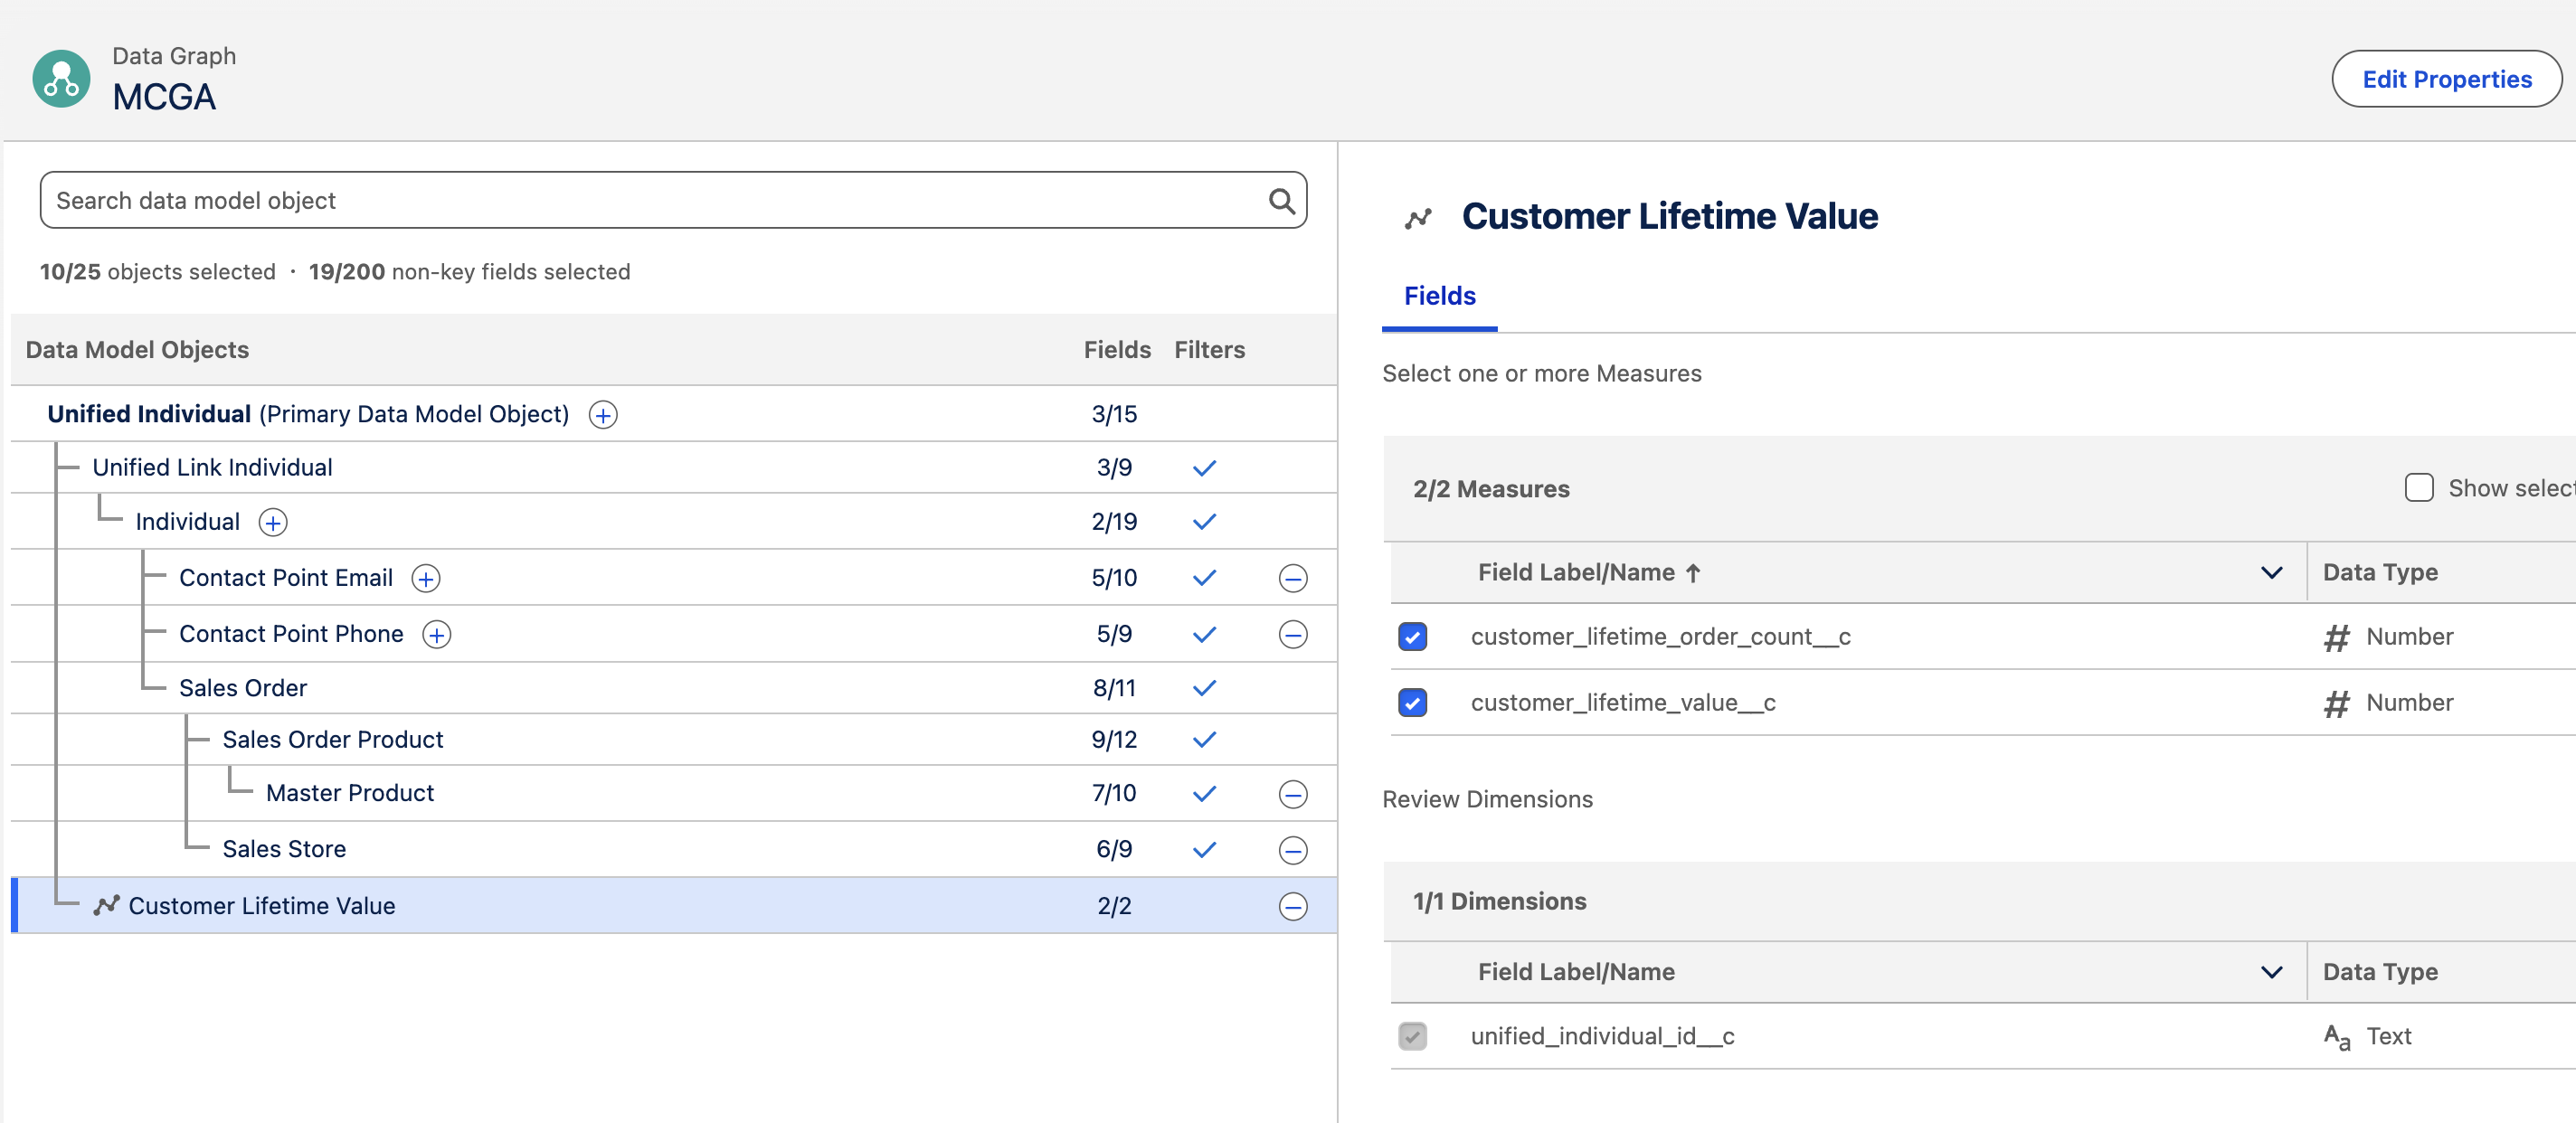
- Save it as Customer Lifetime Value.
- Schedule it to run every hour.
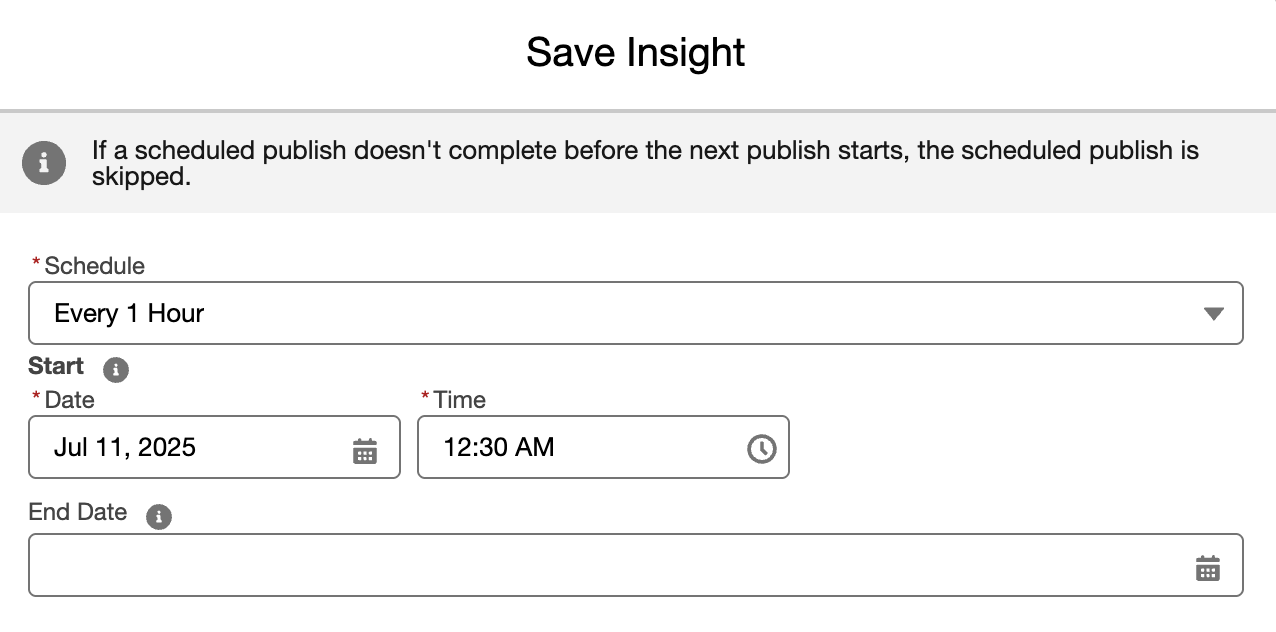
- Click Publish Now.
🎯 5. Segmentation
Create and Name the Segment
- Go to Segments.
- Click New Segment.
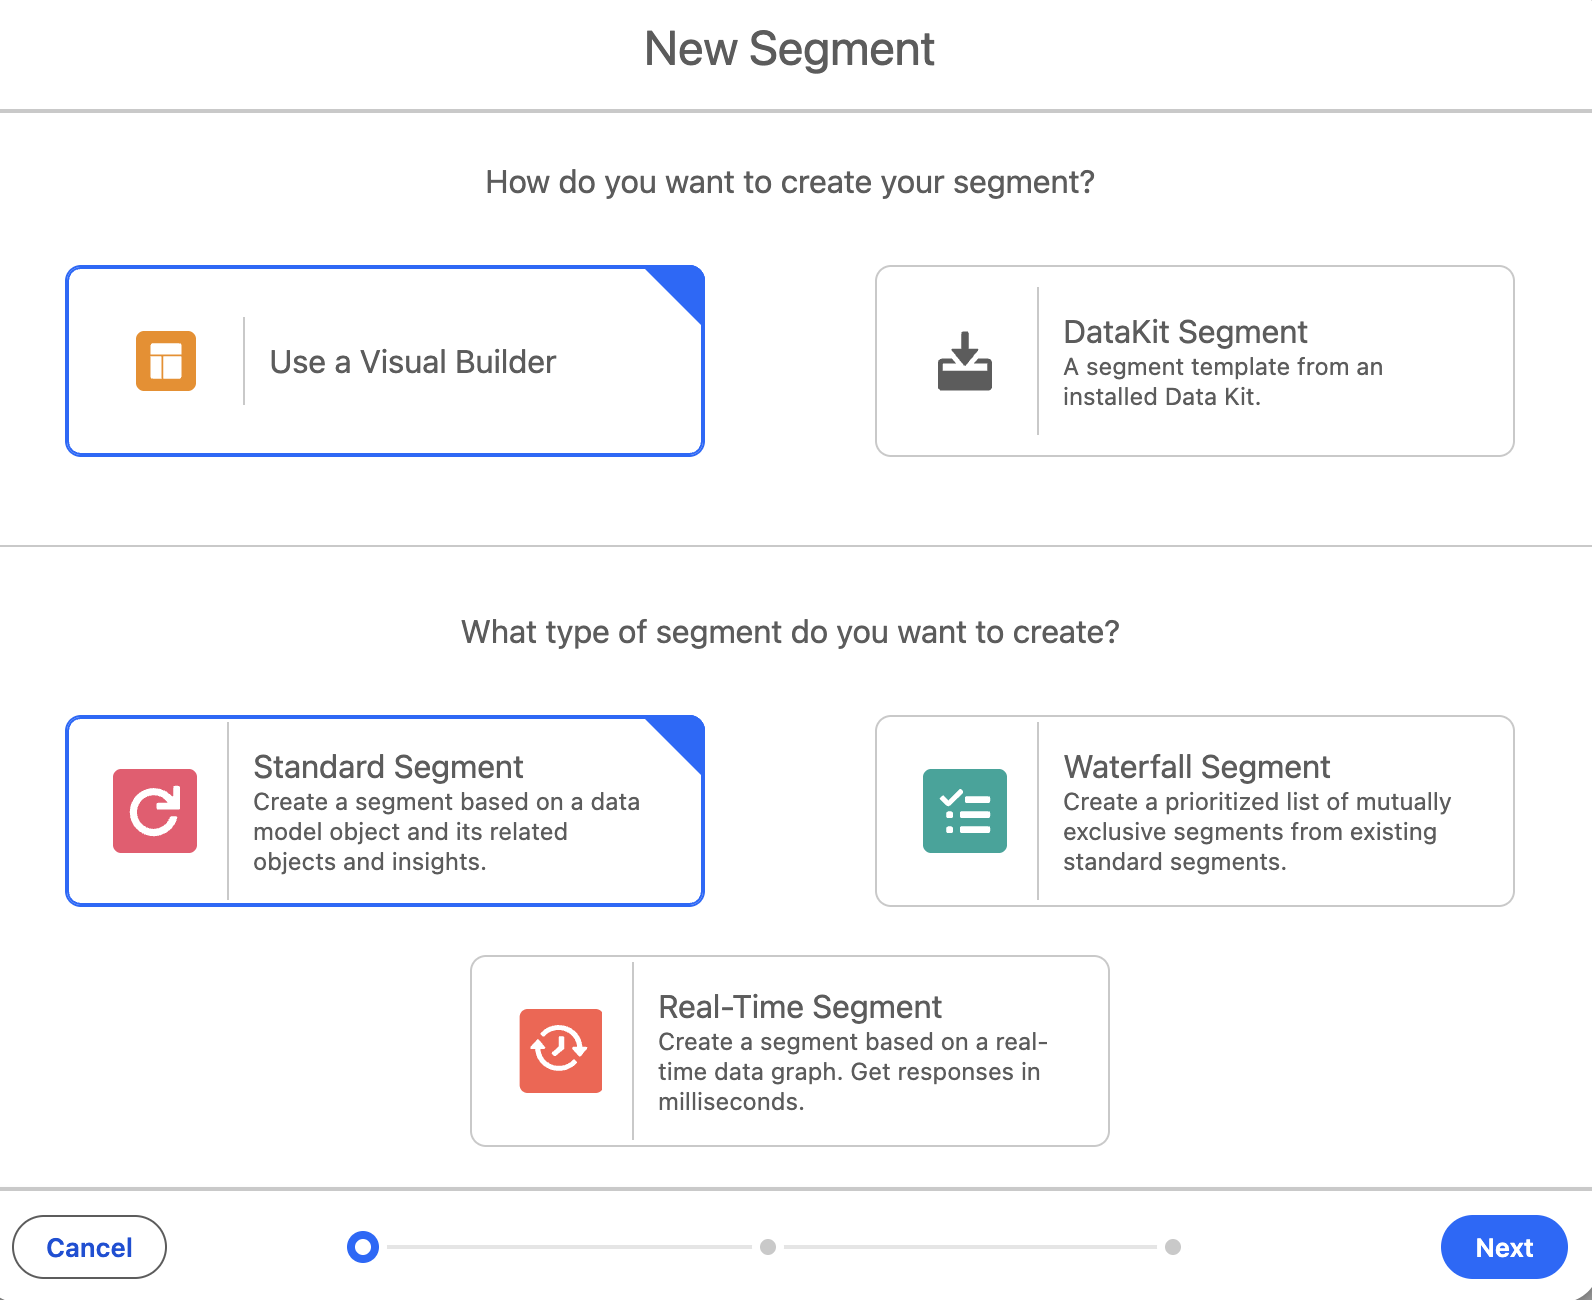
Unfied Individual as the Object to segment on.
As of July 10th, 2025, Marketing Cloud Growth/Advanced only supports Unified Individuals as the Object to segment on.
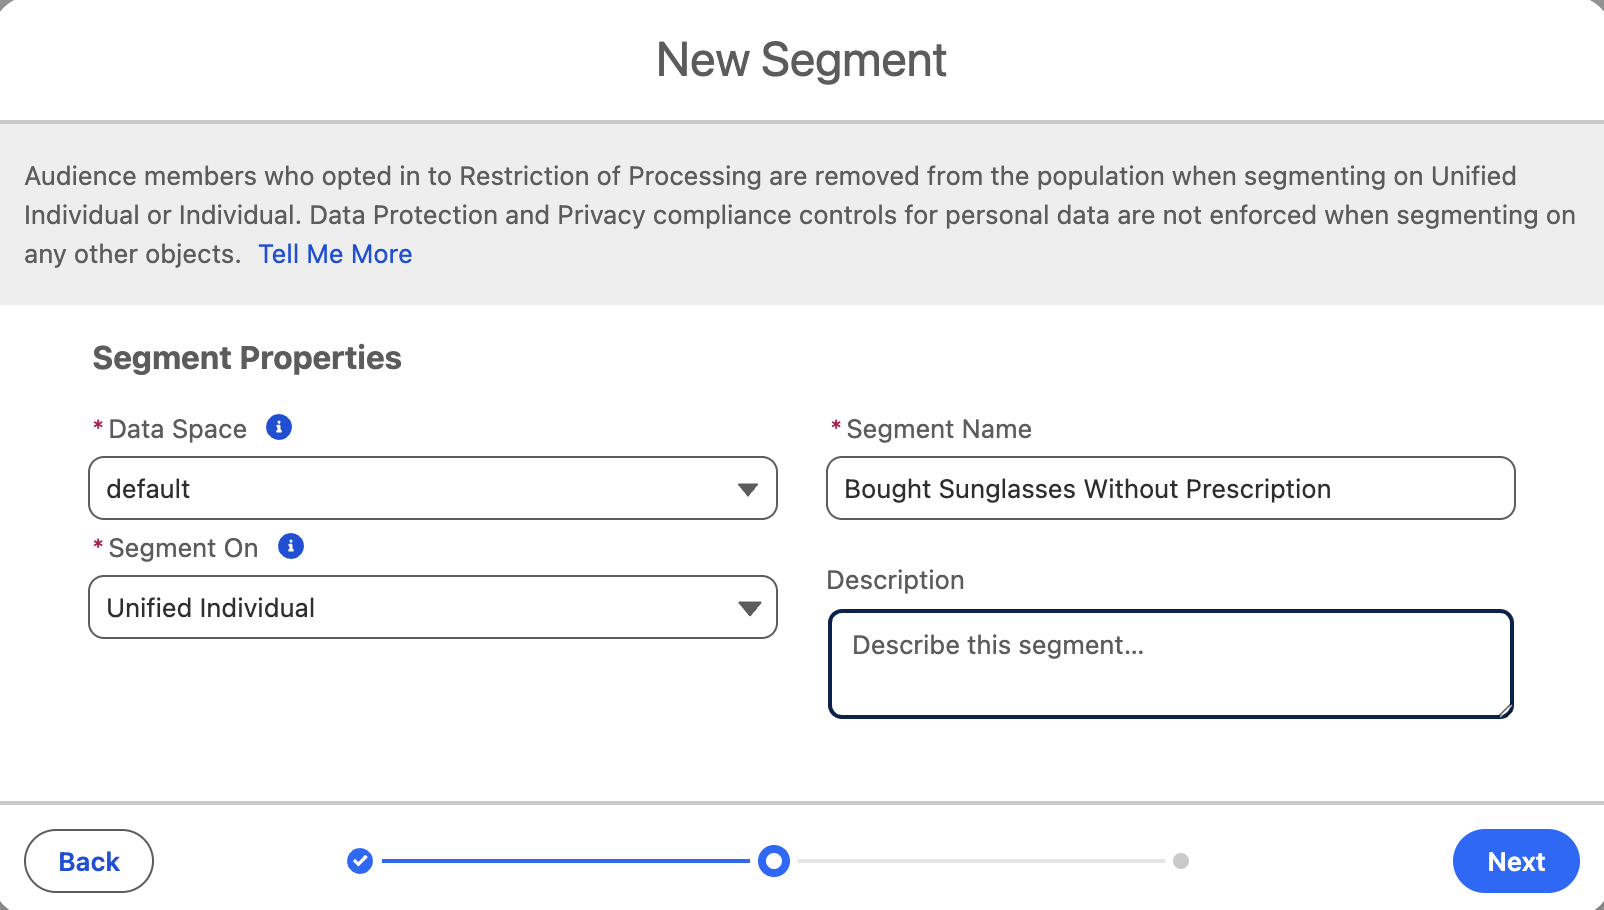
Configure and Activate the Segment
- Define the Segment criteria.
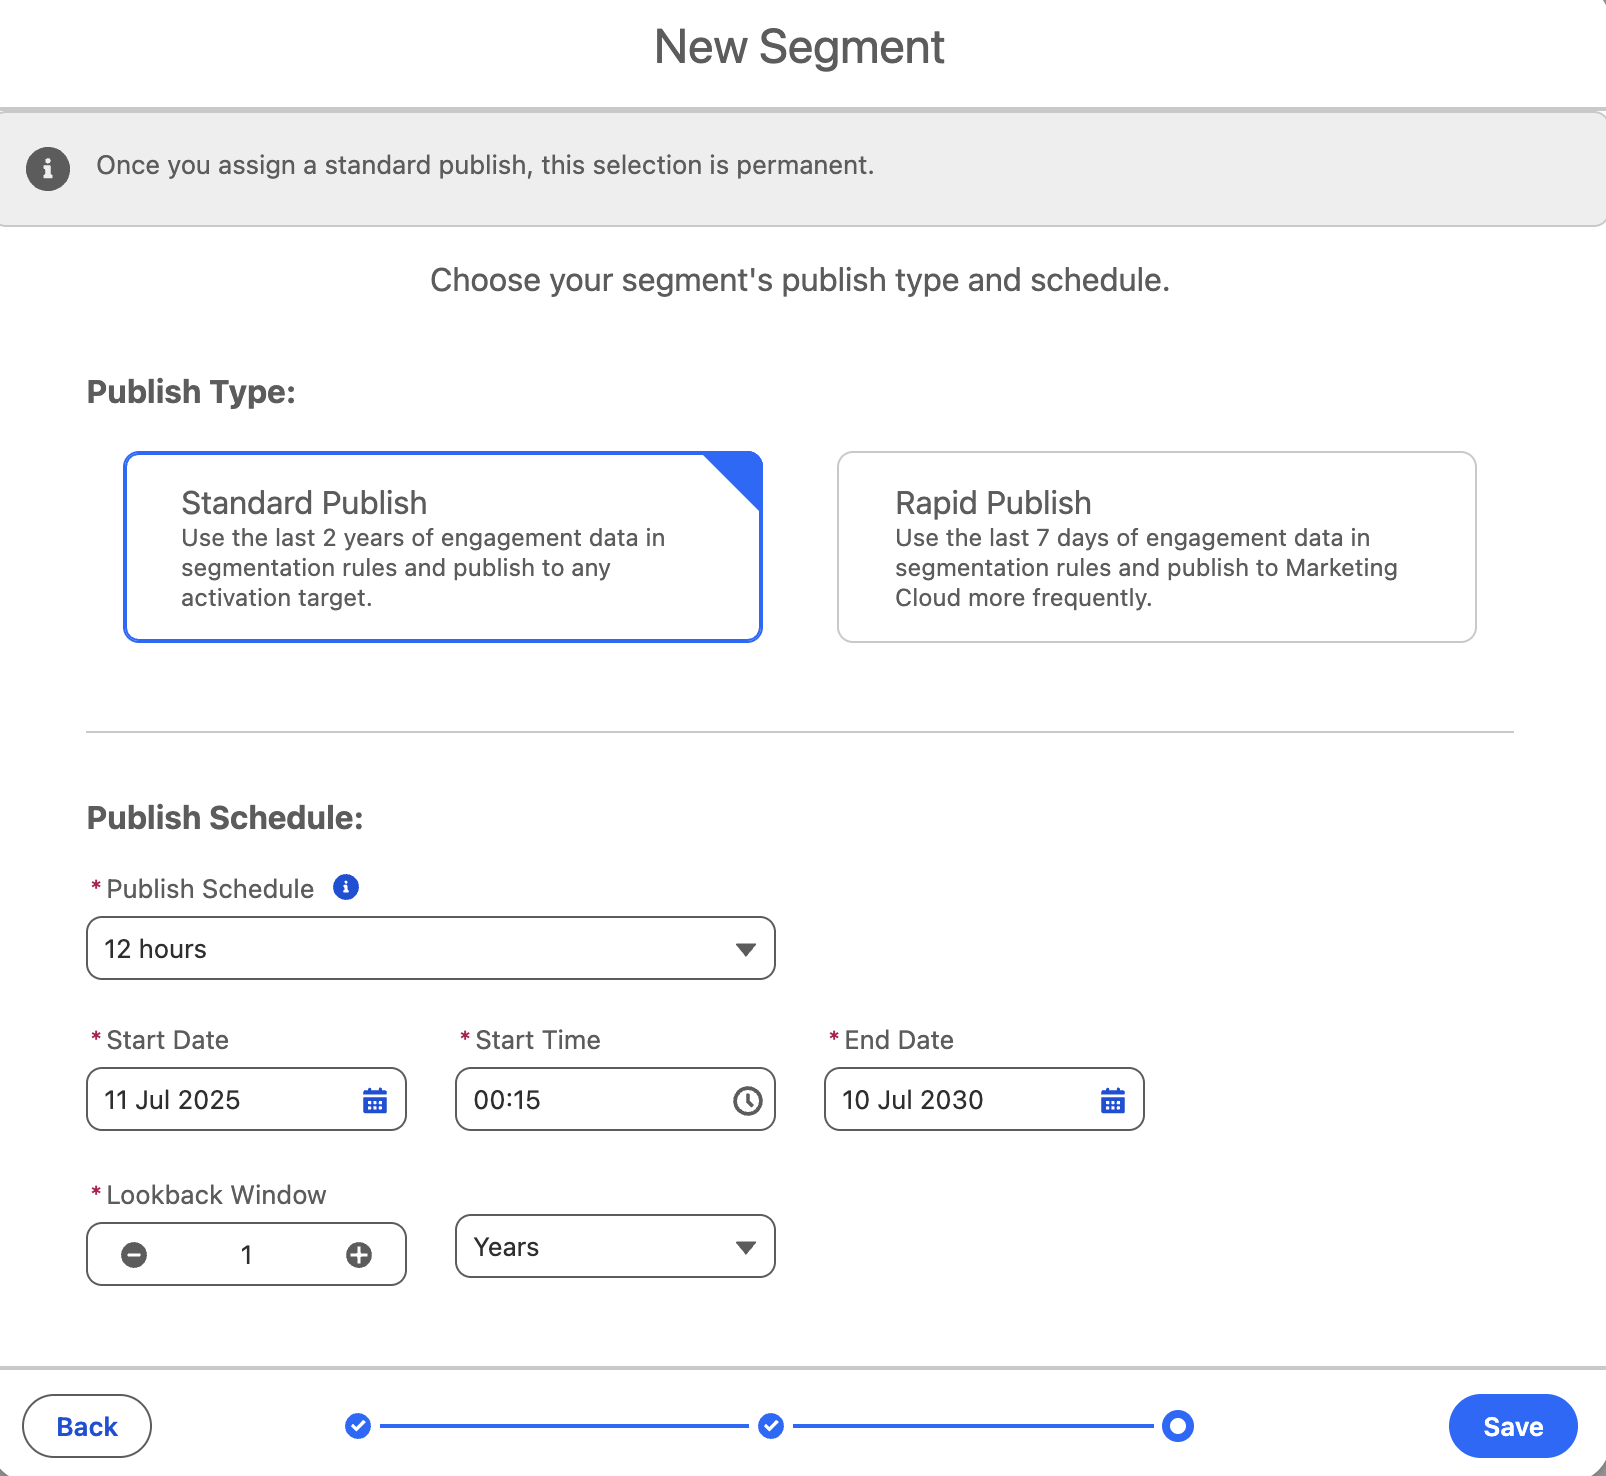
- Apply the following (simplified) filter:
- Customers having at least one order with a product where
Is Prescription=false.
- Customers having at least one order with a product where
Pay attention to the path of the filter. It's Sales Order -> Sales Order Product -> Master Product -> Is Prescription = false.
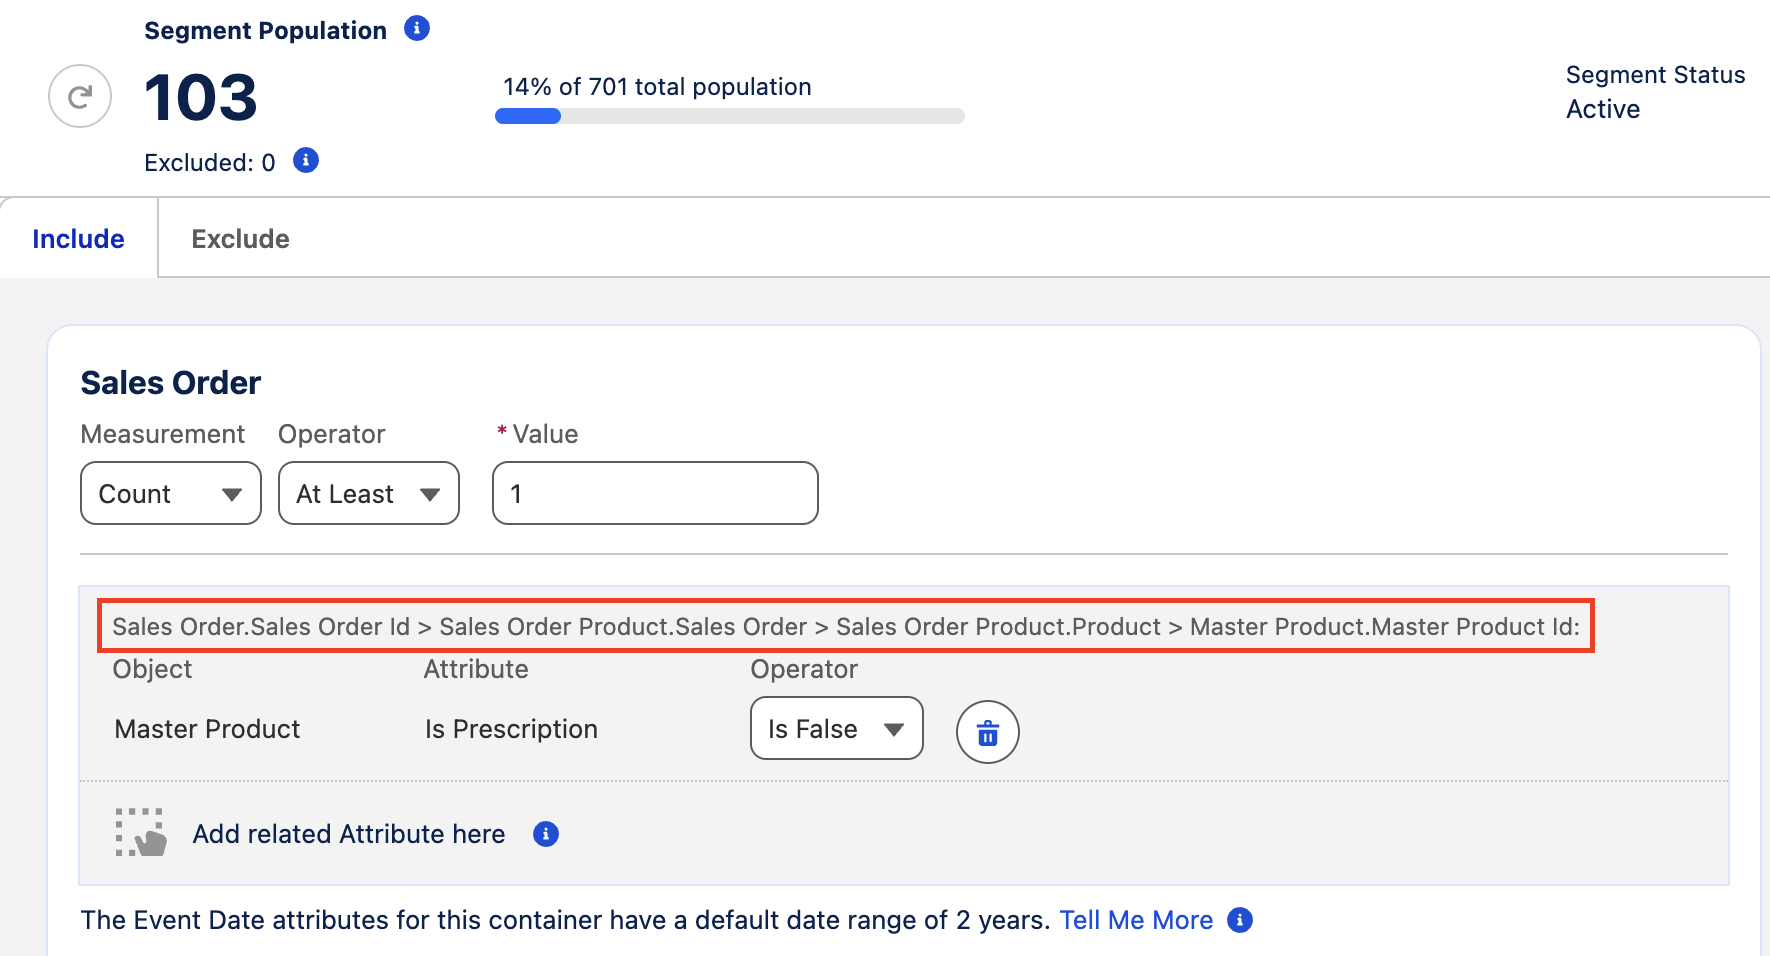
- Save and Activate the Segment.
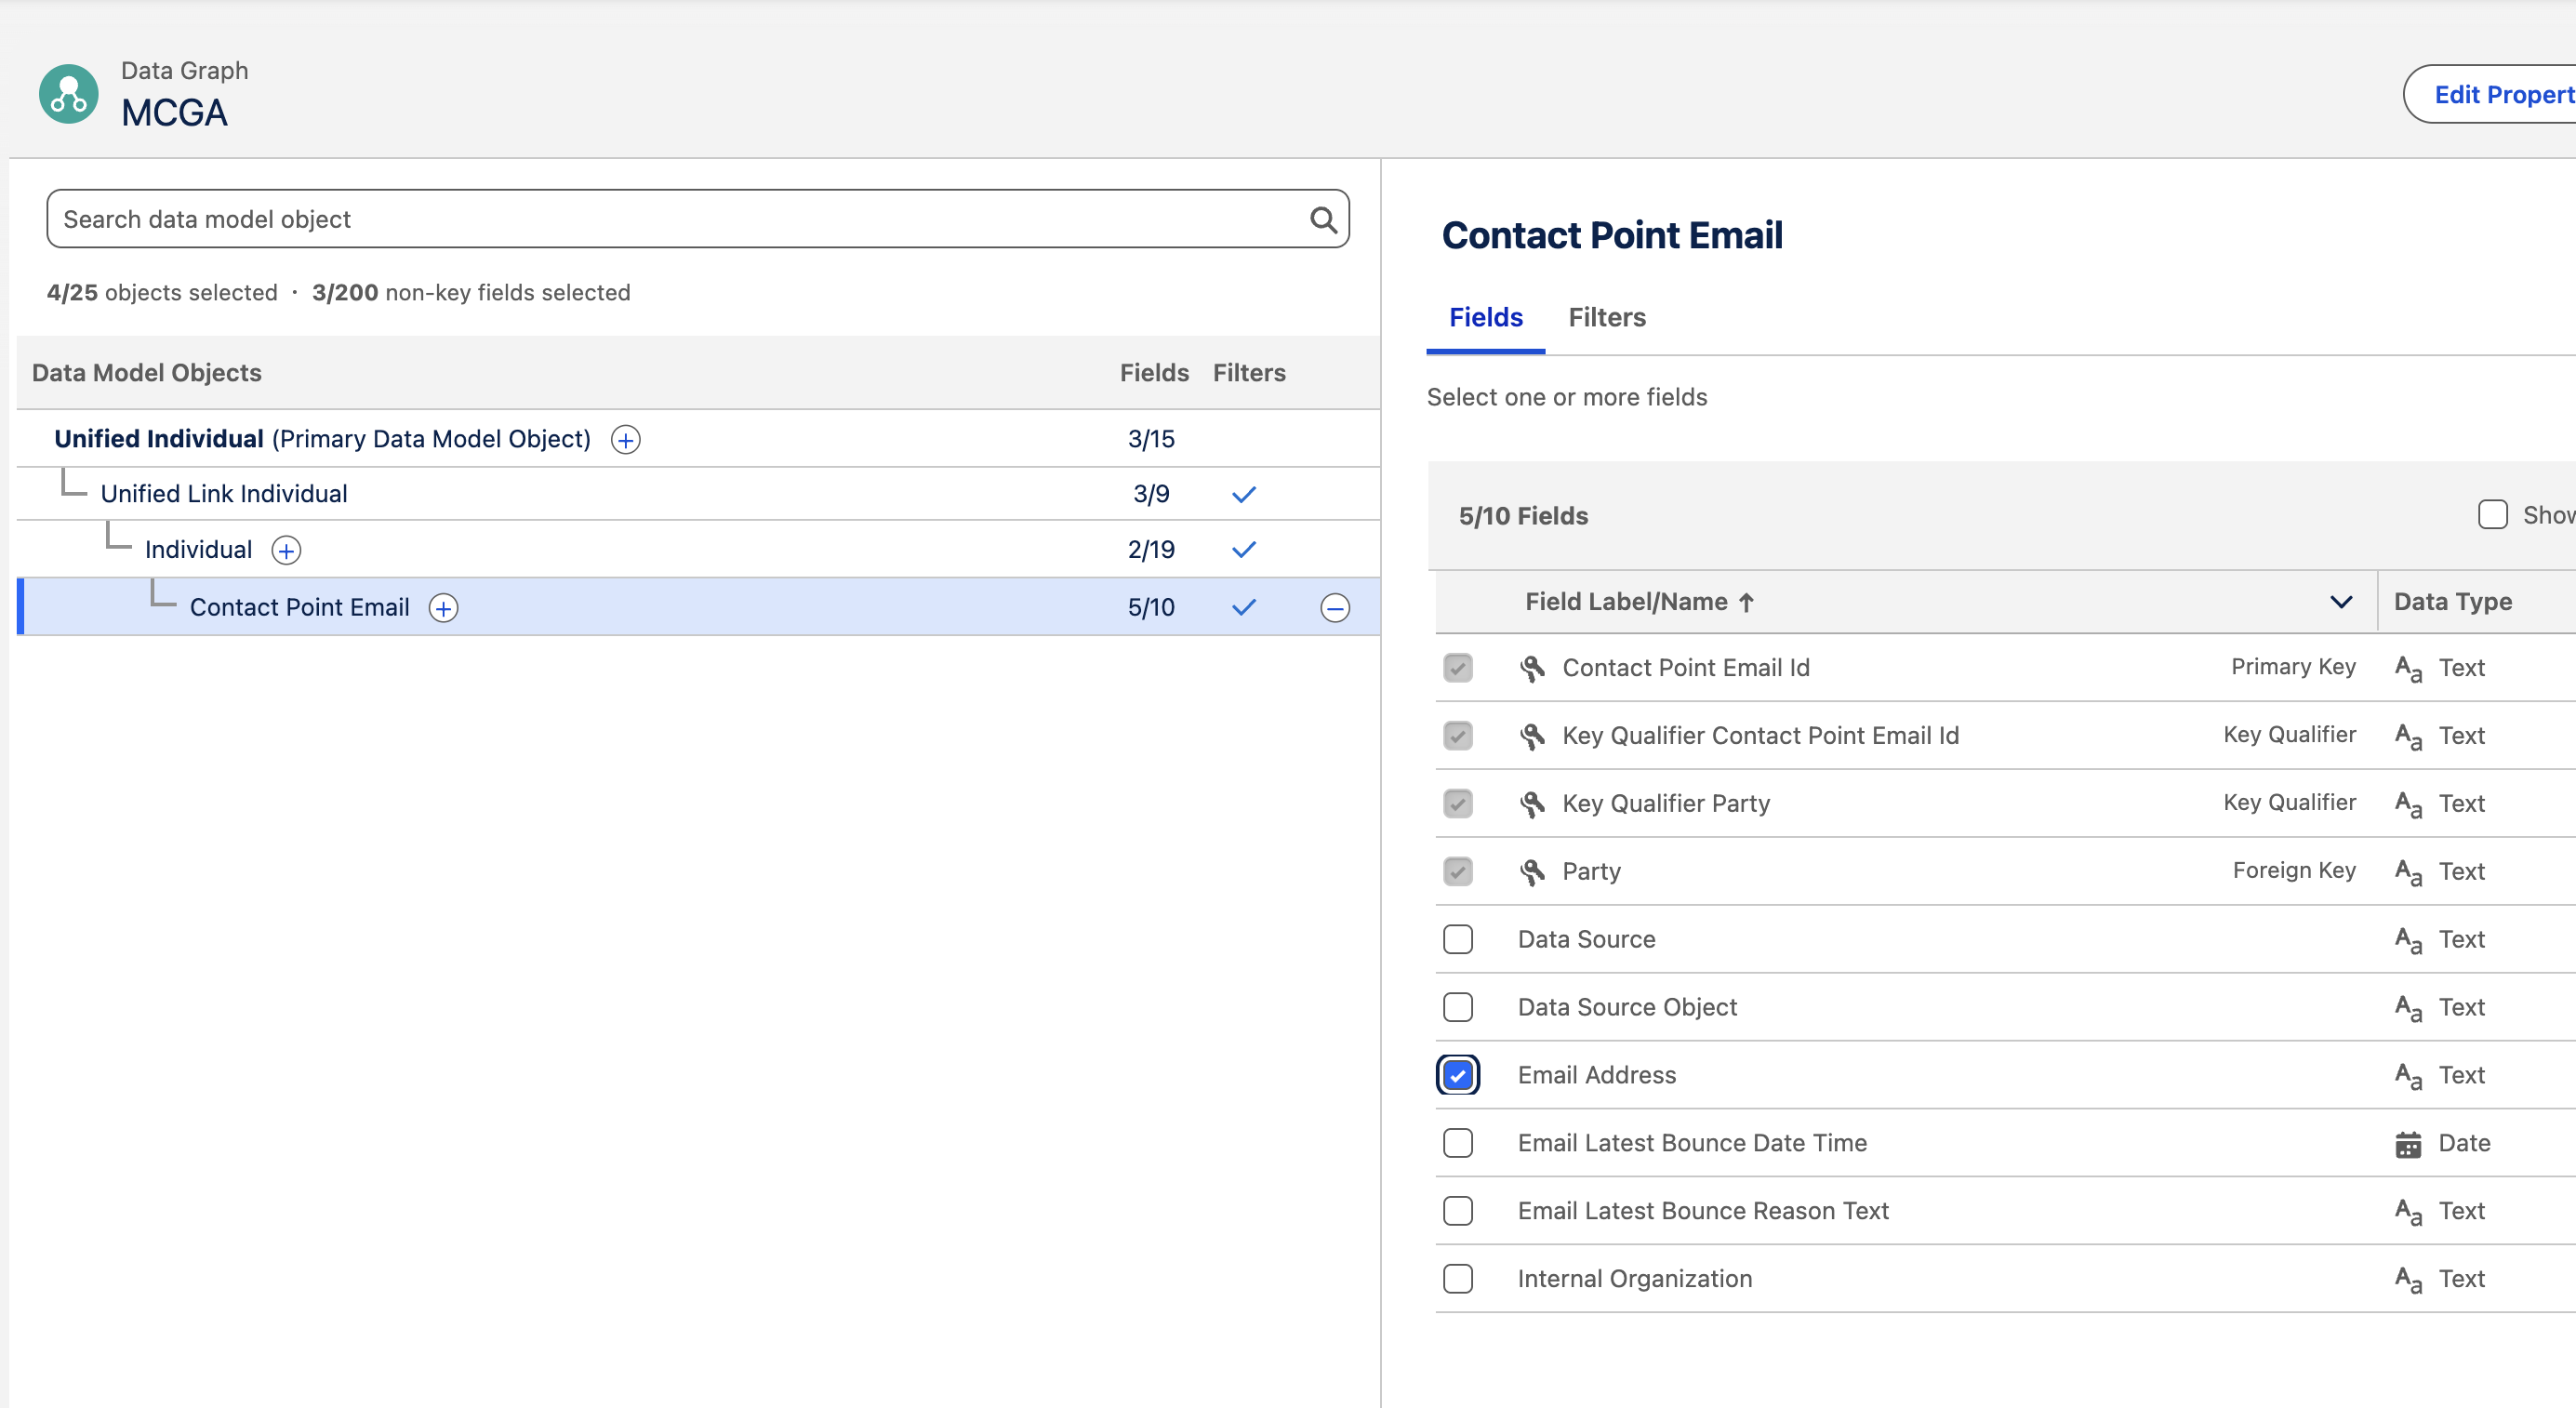
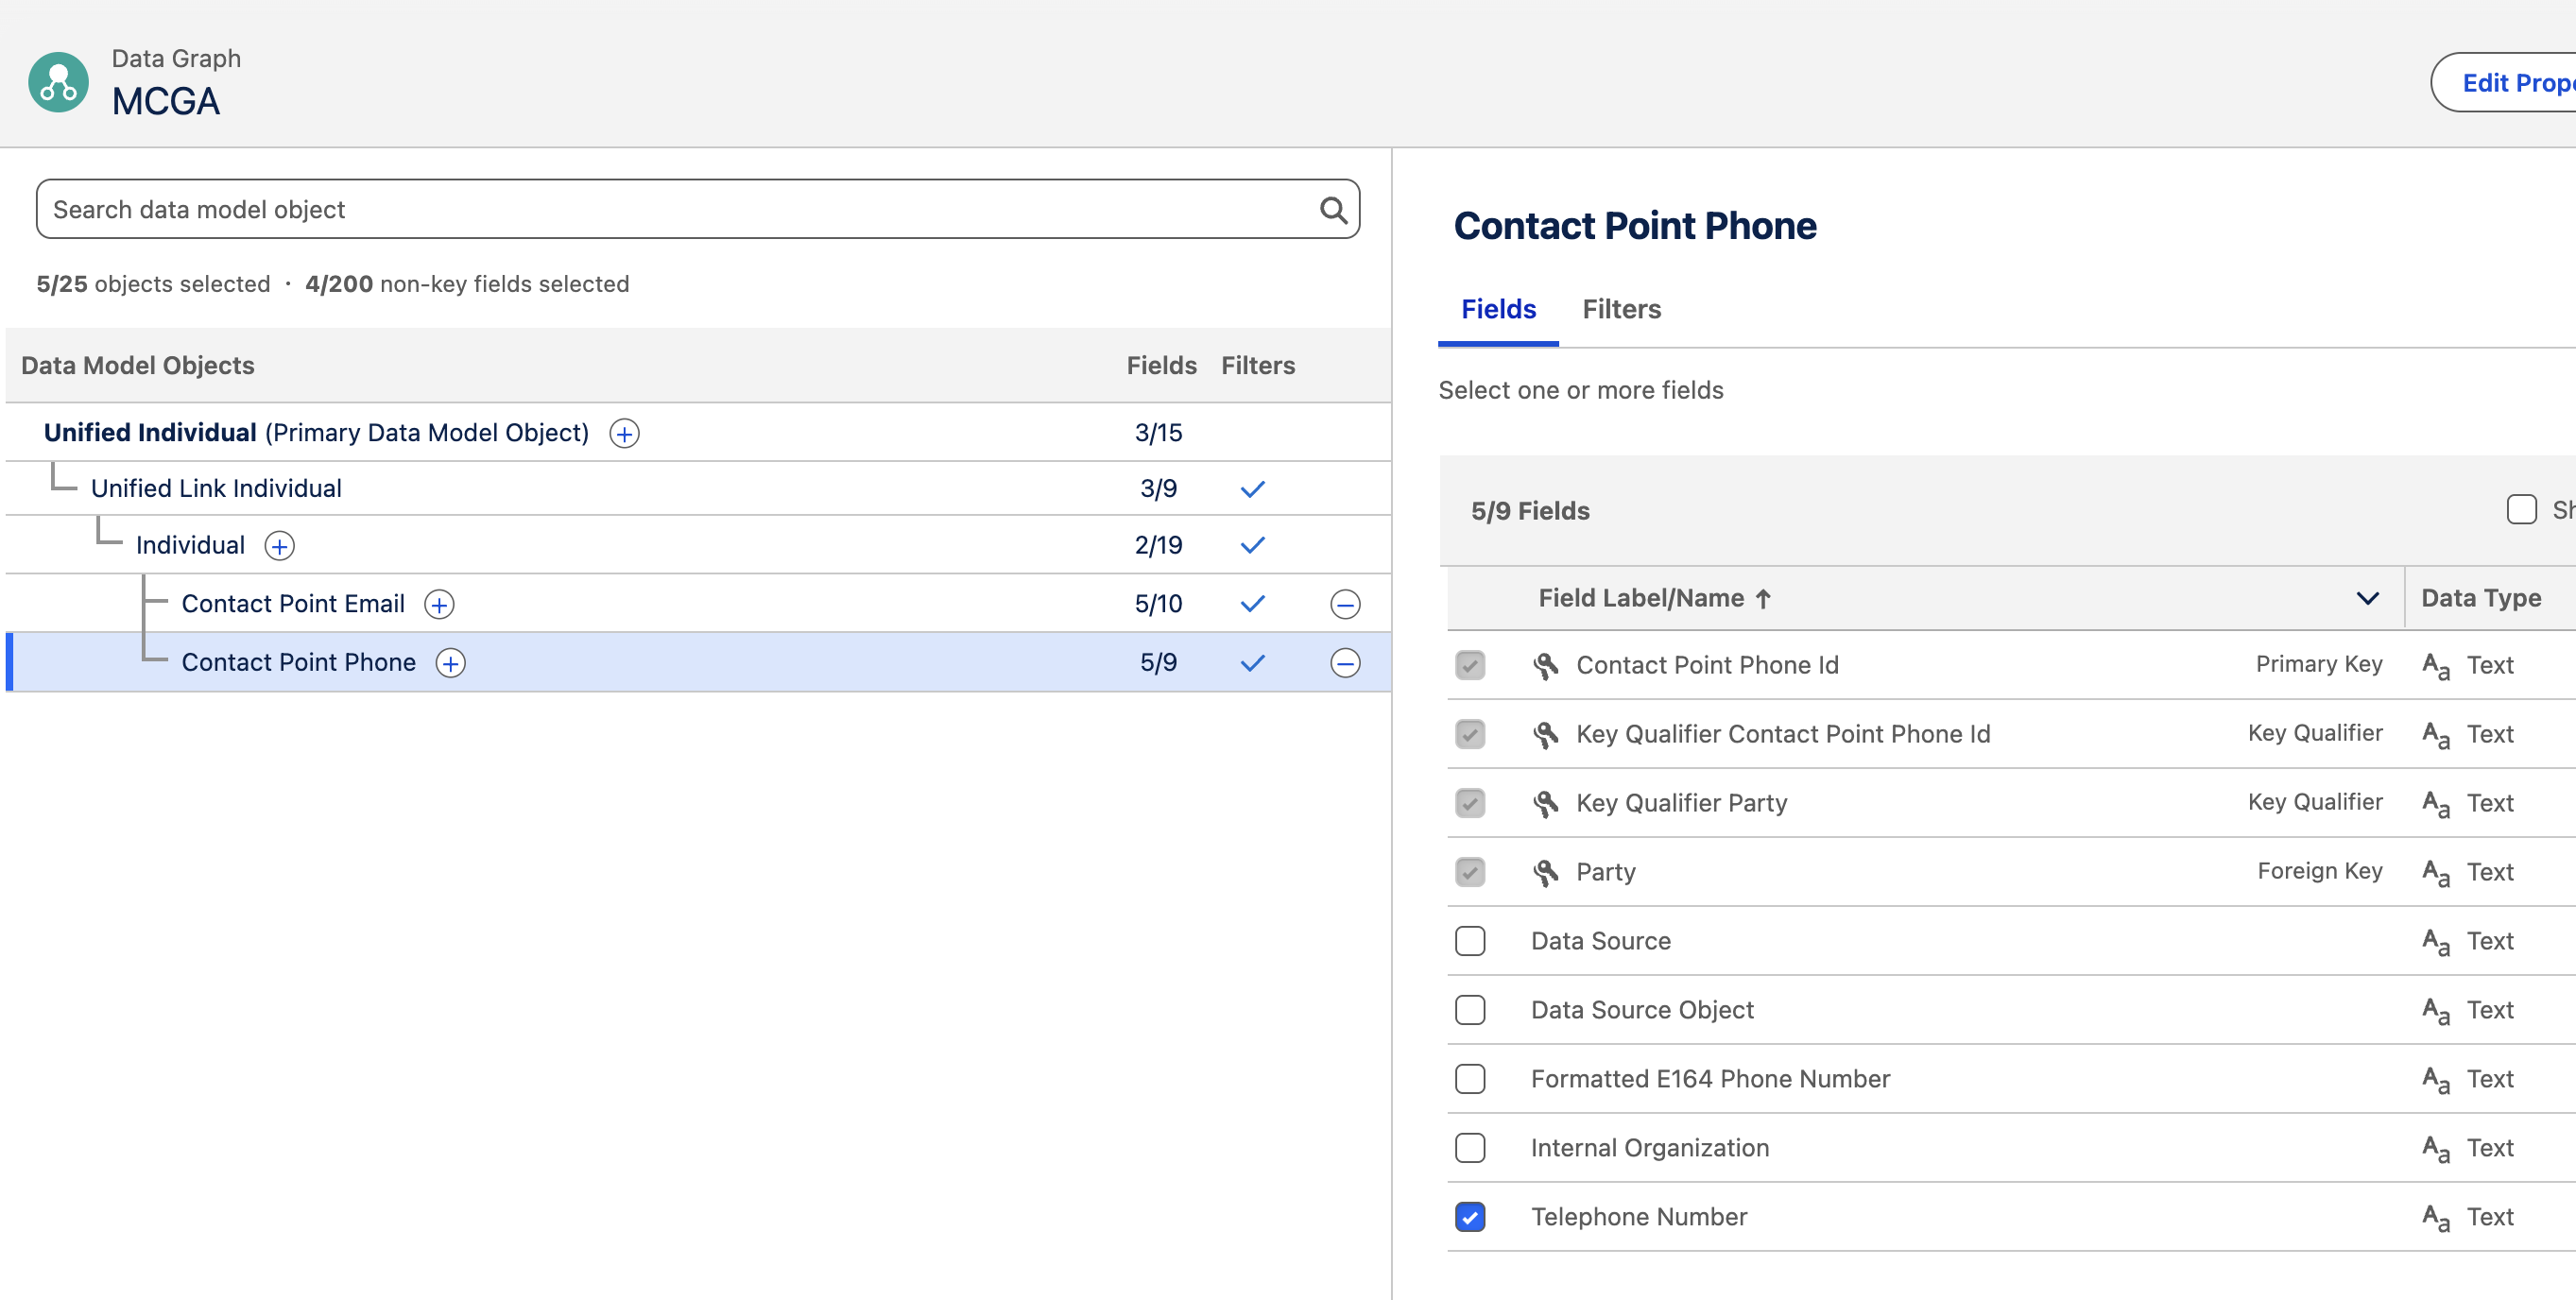
🌐 6. Data Graph
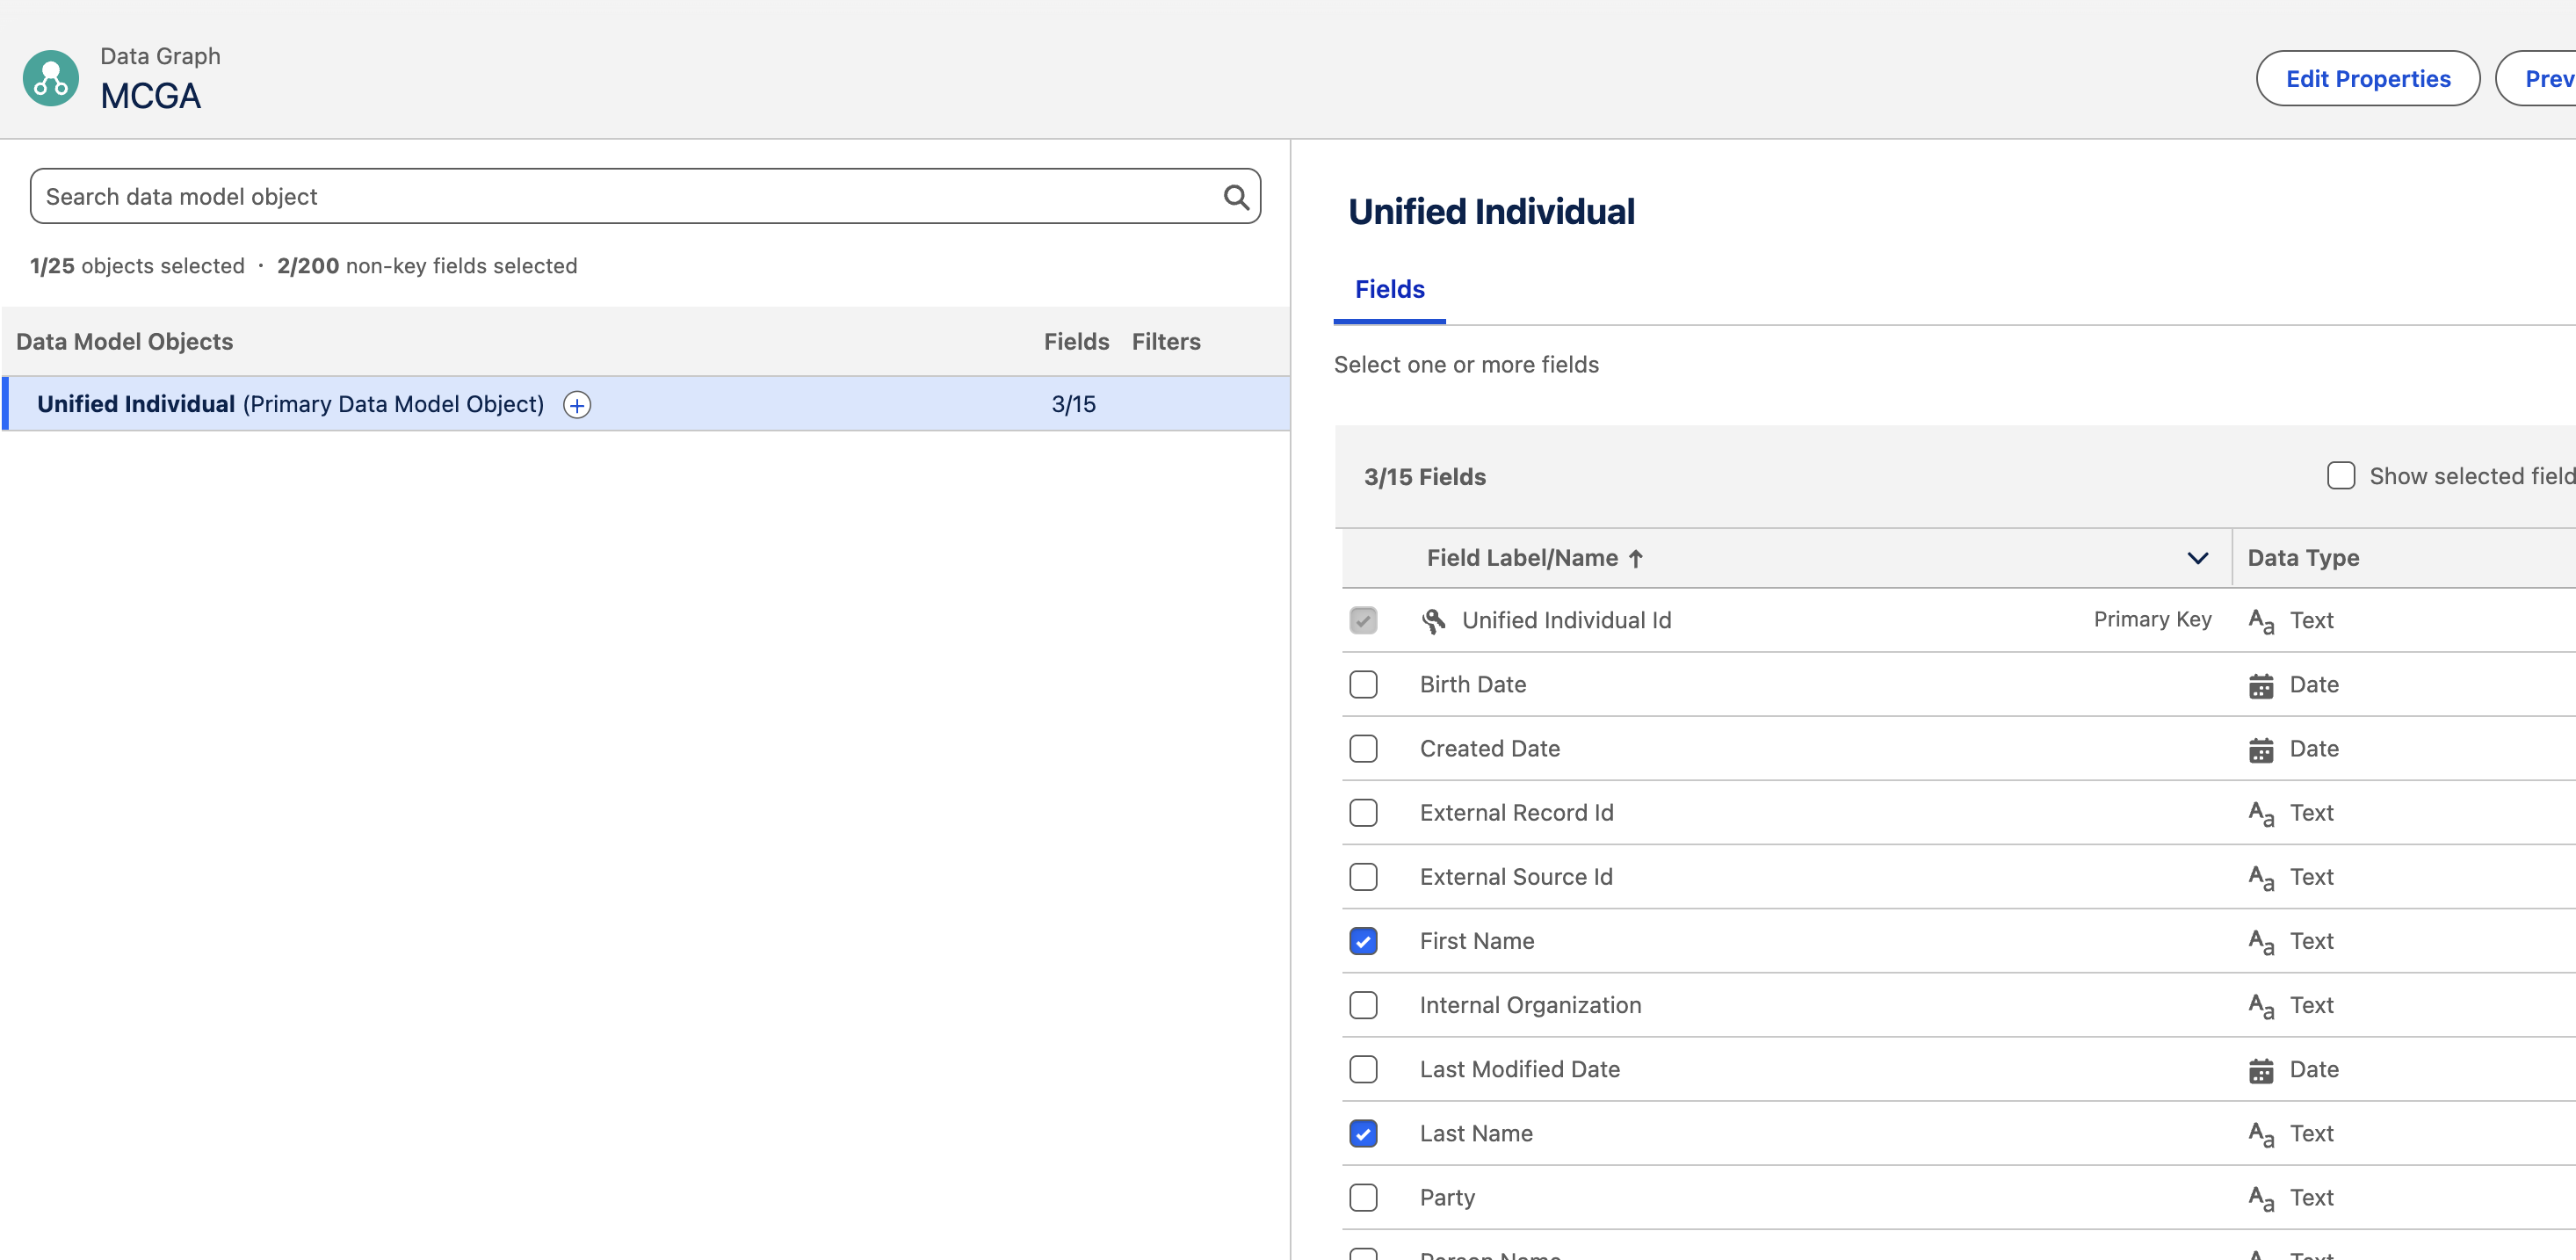
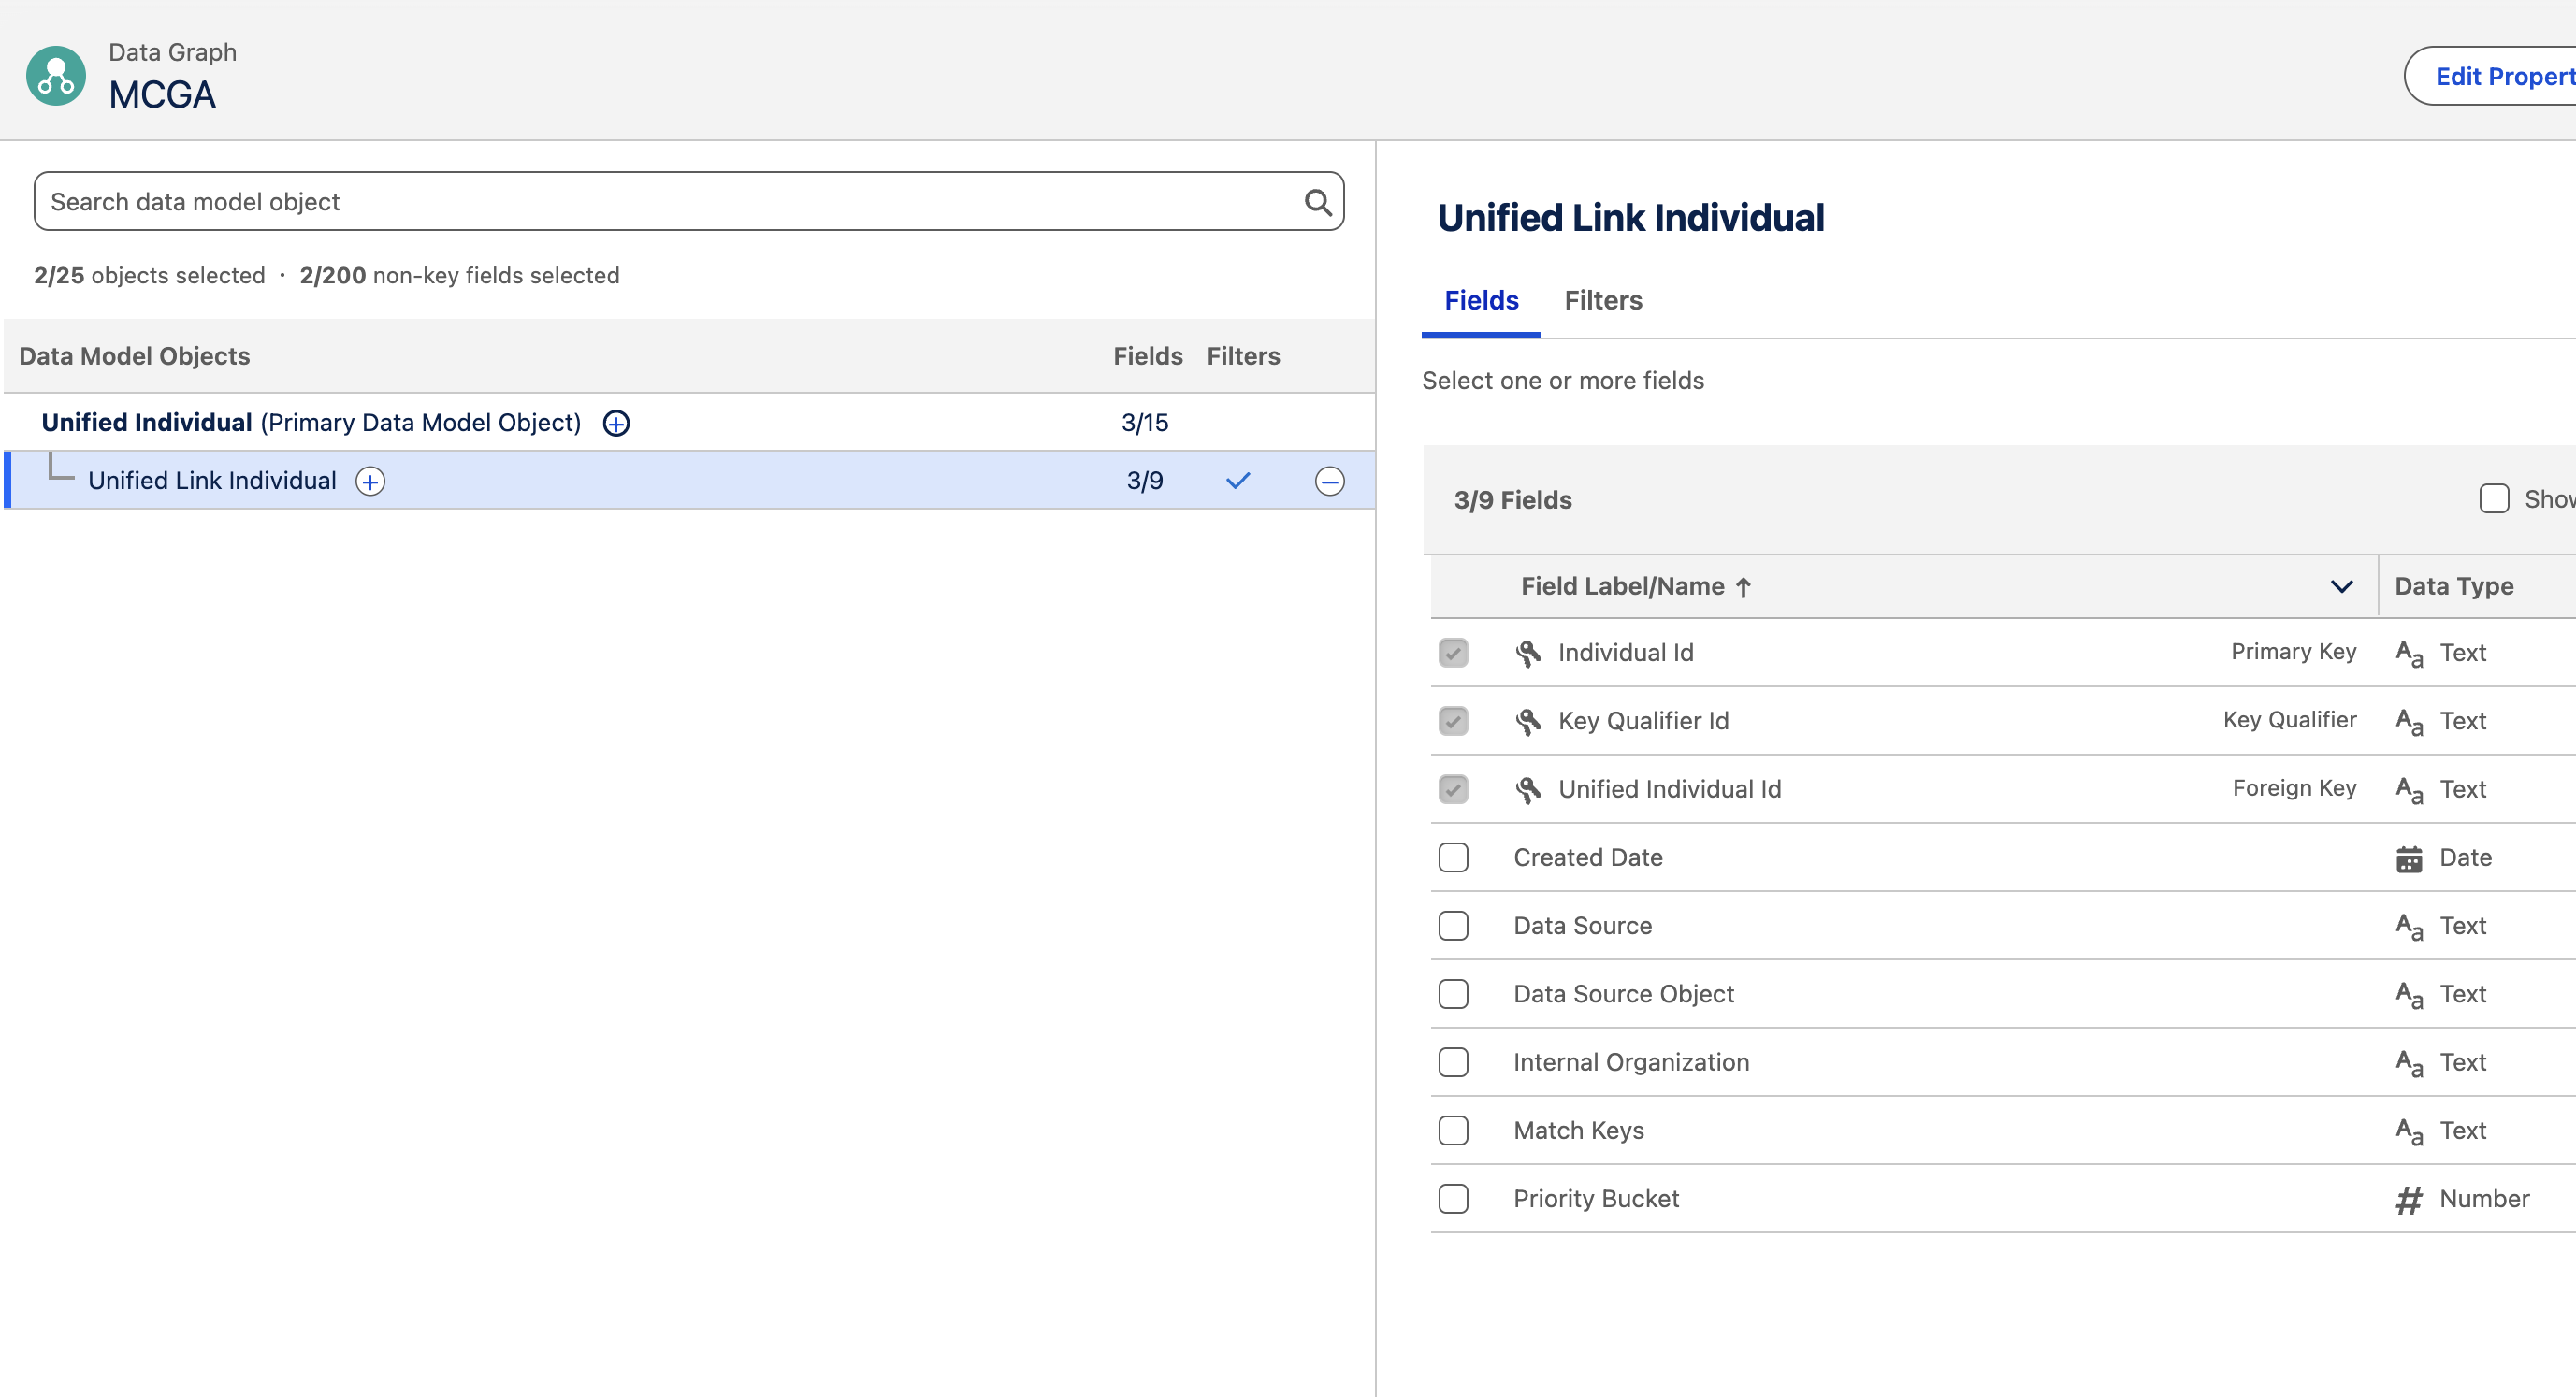
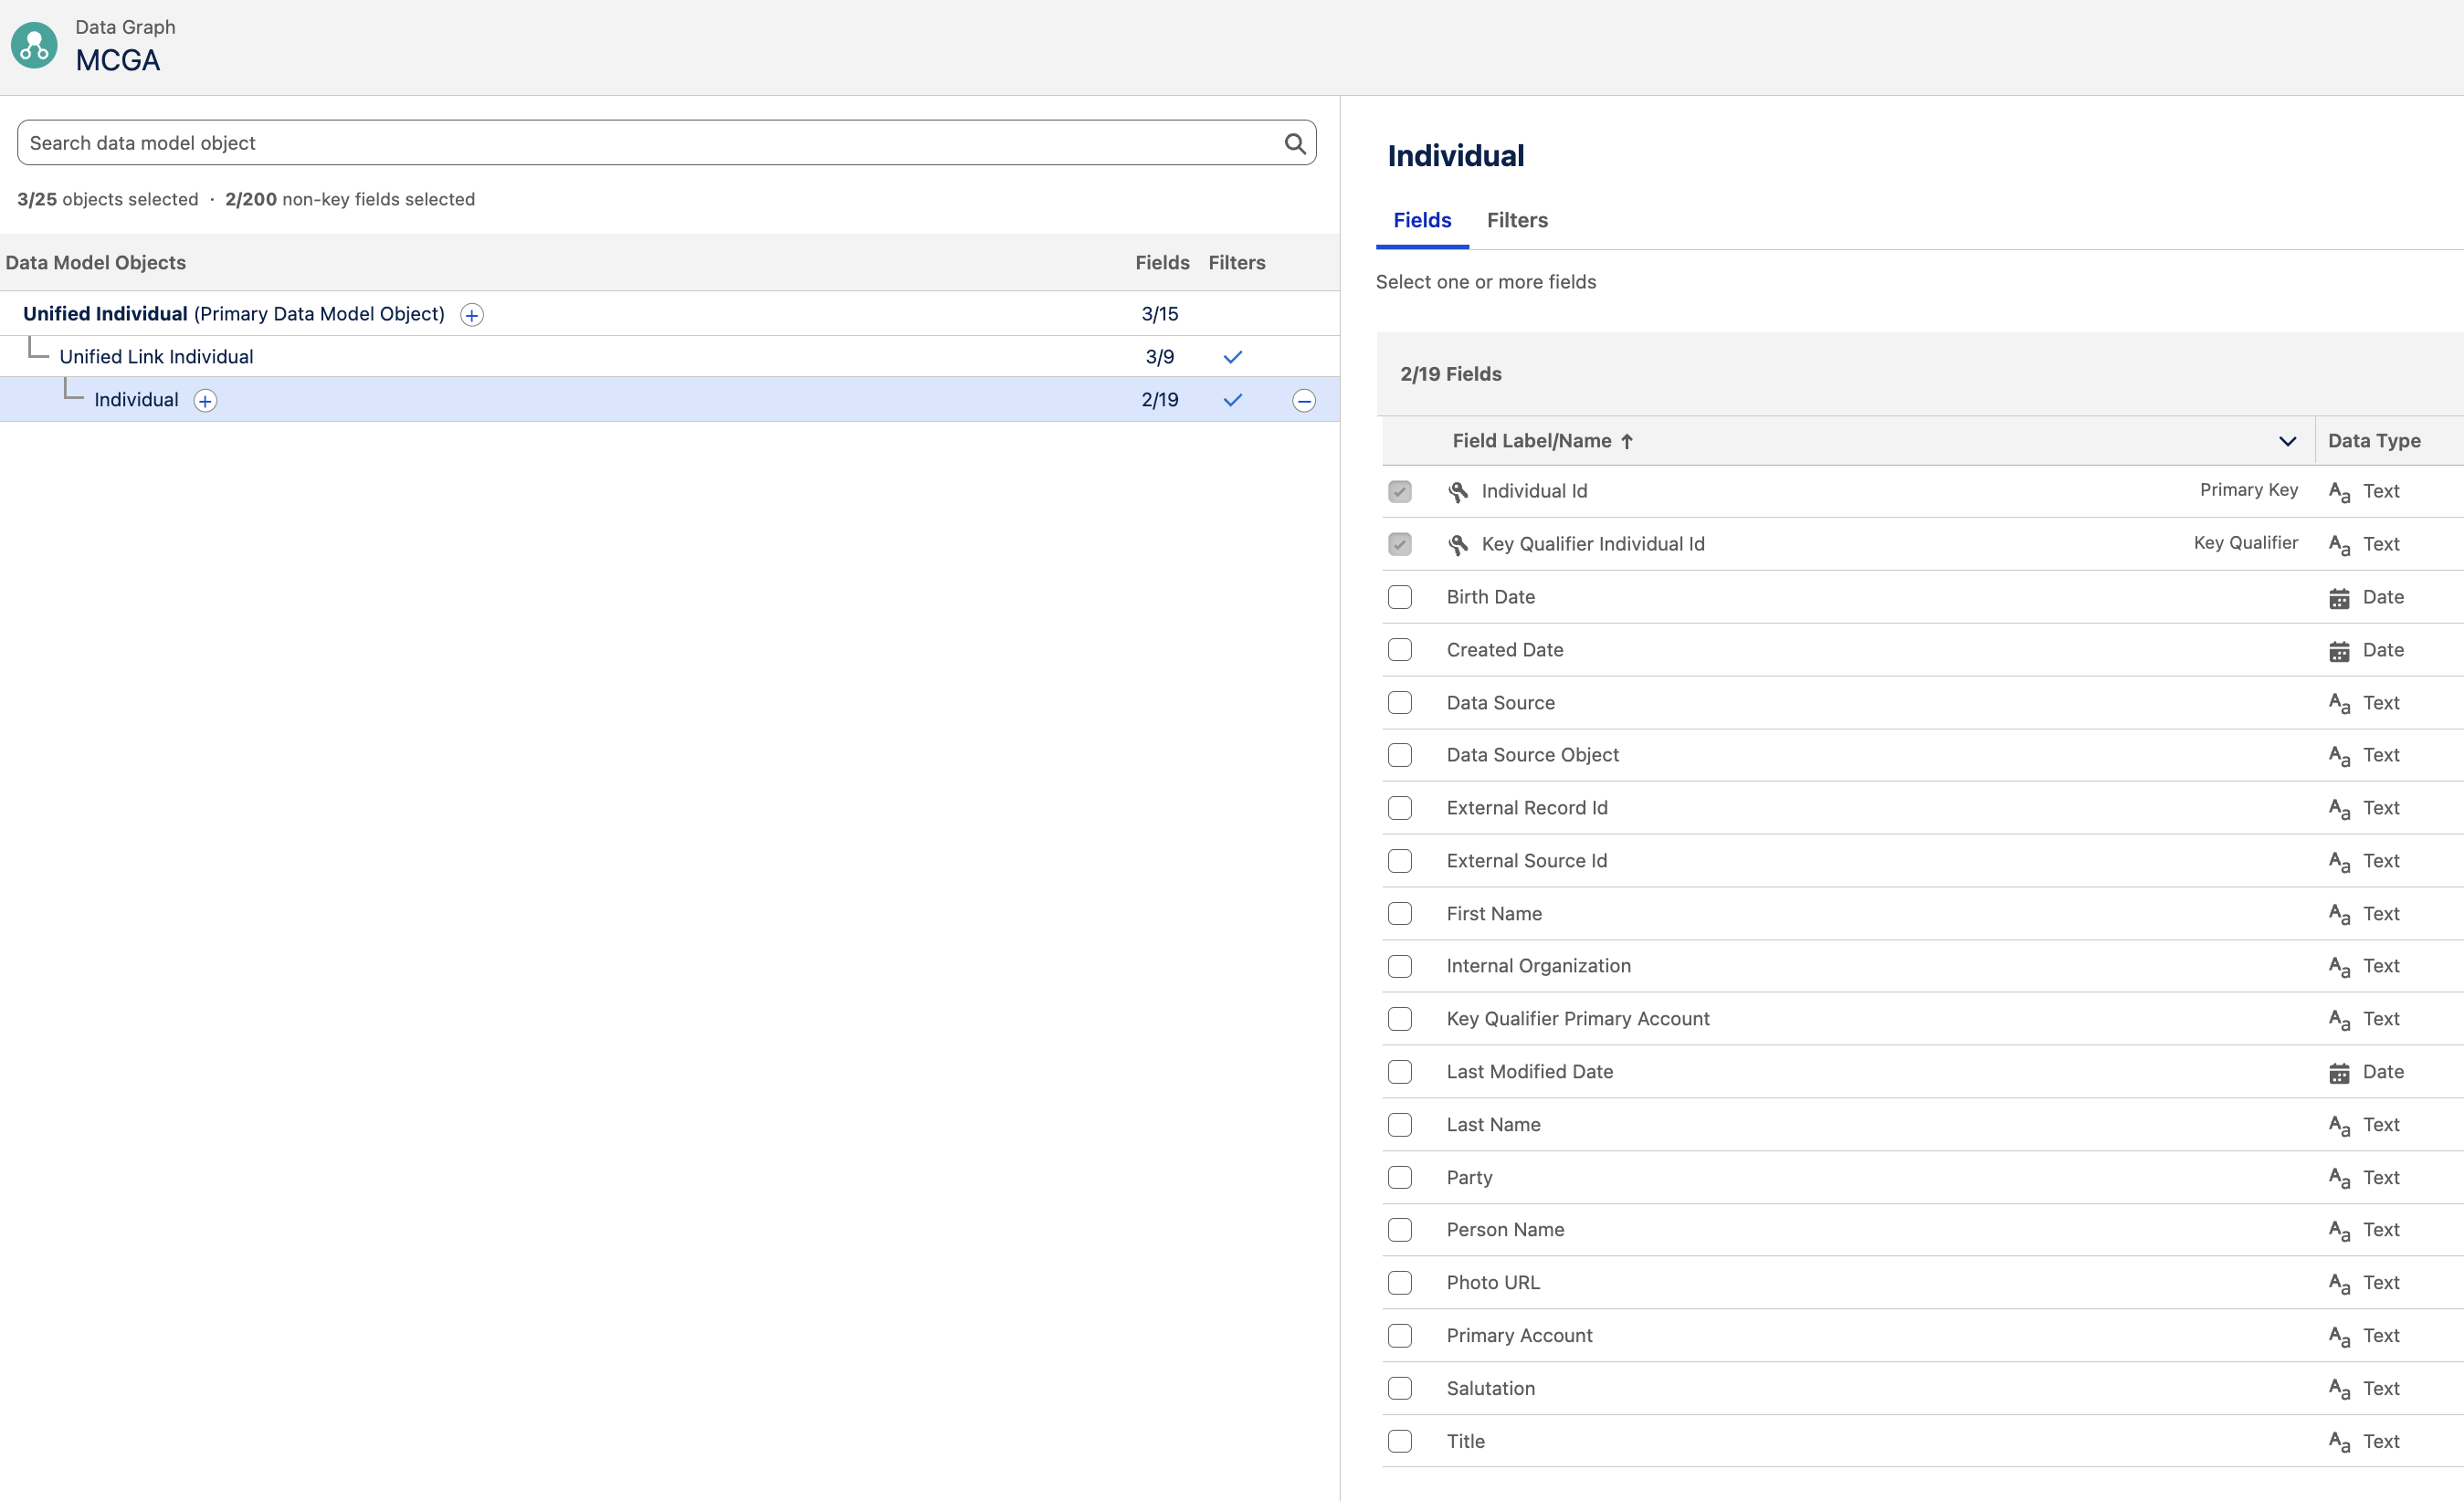
As of July 10th, 2025, Marketing Cloud Growth/Advanced requires the following objects to be present in the Data Graph for emails to send out successfully:
Unified Individual(Primary Data Model Object)Unified Link IndividualIndividualContact Point EmailContact Point Phone
The following fields must be selected during the Data Graph setup:
Individual IDfromIndividual(selected by default)Email AddressfromContact Point EmailTelephone NumberfromContact Point Phone(interestingly, hereTelephone Numberis required, but when mapping Profile data into the Individual Data Model Object, it's not required, whileFormatted E164 Phone Numberis required)
Source: Salesforce Documentation
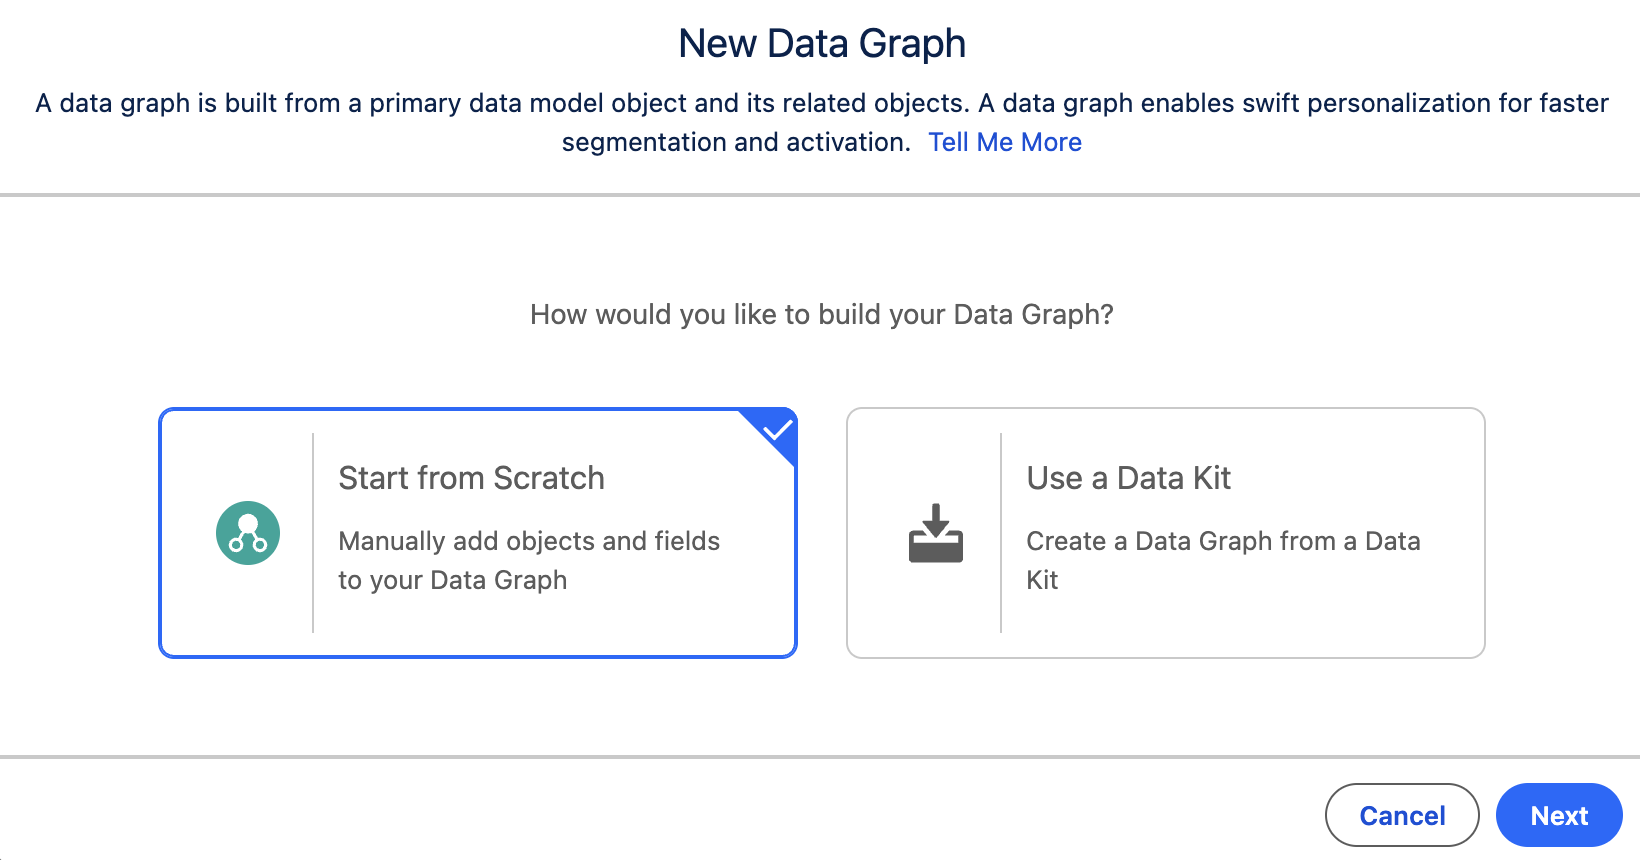
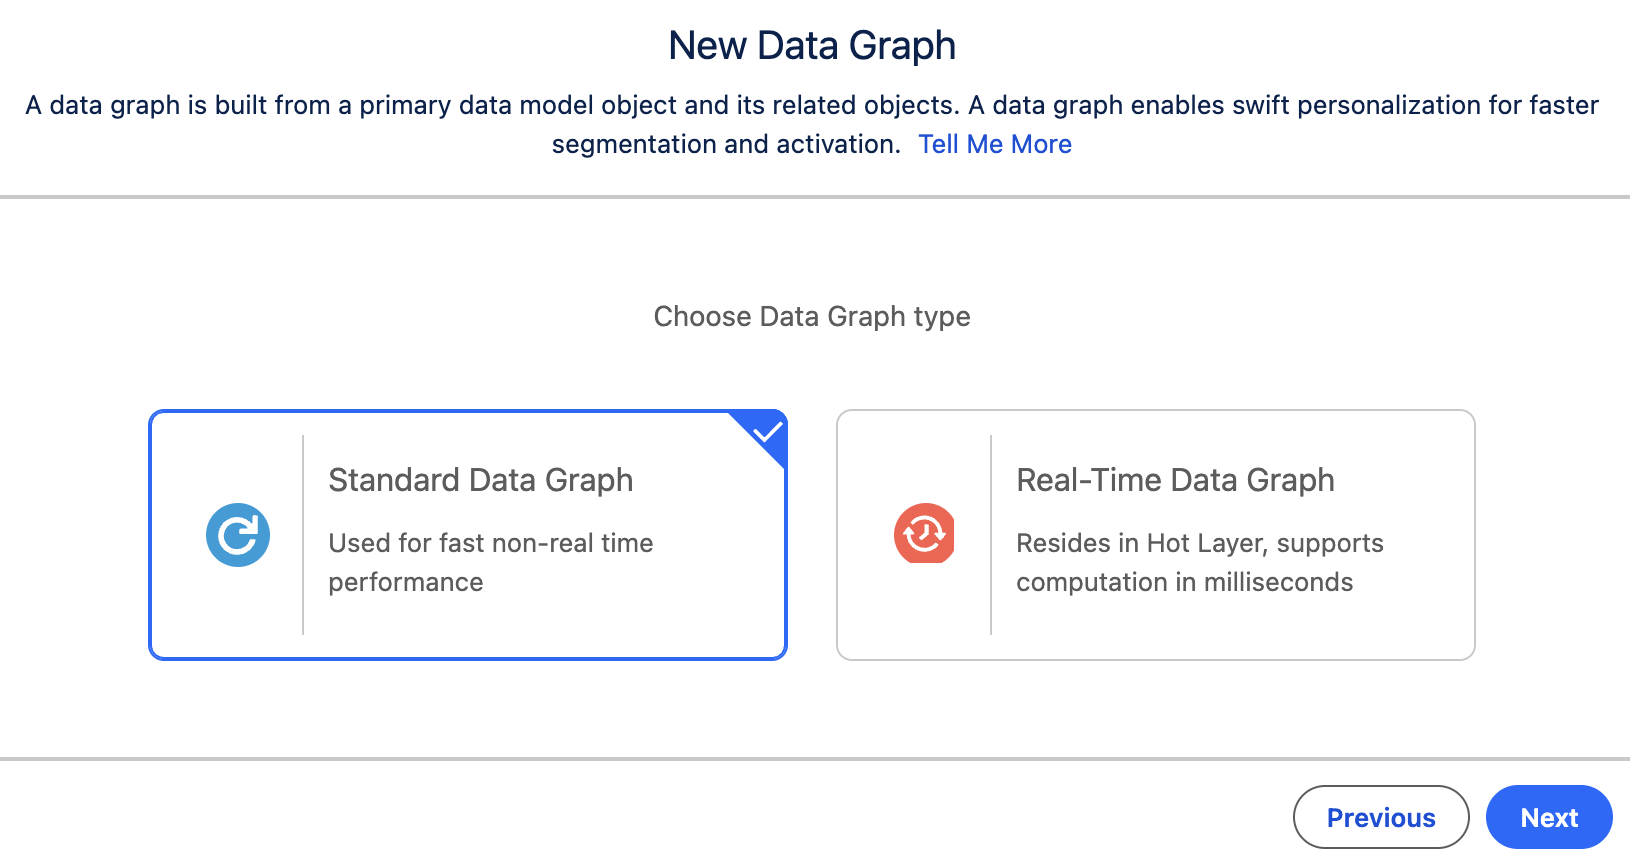
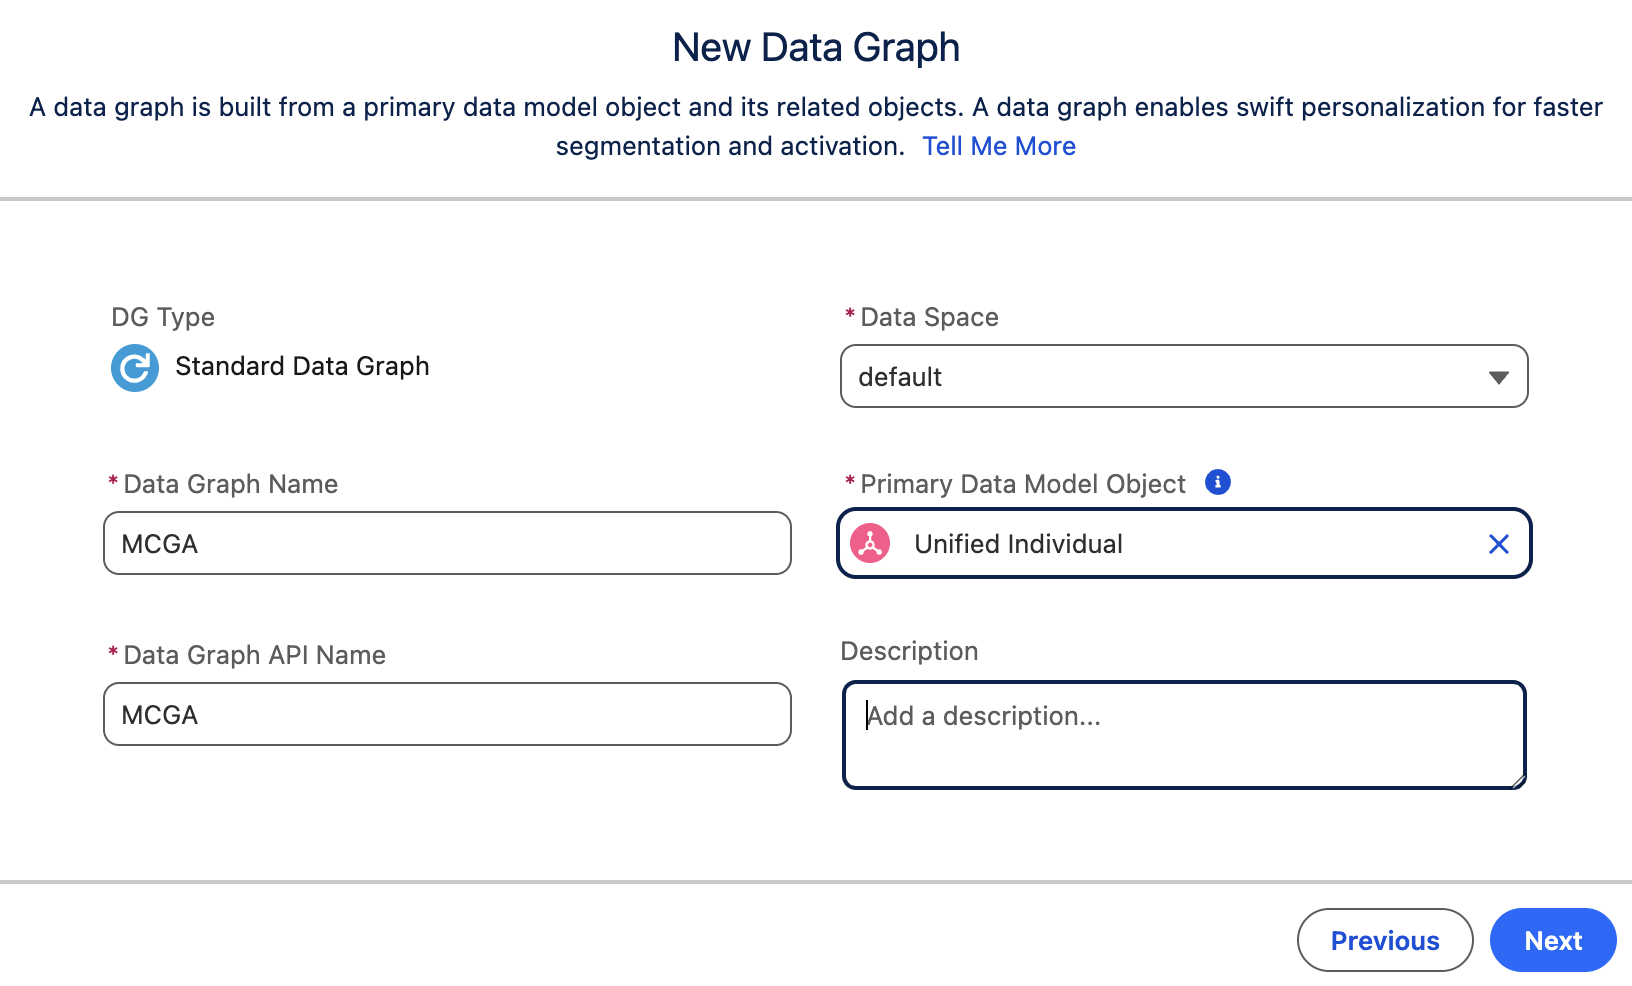
Create and Configure the Data Graph
- Go to Data Graphs.
- Click New Data Graph.
- Follow the steps as shown in the screenshots and name the Data Graph
MCGA.
Add Required Objects and Fields
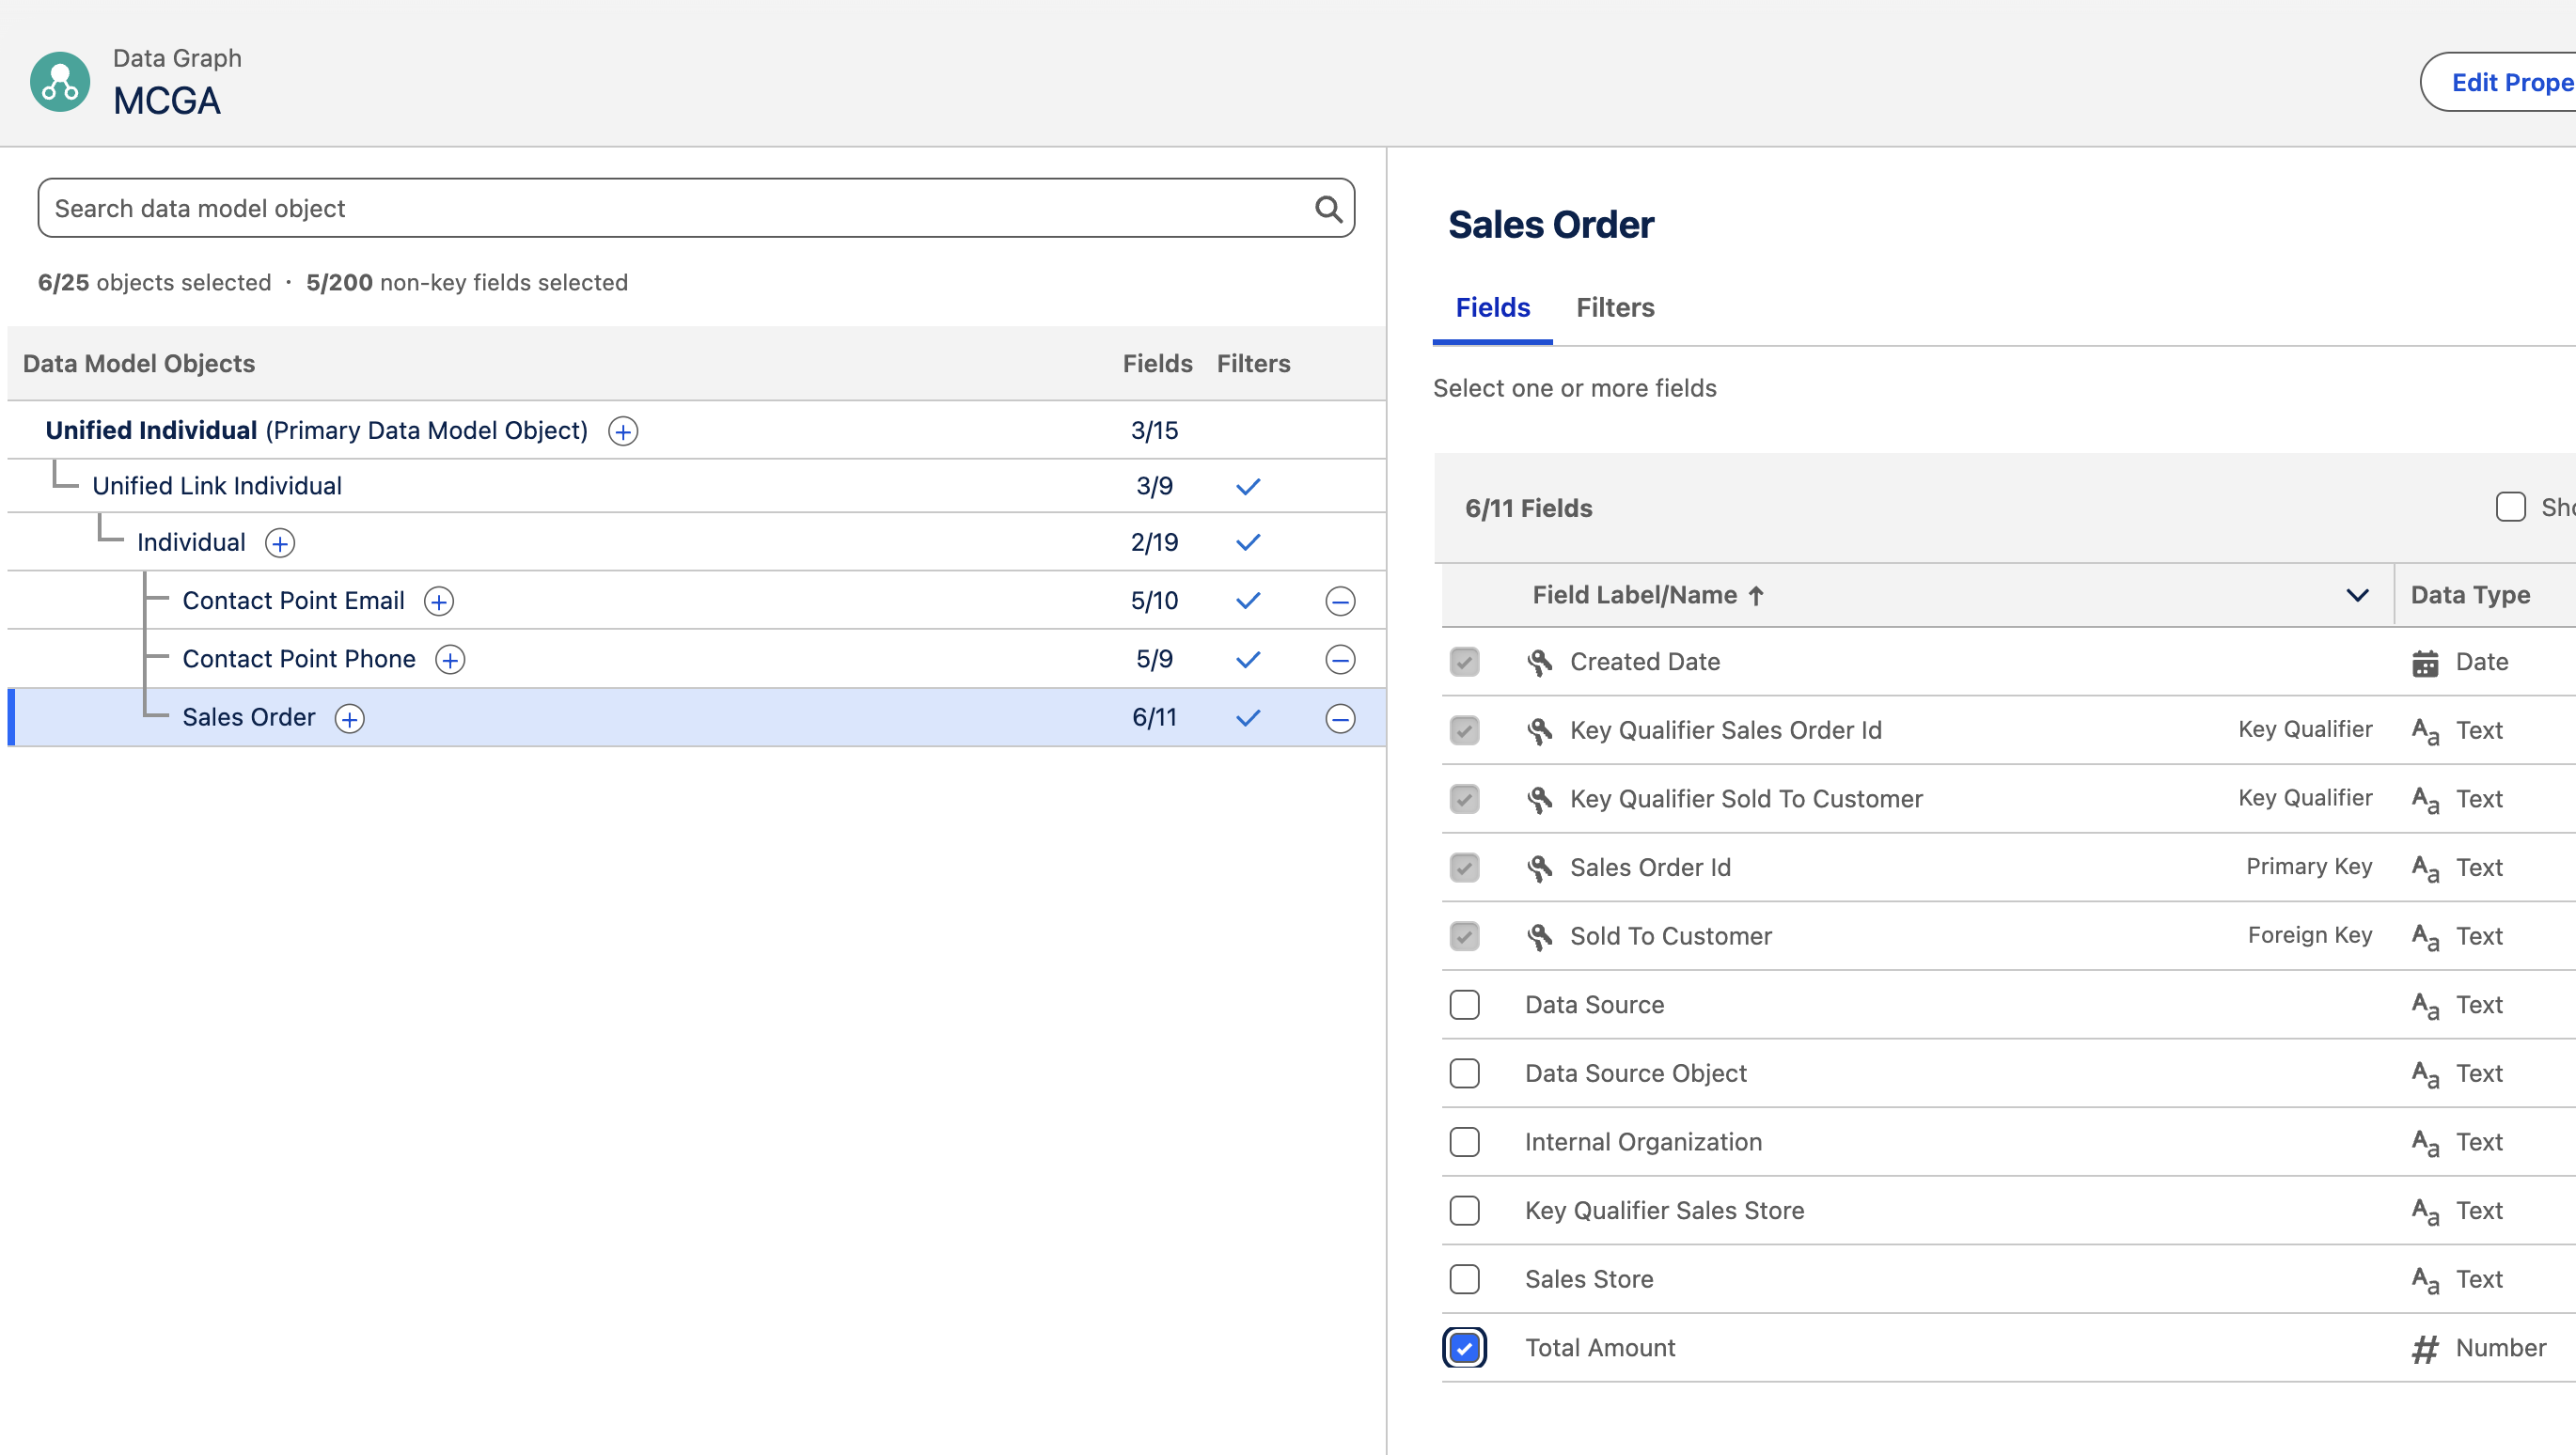
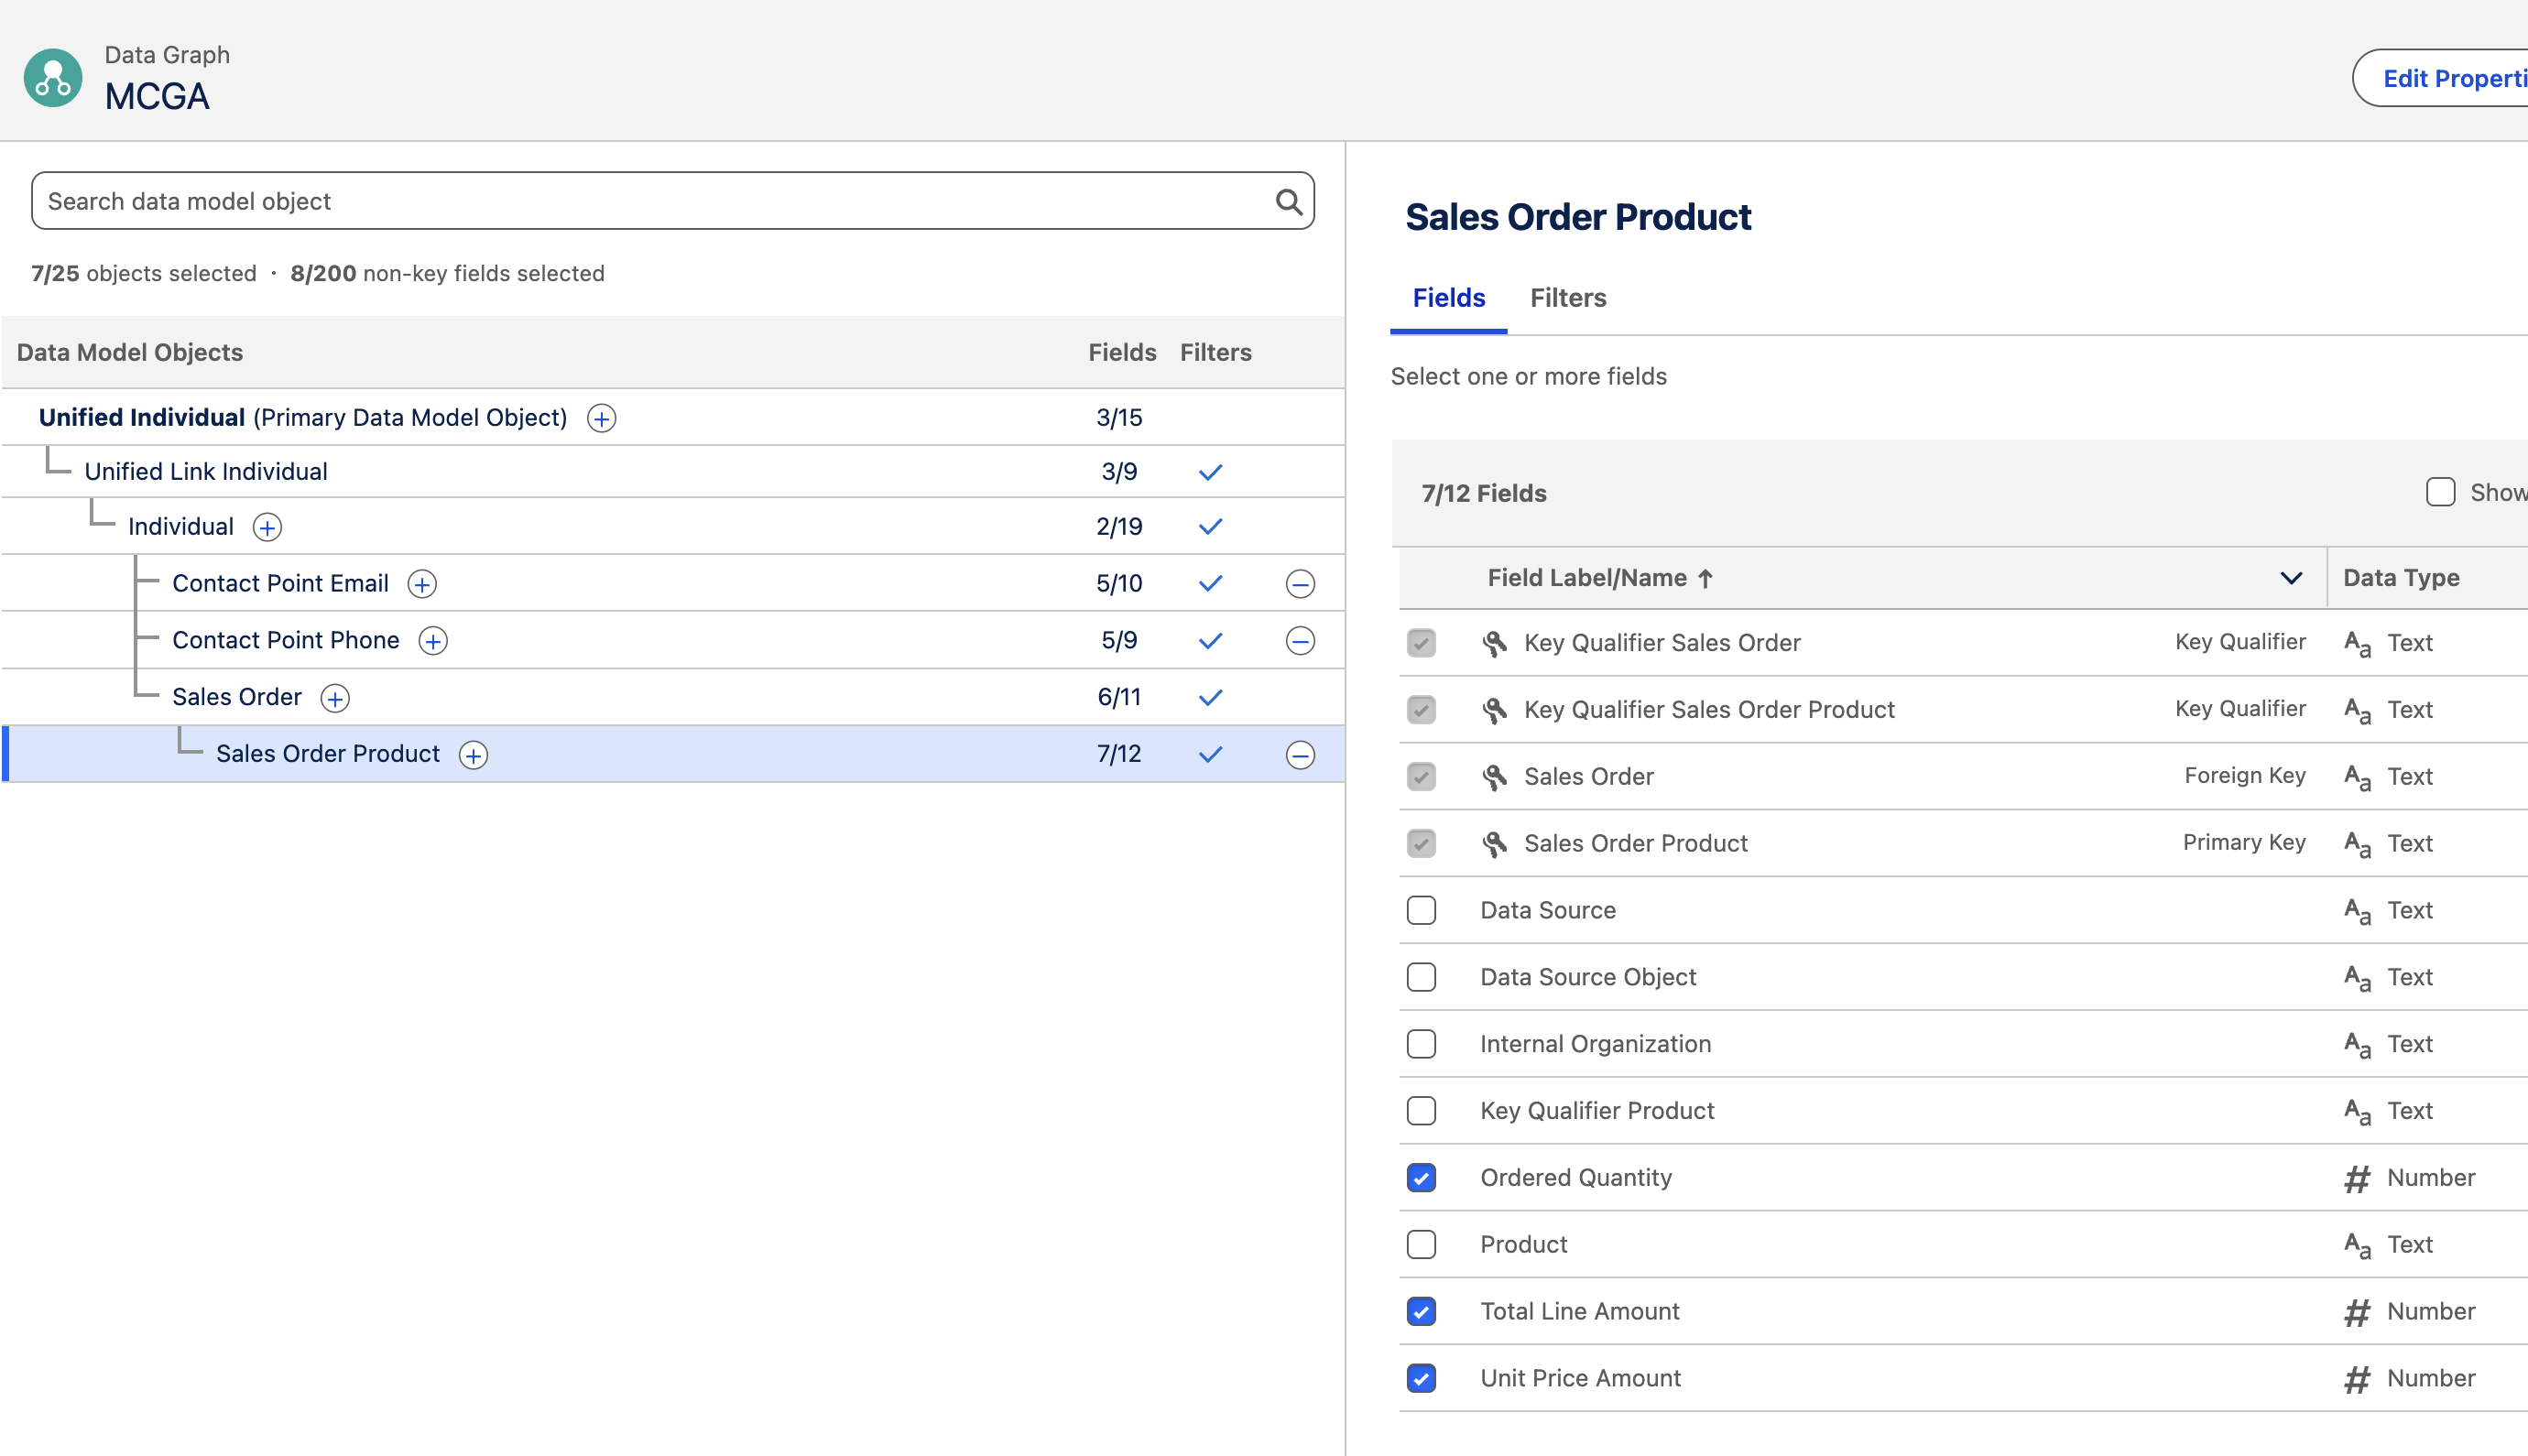
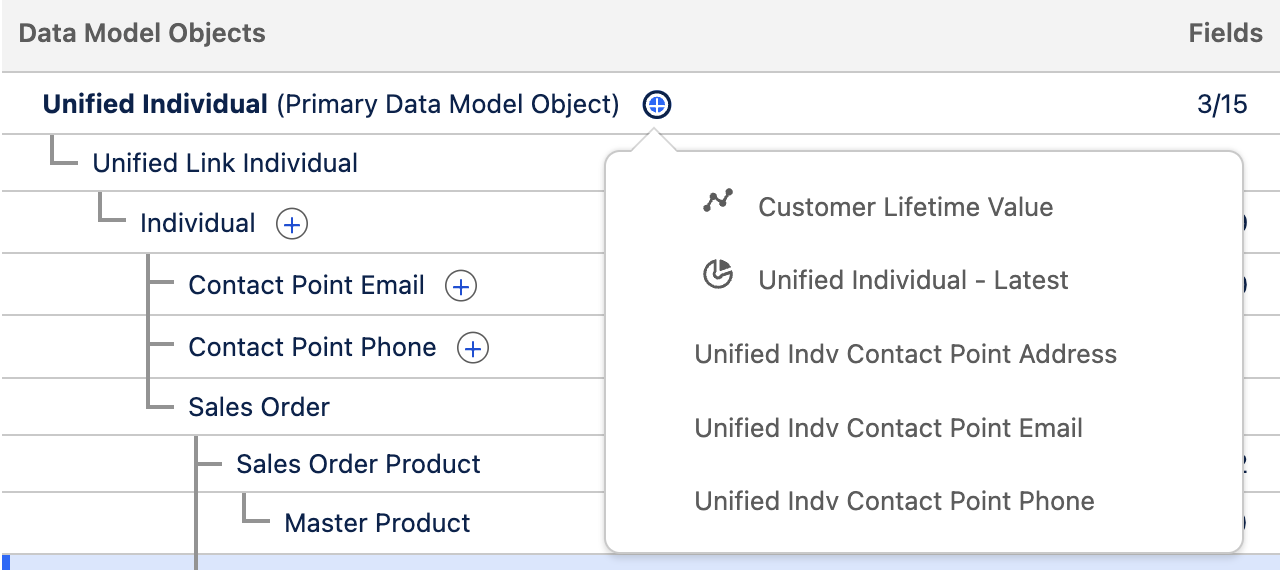
Add Calculated Insight to the Data Graph
Add the "Customer Lifetime Value" Calculated Insight that we created earlier to the Data Graph.
Build and Schedule the Data Graph
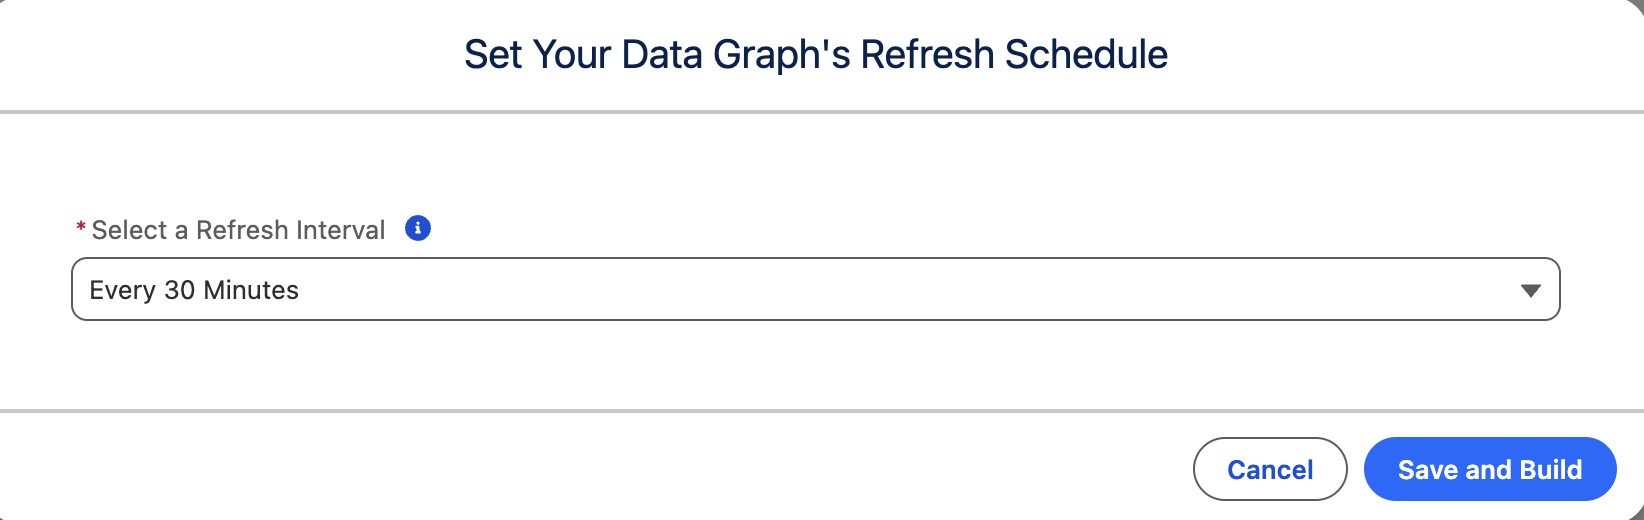
- Click
Save and Buildand set the Refresh Interval to30 minutes.
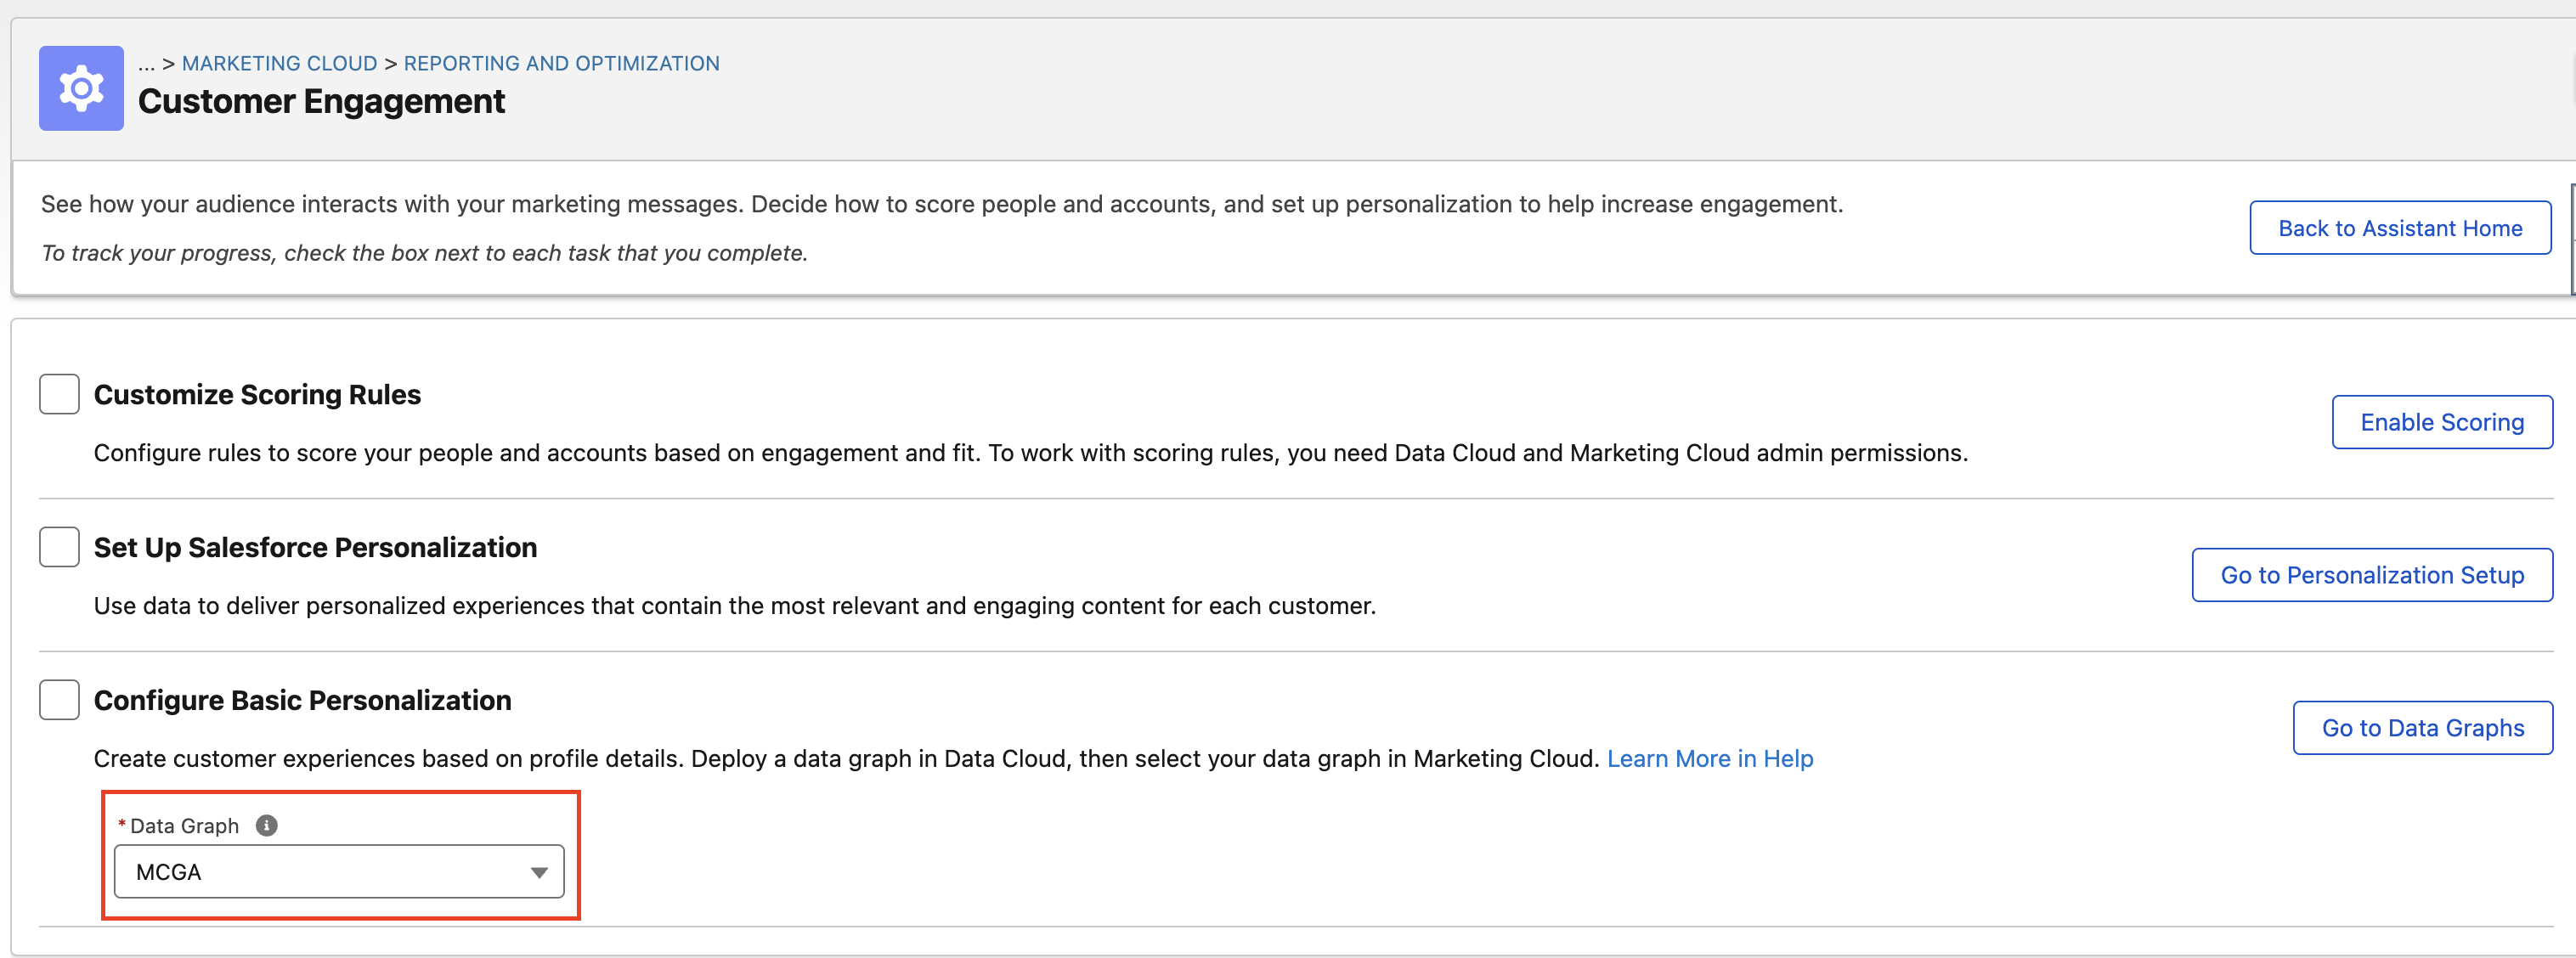
Configure the Data Graph in Marketing Cloud Setup
- Navigate to Setup / Marketing Cloud / Assisted Setup / Reporting and Optimization / Customer Engagement.
- In the Configure Basic Personalization section, click the Data Graph drop-down.
- Select the Data Graph you created in this step.
When you configure a Data Graph for Basic Personalization in setup, it creates a permanent link between that Data Graph and any emails that use it.
If you later switch to a different Data Graph, you'll need to rebuild from scratch any emails that were using the original Data Graph. Simply cloning those emails won't work, as cloned emails maintain their connection to the original Data Graph they were created with.
🚀 Next Up
In Part 2, we'll use the Segment and Data Graph we created here to build a personalized campaign in Marketing Cloud Growth. We'll configure a segment-triggered Flow that sends targeted emails with dynamic URL parameters, carrying customer and product context to our landing page. You'll learn how to set up the brand, create compelling email content, and activate your audience with a tailored upgrade offer.